MX

Akrapovic Evolution System (2021-2022 KTM 250 SX-F)

When you purchase a 2021 KTM 250 SX-F TLD version the bike comes with a slip on Akrapovic Evolution muffler. However, I know that sometimes, certain machines react better to full systems rather than slip ons, we decided to get the full Evolution system to see how it changes the KTM 250 SX-F’s engine character. 

The Akrapovic Evolution full muffler system has a similar character to the slip on version that comes with the Factory Edition, but with added bottom end roll on and mid range. If you’re expecting a ton of added RPM response (excitement) from your full system compared to your standard slip on, you will be disappointed. You simply will not be getting that much added rpm response with the Akrapovic full system. Instead of a smooth roll on that the TLD version comes with, it now has a little more pulling power in second and third gears and pulls those gears much longer.

IMG_3757.jpg

Mid range pulling power is increased, but the muffler pitch is so quiet that you never really feel like you’re “on the gas”. The mid range pull is much more linear and longer than the standard slip on or stock muffler and being able to shift a little earlier with the full system makes it easier to ride in softer conditions. I had a hard time with the KTM 250 SX-F at softer tracks not recovering, if I shifted early out of a corner. With the full system at the same track I was able to shift into third and not have to worry about covering the clutch as much. The full system just simply gives me more “meat” in the mid range.
 Top end and over-rev is where this Akrapovic Evolution system shines. Adding top end and over-rev to the already very capable KTM 250 SX-F only makes this machine more fun to ride. Again, I can’t stress on how deceiving this system is because of it’s quiet nature. I really had to focus in and feel how quick I was going from point A to point B on the track because the pitch of the muffler never sounds “racey”. However even with its quiet note, the Akrapovic full system lets the KTM pull so much farther that it almost feels like I swapped to an aftermarket ECU. The connection to the rear wheel with the full system is unmatched and even though it may seem like it’s not very responsive, the KTM with the Akrapovic full system allows the rider to get on the gas sooner through corners. 

As described the Akrapovic badging will eventually get marked off when cleaned.

As described the Akrapovic badging will eventually get marked off when cleaned.

If you’re reading this and wondering why you can’t simply purchase an Akrapovic headpipe for your Akrapovic slip on, the answer is they will not mate up. The Akrapovic slip on has a smaller diameter OD, (where it meets the stock headpipe), so purchasing just the headpipe will not work. 

A couple of durability notes: 

-The Akrapovic lettering on the headpiece resonance chamber will wear off after a few washes. 

-The Akrapovic muffler stickers will burn away around the 7 hour mark. 

-The overall quality of the system and the parts inside the muffler are second to none. The muffler packing lasts longer than other aftermarket systems and the hardware it comes with is superb. 

-Is the system worth the $1200.00 price tag? Comparing it to other systems out there, I would say you’re getting what you’re paying for. A lighter, race oriented system that gives the rider better overall power throughout the rpm range. 

Frame Tape Review

I have never really had the best of luck with frame tape in the past. Although frame tape works really well, they typically only last one day at the track. I was determined to find something that was better than one ride, so I went searching the internet and ordered up a few different types of grip tape. Instead of writing you up some big article about which tape sucked, I decided to write an article about a gentlemen’s frame tape that I found was good enough, that I would spend my own money on it. I will say it was kind of random because I stumbled upon Corie through Instagram where he suggested I try his tape. After I got Corie’s product and rode with it is when I ended up finding out that he supplies A LOT of other top teams in Supercross frame tape for their machines as well. Corie Barbee doesn’t do this as his job, it’s basically his hobby after he gets off work at his construction job. 

IMG_2318.jpg

Now that you know a little background about the person behind the product, what is this tape all about? Corie doesn’t use anything magical as his product is a 3M tape that anyone can order online, but it’s the template that makes the biggest difference. The cut is where the magic is and if you end up cutting your own (which I have tried) you have to make sure there are no grab spots or sharp corners that can cause the tape to lift. It’s not actually as simple as it may seem! I don’t have the patience nor the time to do this so I would rather pay someone to cut them out for me. Corie’s cuts were spot on and the two different types of frame tape that I used (on a Honda CRF450R, YZ450F, and KTM 250 SX-F) lasted three to four full days of riding yet when peeled off by hand, it was the cleanest out of all the brands of tape I have tried.

As you can see here in this photo, I needed to clean my frame better in order for the tabs to stick.

As you can see here in this photo, I needed to clean my frame better in order for the tabs to stick.

The gray frame tape is a 3M rubber base that blends/grips well with your boots. The amount of grip I had when squeezing each machine made me feel more like I had more contact which gave my arms more of a rest during motos. 

The black frame tape is a more aggressive style of tape that has a thin foil backing between the grip and the glue, which worked out well for the KTM’s steel frame. This tape bended around the frame tubing more accurately than the gray tape and gave me a more secure lock in feel than the stock frame guards that the KTM comes with. The only other frame guard that is better than this black tape is the Acerbis frame guards. 

In order to get Corie’s frame tape to stick proper you have to make sure to prep your frame properly with contact cleaner. Make sure there is no sticky residue on the frame and that you evenly press down on the complete surface area of the tape. The frame tape aren’t meant to last forever so don’t expect it to last a month of riding. For frame tape to last as long as this tape has is saying something, trust me. All of Corie’s templates are hand made/drawn and he hand cuts every piece of tape individually. If you want to hit up Corie for some of his tape, email him at coriebarbee31@aol.com or 334-312-6138 to order yours. Typically a set of frame tape will set you back $15.00-$35.00. If you’re looking for more grip in between your legs, try Corie’s tape, it’s pretty damn good!  

Dunlop MX12 Rear Tire (120/80-19)

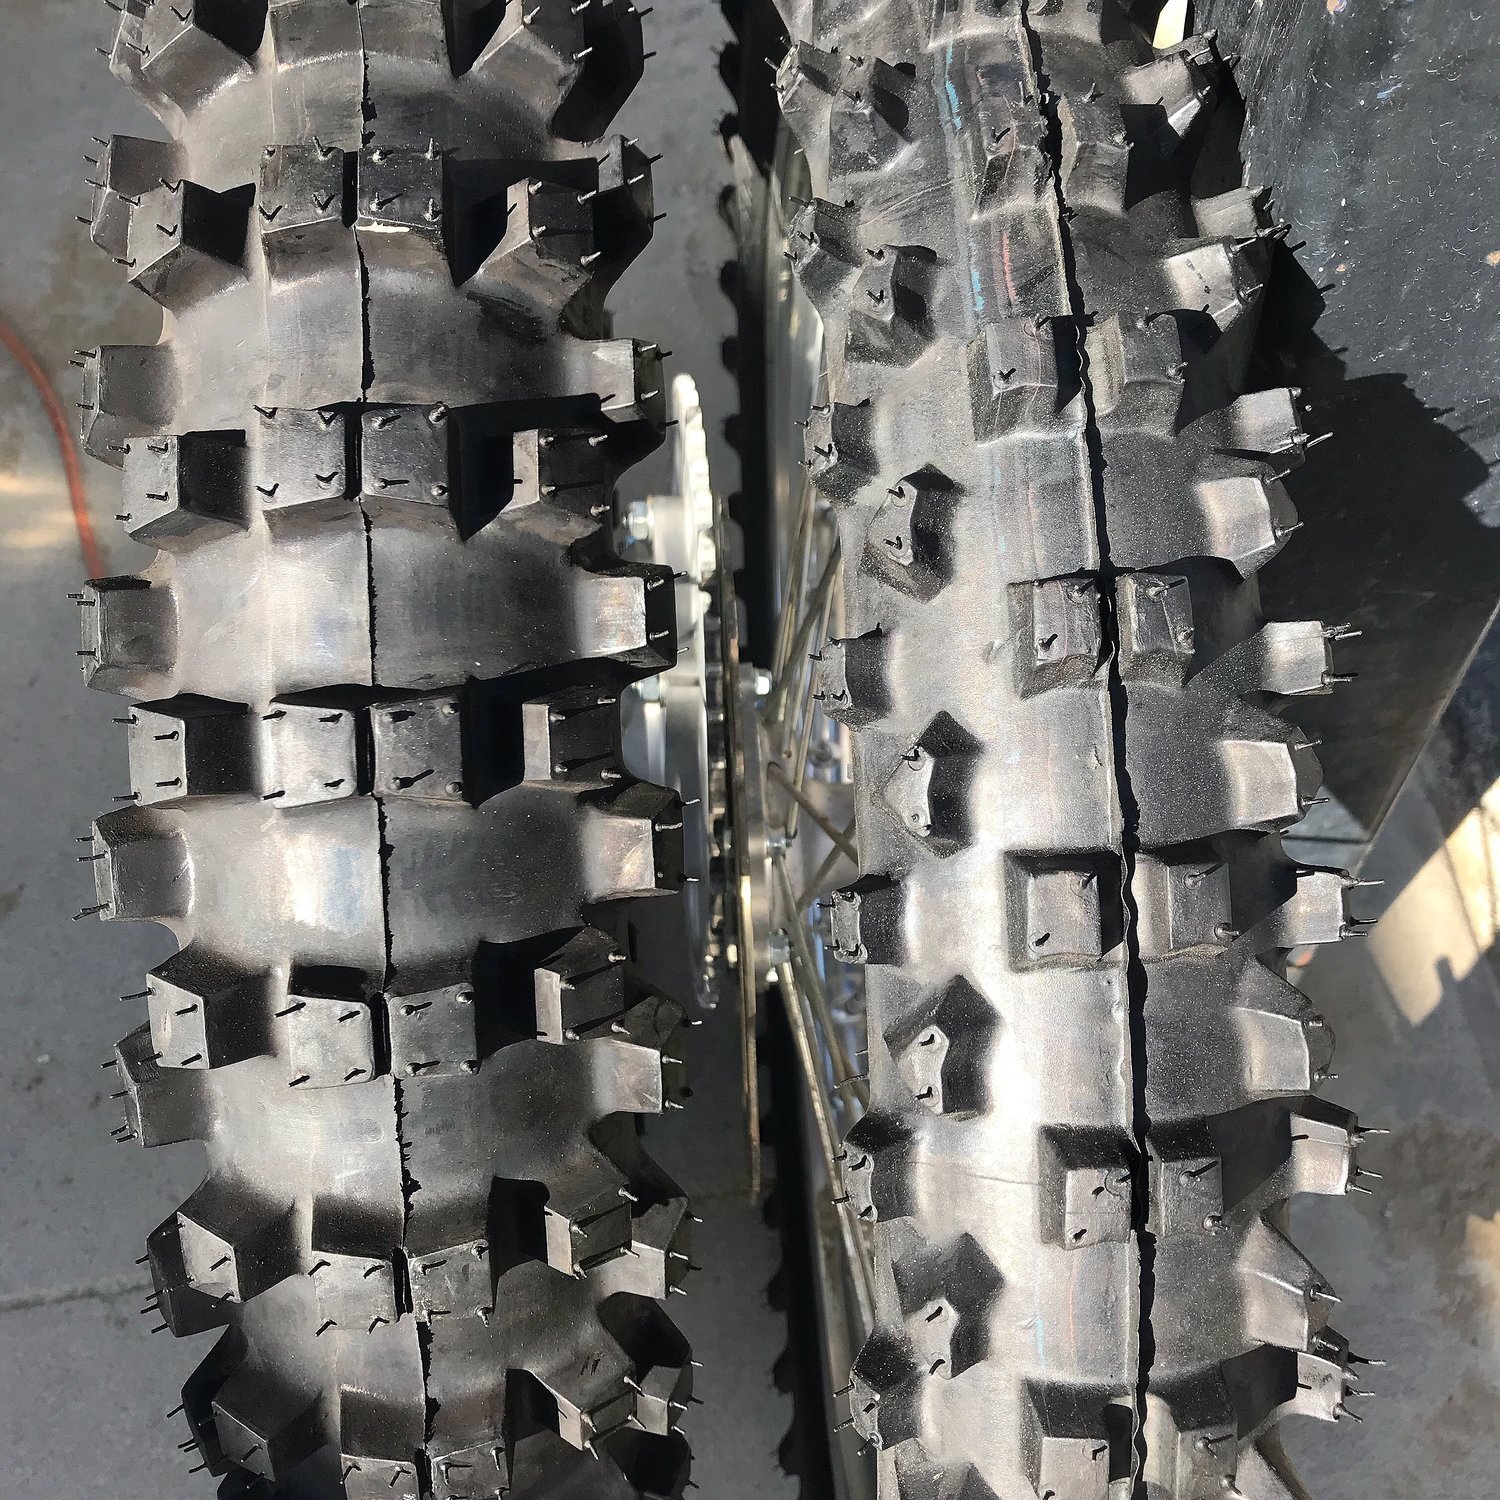
Dunlop offers a wide variety of tires for us moto/off-road guys but you don’t see too many reviews of the MX12 scoop tire out there. I recently had the chance to try a 120/80-19 rear MX12 at a few different tracks that range from sand to intermediate terrain with the occasional hard pack afternoons at Glen Helen. The Dunlop Geomax MX12 rear tire is a soft-terrain tire designed specifically for sand and mud conditions. The Geomax MX12 is the replacement for the MX11 that was out a few years ago. The Geomax MX12 rear tire was made to try and improve performance in mud, sand and soft dirt while expanding the range of conditions it can be used compared to the older MX11 design. Dunlop designed the MX12 to have increased rear wheel acceleration traction, lean angle grip, improved control in ruts and enhanced bump absorption when coming into corners. 

Fresh Dunlop MX12

Fresh Dunlop MX12

With Dunlop’s V-block tread pattern and over 1.5 inches between each row of knobs, the MX12 is can scoop dirt and help move the motorcycle forward in places where a standard MX33 tire would need more help. Additionally, the V-block pattern helps fling mud off of the tire and cleans it off in wet conditions. Dunlop’s block-in-a-block progressive cornering knob technology, used on the MX33 and MX53 tires, has been implemented on the MX12 as well to help cornering traction and slide control. Ribs have been added to the backside of the knobs to improve stability in braking and choppy rutted out corners. No matter how much traction you get out of a tire, it will never be good without consistency. Without these ribs, the steep knobs could bend and fold over, which you don’t want when trying to get on the throttle hard (while leaning) out of a corner. In the testing world, we call this “cornering stability”.

I have ridden with a Dunlop MX12 on 250 and 350’s before but this was the first time I have experienced it on a 450. It’s seriously like cheating when coming out of softer corners. Getting on the throttle harder is made easier as the motorcycle accelerates harder with less throttle. This also makes abusing the clutch much less and allows the rider to use less energy around the track. Another notable positive for me was being able to use alternate softer lines that were too deep for previously used soft to intermediate tires. Instead of sinking into soft soil, the MX12 tire stayed on top of the dirt much better than other soft-intermediate tires. When compared to the Dunlop MX11, the MX12 is easier to lean into a corner and maintain that lean in a choppy rut. Cornering stability has improved on the MX12 (compared to the MX11) and it’s also easier to keep that lean in a rut that is choppy and hacked up.

Dunlop MX12 With 6 Engine Hours Of Soft To Intermediate Terrain Time

Dunlop MX12 With 6 Engine Hours Of Soft To Intermediate Terrain Time

The portion of the test where I was most impressed though was how the MX12 reacted to harder conditions. On intermediate to hard terrain, the MX12 dug into the dirt and hooked up surprisingly well. With the added stability from the reinforcing ribs and the staggered knob pattern, the MX12 felt better than some other intermediate to hard terrain tires I have ran lately. The downside to the MX12 was that on hard pack flat corners it doesn’t have the best lean angle grip. It will slide around more than I would like, but that is to be expected on hard pack with a scoop. However, if there was only a couple parts of the track that had hard pack corners (and the rest of the track was softer), I would gladly take this MX12 because that is how good it works on the other parts of the track. The durability of the MX12 is great if used on strictly soft terrain, but if used on intermediate terrain it can break down the carcass of the tire much quicker. The knobs will not chunk as quick as the carcass will break down. The ribs in-between the knobs will break down over time faster on hard pack. A starting point that I liked for air pressure was anywhere between 12-12.5 PSI.

Dunlop MX12 With 8.6 Engine Hours Of Soft To Intermediate Terrain TIme

Dunlop MX12 With 8.6 Engine Hours Of Soft To Intermediate Terrain Time

If you are looking to get great starts on softer conditions and hook up out of corners like you never have before, look at the MX12 scoop tire. This tire has changed my way of thinking when it comes to what I am going to be running on race day. I wouldn’t even mind running it on late afternoon motos at Glen Helen. Just because of the scoop design, don’t disregard this tire when the conditions go from soft to intermediate. This MX12 rear tire still hooks up well! You can find the MX12 over on rockymountainatvmc.com for $93.00.

ARC RC-8 Clutch Assembly With Aluminum Black Smooth Lever

I will admit that I am usually a stock perch/lever or a Works Connection Elite Perch/Lever kind of rider and although I have tried many different perch/lever set ups those are the two that I normally gravitate towards or back to. I have tested a lot of combos and have come to the conclusion that it’s tougher to make a better than OEM lever feel, perch and engagement feel. Now enter the ARC RC-8 Clutch Assembly With Aluminum Black Smooth Lever and I have found another perch/lever combo that I am genuinely happy with. Other perch/lever set ups that I have tried have either screwed up clutch engagement points with their odd ratios (and messed my corners up) or the lever is simply doesn’t have the right shape for my size large hands (lever shape is a key component to feeling comfortable with your rider triangle). Designing/making a perch/clutch lever is harder than most people think obviously. If you don’t get the lever ratio correct, you will have a clutch feel that is on/off or an engagement that is too grabby or slow feeling. Not easy. 

IMG_1956.jpg

This ARC Billet Aluminum CNC-Machined lever assembly is the one that a lot of top teams run. If you haven’t met ARC Bob then you are really missing out. You might have heard me talk about him on some Racer X videos because the guy is a mad scientist of levers/perches. He will not rest until he’s created massive headaches for consumers due to the fact that he gives us so many damn options!  The features of this perch/lever combo start with the ARC aluminum smooth lever with a 27mm ratio, which I am a fan of. I am not a foldable lever kind of guy because I like a solid feel to my finger when I am pulling in the clutch. It just gives me a more positive feel and this lever seems to give me just that. Not to mention that the lever shape is one of only two shapes in the aftermarket lever business that I can get along with. There is a nylon sleeve that contacts the handlebar that allows for rotation in a crash, which is nice when you have a tendency to tip over in corners from time to time.

IMG_1960.jpg

The cable 1/8 turn quick adjust has a large diameter rubber wheel that is easy to reach for/adjust on the line or in the air. yes, even if you’re a novice rider, you will be able to adjust it in the air! One of the other highlights is the "external pivot". The pivot bolt screws into the lever and the bolt rotates in the perch on replaceable bushings. Whaaaat! This eliminates almost all up and down play in the lever and gives me the positive engagement feel that I look for. In the world of tighter tolerances, this is what you want from a big four stroke. When you have horsepower, you could possibly get more vibration and that can radiate towards the ends of your levers. When you have a tighter tolerance in your levers, you get less vibration feel and more positivity on each end of your bike. It may not seem like much, but it’s the little things that make a difference when it comes to “feeling factory”.  It’s also nice that the clutch pull gets a little easier on the bike that I installed the ARC perch/lever on (2021 YZ450F).

At a cost of $205.00 for the complete perch/lever it’s a sizable investment, but with the quality of Bob’s work at ARC, I am happy to pay for something that I know I am going to love as well as last! ARC gives you a lot of ratio and lever options, so go visit the mad scientist of levers website at www.arclevers.com


Fasst Company Rear Brake Return Spring

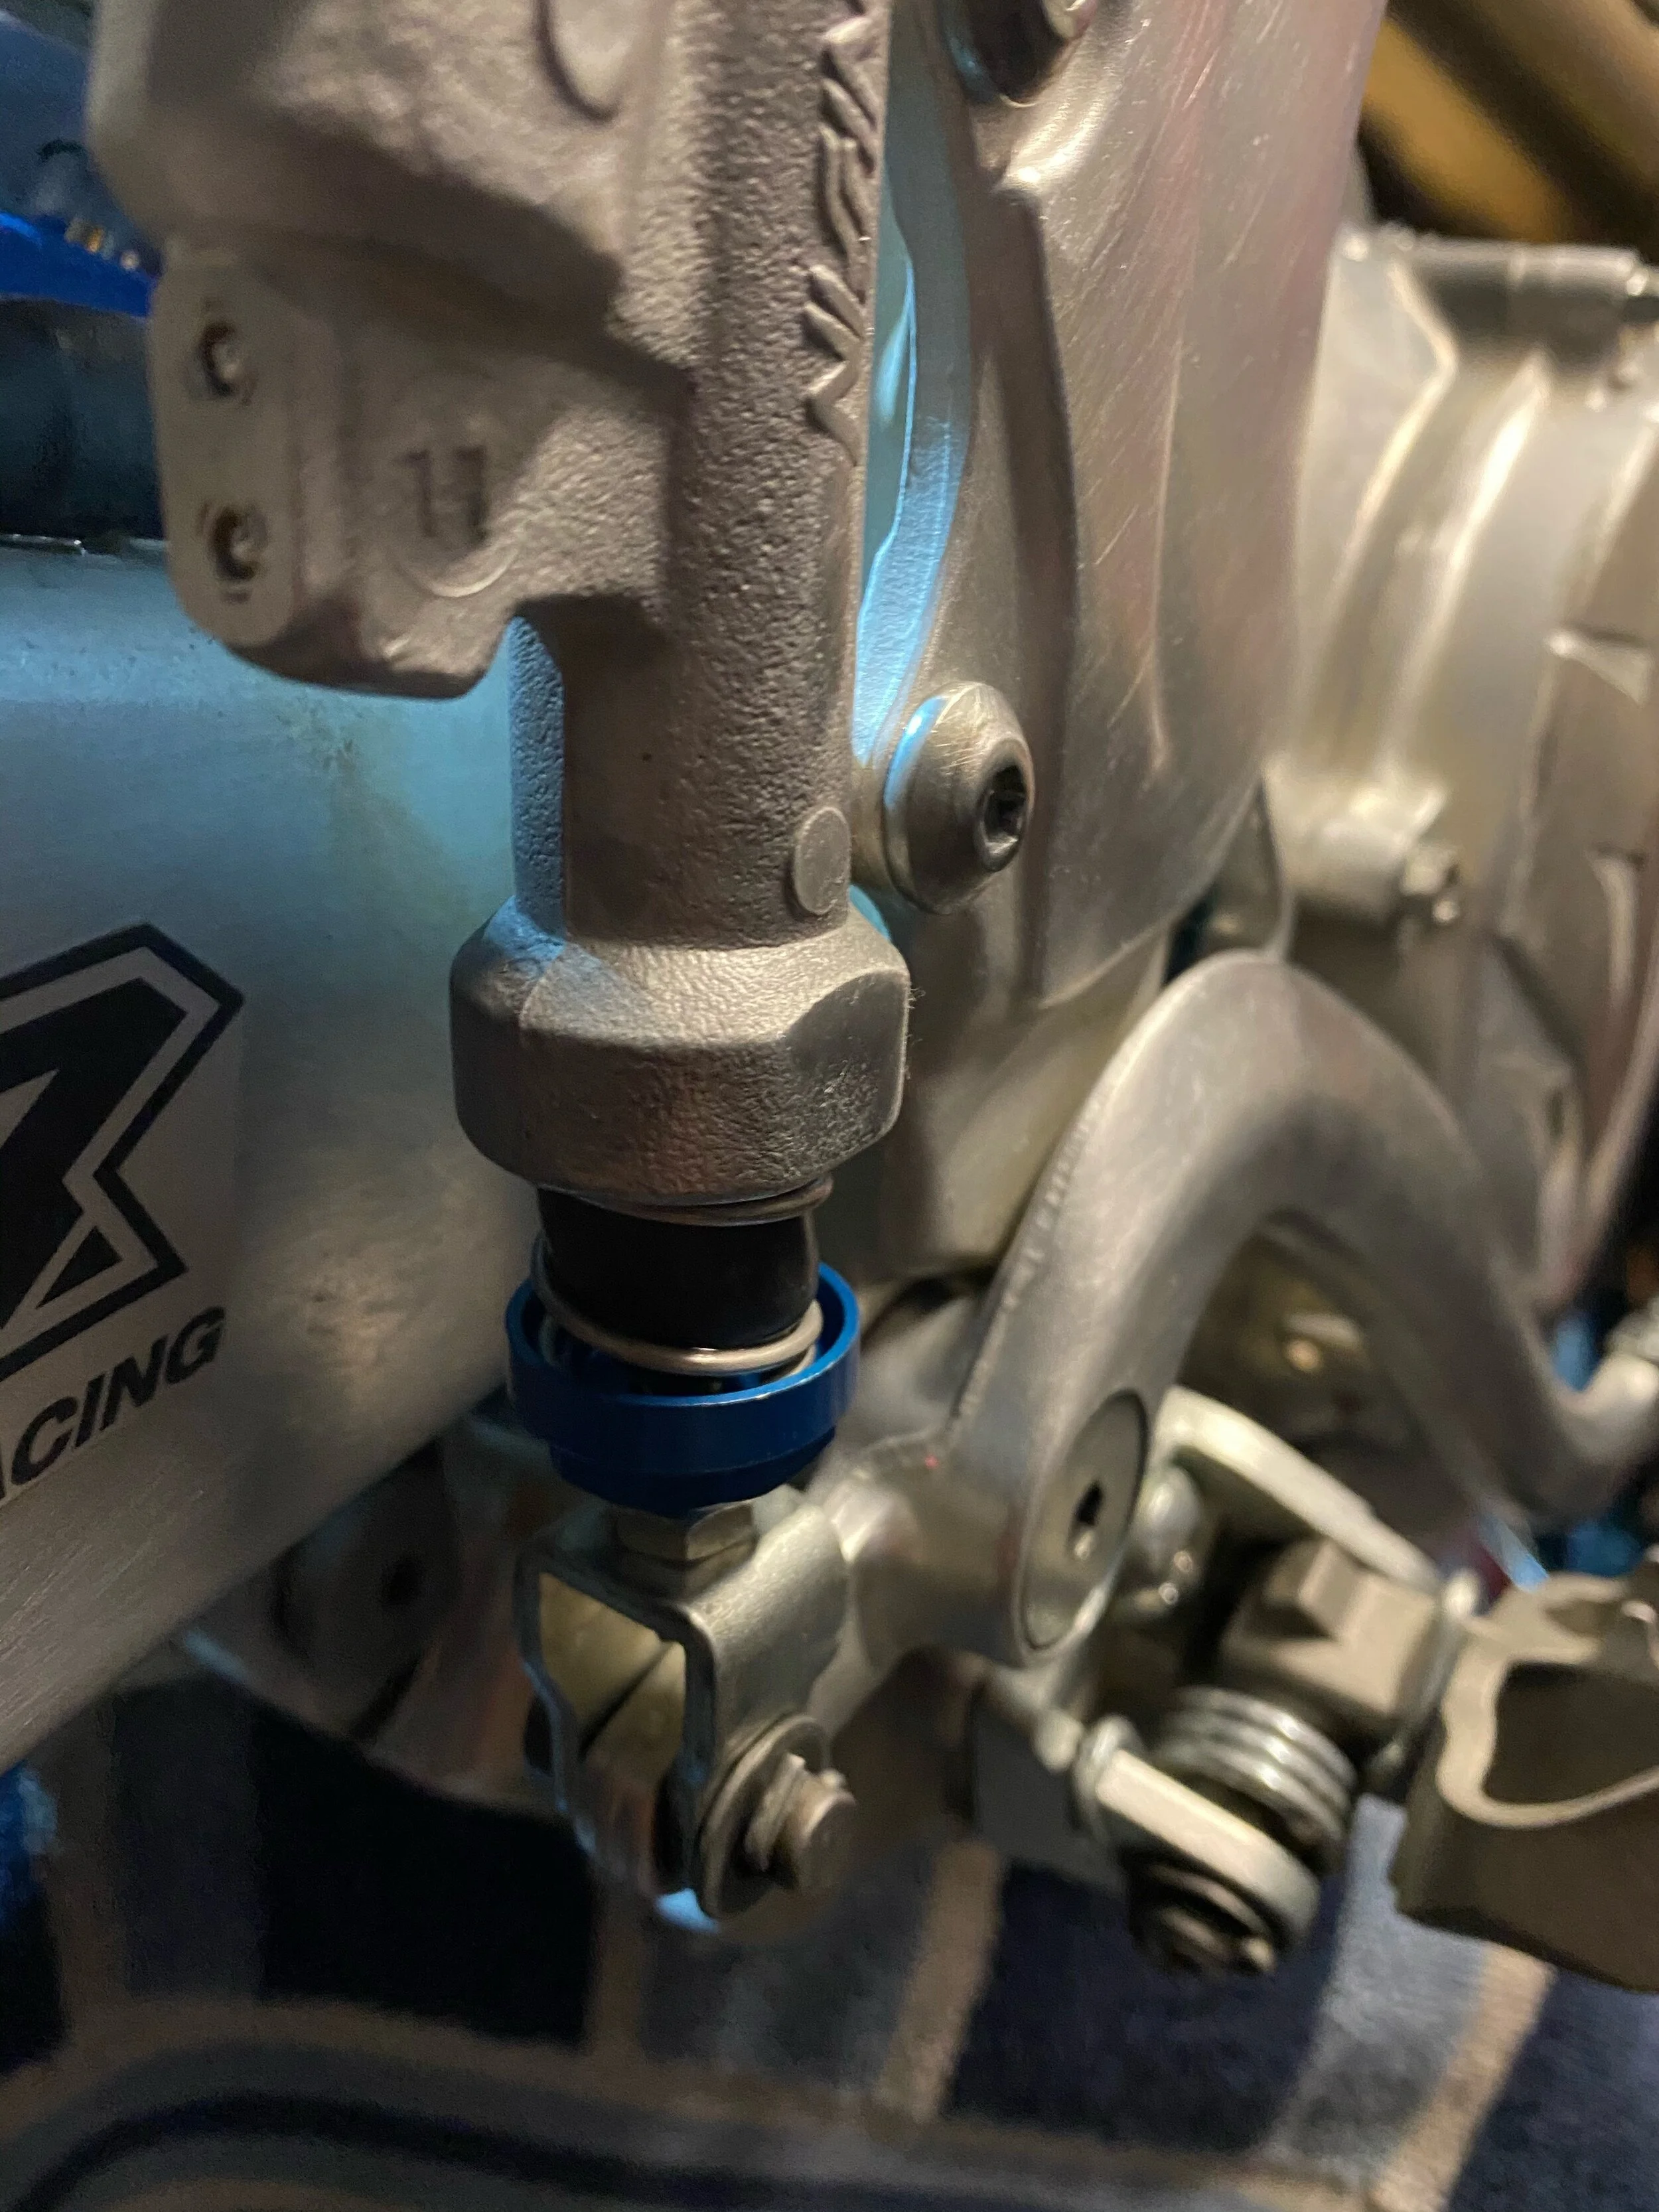
Something that I have been using and quite frankly have forgotten to tell you guys about is the Fasst Co Rear brake Return Spring. Are you breaking rear brake pedal springs on a KTM or Yamaha? I seem to do this every few hours, so I decided to try out Fasst Company’s Rear brake Return Spring on the blue and orange machines. Fasst Co’s Rear Brake Return Spring offers tunable pedal resistance and a more controllable feel by placing the spring in compression instead of tension, which can minimize the "on-off" feel of some rear brake systems.

IMG_0262.jpeg

The pedal resistance can be adjusted by how much preload is placed on the spring. The Return Spring Kit also minimizes debris from jamming the master cylinder as well as eliminating the stock tension return spring that attaches to the pedal. The Rear Brake Pedal Return Spring Kit consists of spring, spring bucket and nut. The spring bucket contains the spring as well as seals the master cylinder with the stock rubber dust boot. 

IMG_0263.jpeg

Installation takes 10 minutes and the return spring kit gives you more of a positive feel, without a lot of slop, not to mention it’s way more durable than the OEM Yamaha or KTM rear brake pedal springs. Honda’s OEM return spring seem to last much longer, but nonetheless Fasst Co makes one of theirs for all Japanese and Austrian models. For 20 bucks it’s an easy one time investment on something you may purchase every few months. You can purchase or check out what they offer over at www.fasstco.com

FMF 4.1 RCT Muffler System (2020-2021 Honda CRF250R)

The 2020-2021 Honda CRF250R chassis is one of the most fun to ride in the 250 class, with its easy to corner nature as well as a great suspension package. However, Honda focused a lot of their engine R&D on peak horsepower and not torque, which to me the CRF250R lacks the most of. When riding the Honda back to back with other models in its class, it’s obvious that the Honda needs a little help/pulling power out of corners. I went to FMF to see if they had what I needed in a muffler package and came away with these thoughts for you to digest. 

rx_keeferce8u6954.JPG

Let’s address the elephant in the room first. Can I even get one at this time? Sadly, most likely not. COVID has done a number on a bunch of stock with anything related to dirt bikes! This is not just with FMF, Pro Circuit, Yoshimura, etc., as this is happening with a lot of other key parts to our industry as well. The reasons go from not enough workers/employees to keep up with the demand to not enough material to build the product. This pandemic affects eery business and our industry is no different. This is a good thing and bad thing. Our industry seems to be booming, which is great, but us die hard moto dudes have to wait for months to get a damn muffler! That sucks and I get, but you need to breathe! FMF plans to have Honda mufflers back in stock in March, so if you have placed an order for one of these or any other Honda FMF muffler system for that matter, look towards the middle of March for delivery. Give these muffler companies some time and patience as we all are dealing with some sort of back log because of the pandemic. Plus I have heard that some people just simply don’t want to work at this time!

I like the fact that even though there are two headpipes and two mufflers it still didn’t take that long to install. The headpipes go on super easy and the mufflers slide into the slip fit joints with ease, yet are tight enough so the joints don’t wear out too soon. I have over 20 hours on the FMF 4.1 RCT mufflers and the slip fit joints are great, which is rare for titanium slip fit joints. Another added feature is that you will be losing close to two pounds off of your CRF250, which can also aid in helping the Honda’s chassis even more.

IMG_1404.JPG

So let’s start off with a couple things I didn’t like from the FMF 4.1 RCT system. The pitch/sound of the FMF 4.1 RCT mufflers are LOUD! The sound is deep and throaty but it is loud compared to other aftermarket mufflers! I didn’t run the quiet inserts, but I plan on trying these to see what it does to power and sound. Once I rode with the system for an hour or so the sound actually improved/dampened as the packing inside expanded. So don’t completely freak out when you first start it up. The second thing that you must pay attention to is that the headpipe springs can break and that could cause your headpipes to pop away from the exhaust ports of the cylinder head. I had this happen two times over the course of almost 22 hours so make sure you keep new springs on the headpipes. I learned if you keep new springs on, the headpipes remain on and don’t give you any issues. I would go no more than 8-10 hours on a set of pipe springs. 

Now with everything I did like about this muffler system: The power delivery is great and FMF made more power where the CRF250R needed it! The Honda needs bottom end and this is the only dual muffler system that has given me more grunt/low end out of corners! THANK YOU! The Honda CRF250R comes out of ruts/deep soil stronger and pulls harder through the mid range. Second and third gear recovery is improved as well as low-mid RPM response. The FMF 4.1 RCT muffler system makes the Honda feel more exciting and lighter around the track, which helped me improve my cornering. Top end/over-rev is as good as the stock mufflers and to me that is just fine because now I am able to short shift the CRF250R more than I could with the stock system. I am running a 13/49 gearing spec with the FMF 4.1 RCT system and that gives me more options with third gear through corners. With the stock muffler and 13/48 gearing, using third gear wasn’t even a thought in my head.

IMG_0639.jpg

The FMF system will set you back $1500.00 which is my last gripe of this article! Holy crap that is expensive, but at least I know if I have my mind made up on spending my money on an aftermarket muffler system, I know I am getting something out of it with the power increase.  You can visit rockymountainatvmc.com or fmfracing.com to get yourself on the list for the next production run. 

HGS Exhaust System For 2021 KTM 250 SX-F

Something that most riders (including me) may not see a lot of in the states is HGS exhaust systems. HGS is a Netherlands based company that has been making exhausts since the early 90s and are mostly popular among European club riders and of course many factory supported MXGP teams. I had the chance to try out an HGS exhaust with the Conical silencer on a 2021 KTM 250 SX-F supplied by Bud Racing (American porter for HGS) and wanted to get you all some feedback on a muffler system you may have never heard of.

IMG_1668.jpg

The stock engine character of the 2021 KTM 250 SX-F has a smooth roll on power delivery that comes on strong through the mid to top end range. The over-rev of the KTM 250 SX-F is down right impressive and allows the rider to stretch each gear farther than any other 250 MX machine out there. Other mufflers I have tested provided great mid-top end gains but it was very difficult to get more low end. I was looking to get some more low-mid range gains from the HGS and that is exactly what I got. First things first though, how was the HGS to put on? I am not going to lie, it wasn’t the easiest system to bolt on! The headpipe fitment to the cylinder head was very tight and took some coaxing to slide into the exhaust flange. Once I finally got that slipped over and fit up the rest of the system bolted on without issue. I am not going to look forward to taking this system off as I know that headpipe will be a tough one to get out even with the generous amounts of anti-seize I put on around the lip of the HP. 

The weight of the HGS is not one if it’s strong points as the complete stainless system weighs only 11 ounces less than the stock system so if you’re looking to lose more than a pound on your KTM 250 SX-F, you might want to look elsewhere. However, most consumers that purchase a stainless system expect to have some weight along with it and pick up durability instead right? In this case that is what I was looking for because this system was going to stay on my son’s practice bike for a while and get beat up.

IMG_1671.jpg

Like I mentioned above ,out on the track the HGS system has more bottom end pulling power and really pulls much harder than the stock exhaust through the mid range. Accelerating out of corners in second gear provides more recovery/pick up than the stock muffler and allows the rider to shift to third gear sooner than the stock system. I like that the HGS system gives the KTM a little more low end RPM response and makes the KTM feel even more playful in low speed/RPM situations. When the track is tilled deep the KTM 250 SX-F gets on top of the soft stuff better with the HGS system and each gear can be stretched out just as long as the stock system. You will not be getting any more top end/over-rev with the HGS, but for what my needs were for this bike, that didn’t matter. The overall look of the muffler isn't that appealing but I am the type of guy that is looking for function over fashion when it comes to my parts on my bike so I give this muffler a pass because it worked so damn good on the track.  

The exhaust note is pleasant and not too loud and has a similar stock sound to it. My B level son even mentioned how he liked how good the KTM 250 SX-F now felt coming out of corners and to my naked eye that was visible as well, as I was watching him. Now comes the tricky part… How do you get one? You will have to go to Bud Racing website www.Budracing-usa.com or call them at 951-245-2660. The cost of the HGS system with the Conical silencer is $849.99 and from what I have seen, they have them in stock! That’s right! IN STOCK! Something you may have not heard of since this pandemic hit.

Any questions about this system please email me at kris@keeferinctesting.com

Pro Circuit Aluminum Throttle Tube

Have mostly been a plastic throttle tube type of guy, but I have appreciated the toughness of an aluminum throttle tube when I have some medium to large sized crashes. The one thing I usually don’t like is the firmness of the aluminum throttle tube when landing as well as how big they feel in my hand. I am very picky when it comes to handlebar set up and can be hypersensitive to any changes on or around the rider triangle area. I have tried a lot of throttle tubes and only ran across one or two that I actually like.

IMG_8862.jpg

Recently I stumbled across the Pro Circuit aluminum throttle tube while at the Husqvarna headquarters. Pro Circuit throttle tubes are CNC-machined out of aluminum and are Teflon coated on the inside to reduce friction which gives you a smoother twist of the throttle. As mentioned above the PC throttle tubes are much stronger than the OEM plastic units and are available for most Honda, Yamaha, Suzuki, Kawasaki and KTM two-stroke and four-stroke models.

A couple things that stood out to me with the Pro Circuit tube: One was that it felt smaller in my hand than other aluminum throttle tubes and it actually DID in fact feel smoother than the stock plastic ODI lock on tube (that comes stock on the KTM/Husqvarna). For me to have a grip/throttle tube that isn’t too big really helps prevents me from getting arm pump. If you’re getting abnormally more arm pump than usual, you might want to check the size of your throttle tube or grip. Even if you have big hands (size L-XL gloves) going to a slightly smaller throttle tube or grip could help alleviate some arm pump issues. Some companies swear that their aluminum throttle tubes are smoother feeling, but a lot that I have tried are worse than a plastic tube. PC’s aluminum tube is actually smoother than the stock plastic piece and tays that way for more than a few rides/washes.

I will say that having an aluminum throttle tube does feel slightly stiffer than the plastic lock on tube, but it’s not so bad where my wrist is begging for me to change it back out. Overall, I have come to like the Pro Circuit throttle tube and would recommend it for picky “rider triangle” riders like myself.

Seat Concepts OEM Race 2.0 Complete Seat

My standard 2020 KTM 450 SX-F Factory Edition seat didn't last long. The foam broke down, the cover ripped and my butt wasn't happy with me. I have pictures to prove it, but I'll spare all of you that nasty image. Enter Seat Concepts. After all of these years I have yet to experience any of their products until now. I wanted to get a complete seat so I had an extra one on hand and thought why not try something different. Seat Concepts offers covers, foams, complete seats and anything in between. I chose to try the standard OEM Race 2.0 seat and came away impressed. 

IMG_8628.jpg

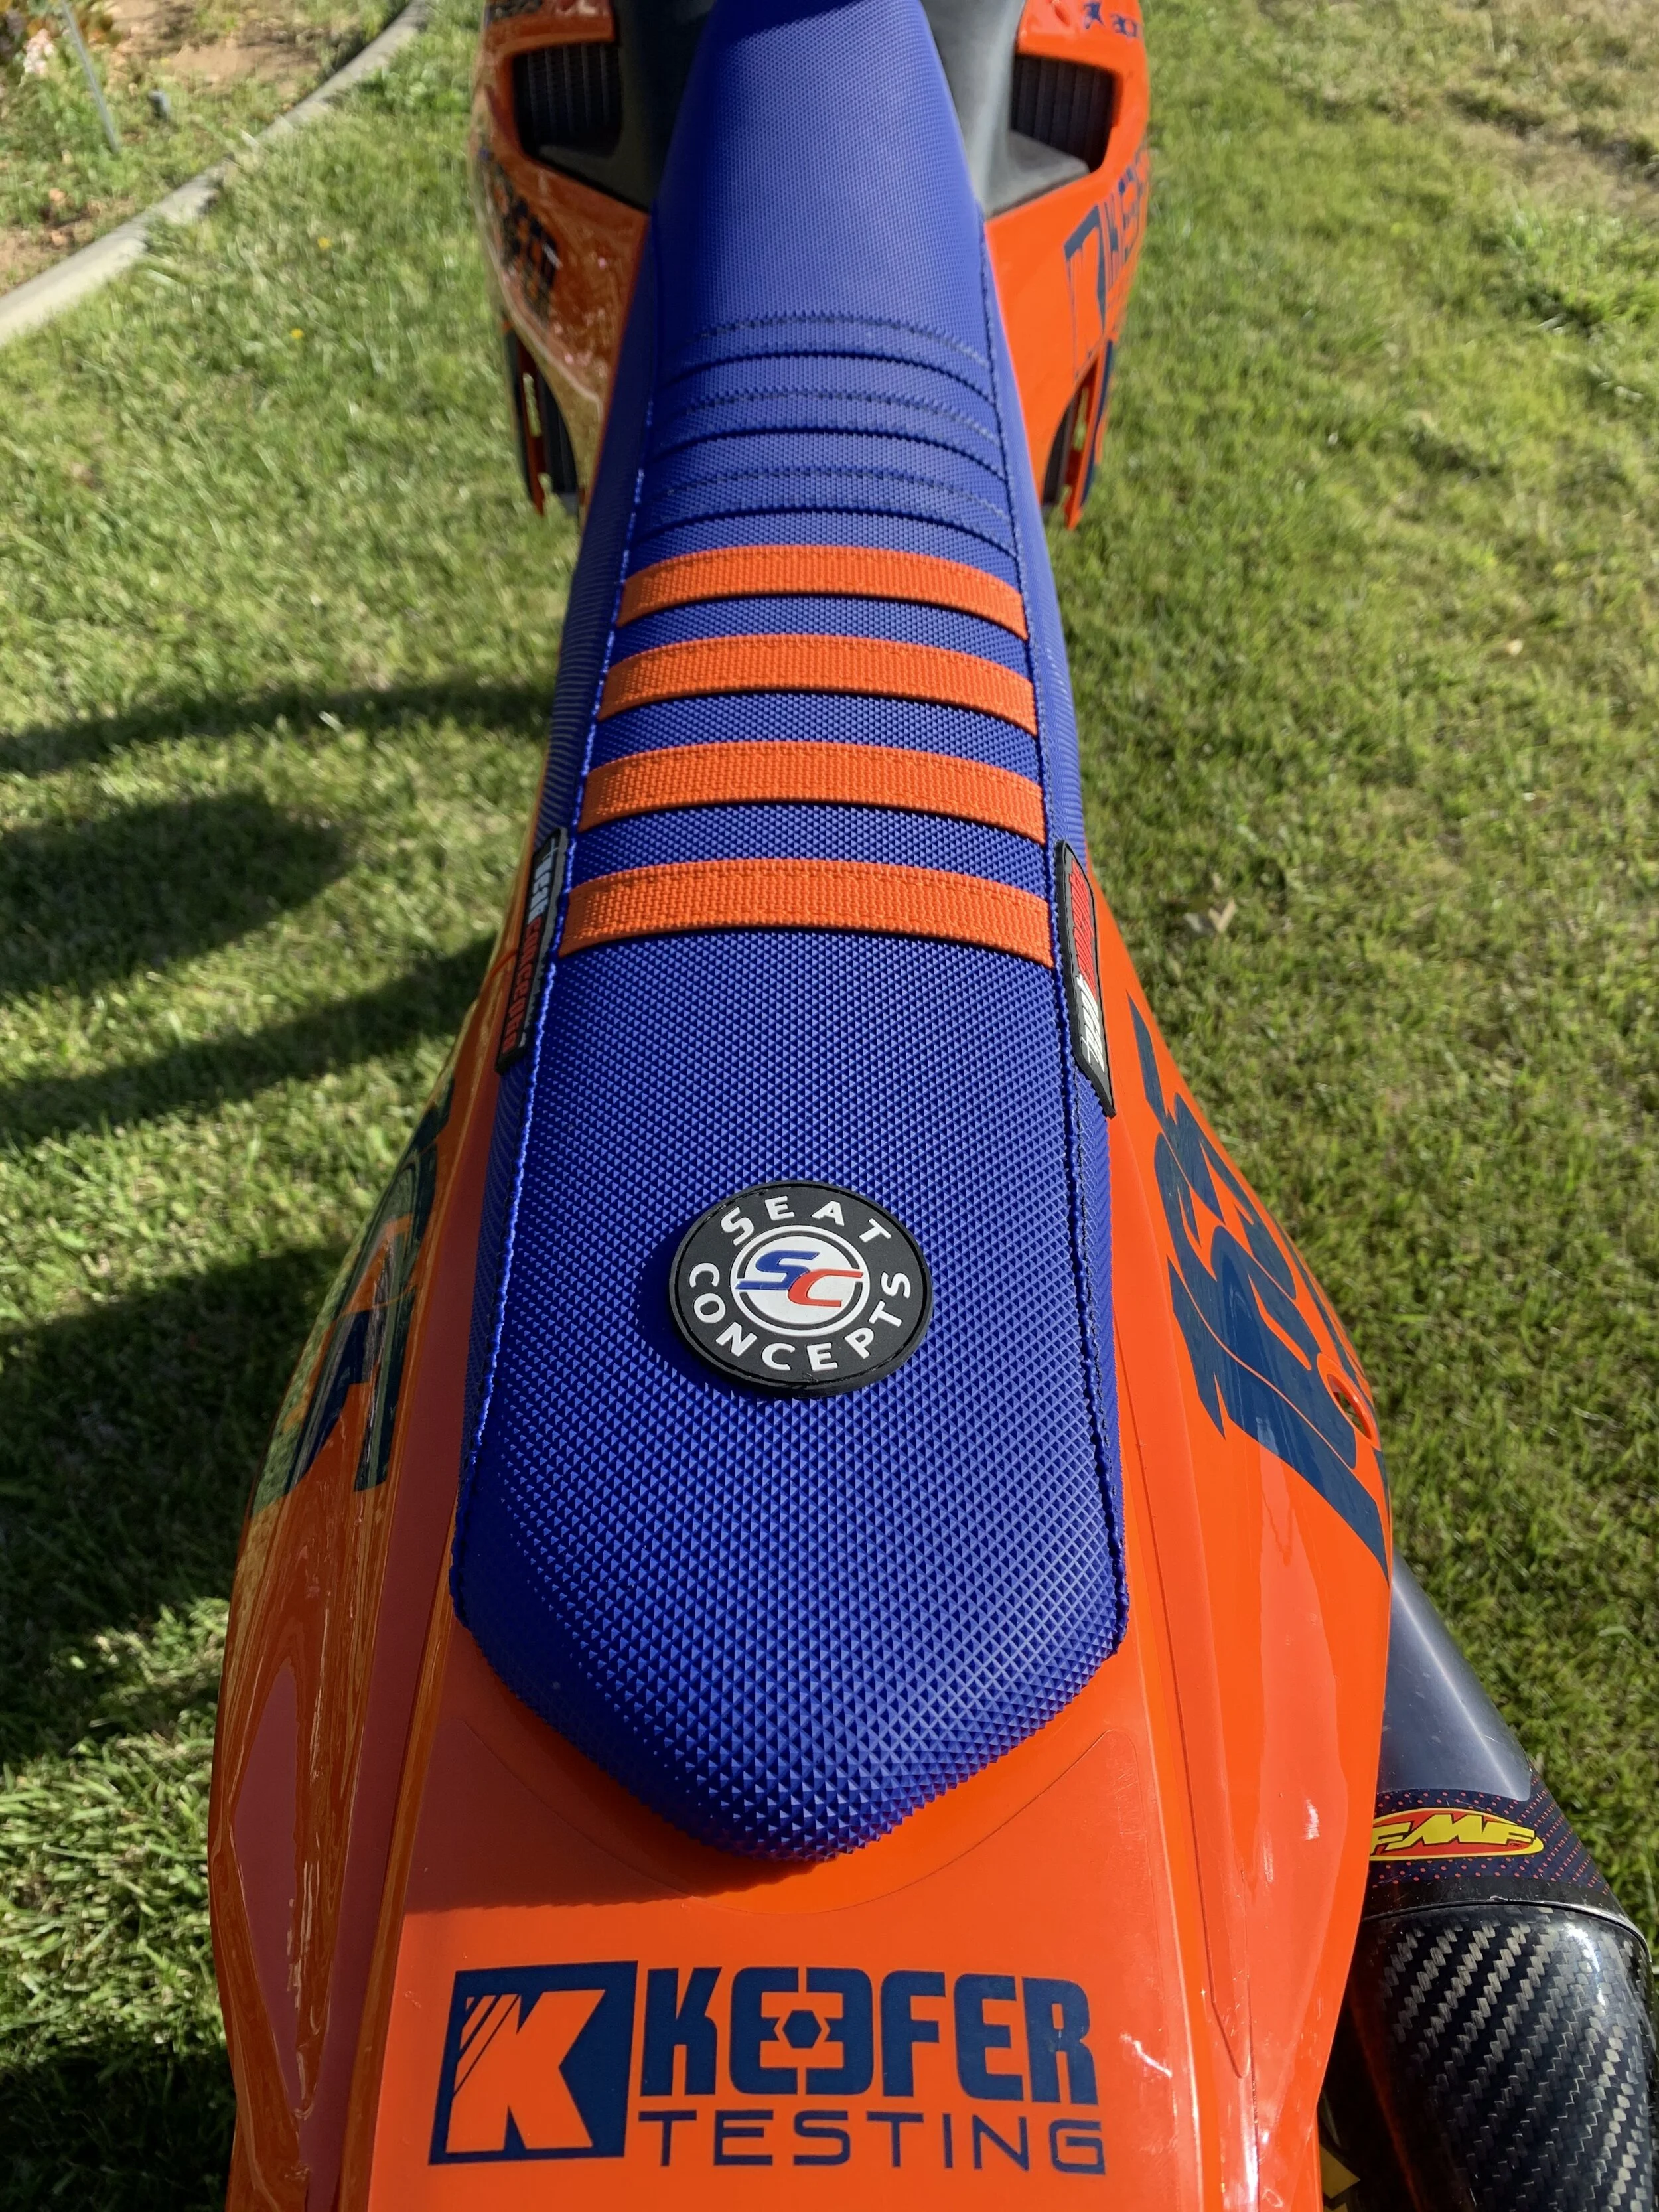
The 2.0 seat is light, the cover is beautiful and the whole seat pan itself is well built. The standard foam was a little soft for my liking, so if you’re looking for a slightly firmer feel from your OEM foam, you may want to order a firmer density from the beginning. Seat Concepts does not offer custom seat shaping or custom covers. Seat Concepts foam material starts out as a liquid, so each different seat shape requires its own mold. They do not alter existing foam shapes. Due to their current production process, cover options are limited to those shown on each specific product page on their website. The Seat Concepts foam feels different than any other foam I have tried to date. The foam has a slightly more of a cushy feel in the middle of the seat than other foams I have tried, so comfort is always at an optimal level near the middle of the seat. The front as well as the rear of the seat has a slightly firmer feel to it, but I was mostly riding in the middle cushy part. I have noticed over the years that I just like firmer foams, especially when diving into deep ruts. On small chop the seat foam was extremely friendly to my butt and took a lot of the harsh impact out of some unexpected acceleration square edge.

IMG_8562.jpg

The Seat Concepts cover is ribbed and has plenty of traction to keep my shovel pan ass where it belongs, when on the gas hard out of corners. Did I mention that I love the way the blue color way ties in with my new graphic set up on the KTM? For $294.99 you’re getting a quality complete seat with a one year warranty and to me that seems like a fair price. If you’re as picky as me with your rider triangle, going to a Seat Concepts complete seat is a great way to better your riding experience. 

IMG_8637.JPG

Seat Concepts makes complete seats, covers and foams for most makes and models. Check them out over on seatconcepts.com.   

Recommended Handlebar Specs For 2020 MX Machines

When it comes to handlebars I am a pain in the ass. The height, width, rise, and position is very important to me between each bike that I test. I find that you can’t run the same handlebar bend on every bike, even though I like a bend on one bike, sometimes it doesn’t feel as good on another. Every bike has a different rider triangle so you must adapt to different bar bends if you change motorcycle brands. As the years progress, dirt bikes evolve as well as their dimensions so don’t be that rider who sticks with a Honda High bend that you ran back in 1997. As you may have heard in my “Handlebar 101” podcast (show #70), if the bar feels too low (height), you should try to get the bar height from your bar mounts and not the handlebar itself. Getting the height from your bar mounts allows you to keep proper technique (position) through corners (where most of the time is made up on a track). This article was a big hit last year and by the shear number of emails I get about handlebars, I wanted to update some bends for 2020. Here are some of my favorite bar bends right here for 2020 as well as a recommendation on bar/bar mount heights for different sized riders.  

As you will notice most of these handlebars on this list are Pro Taper and Renthal. This doesn’t mean that I am trying to sell you on these handlebar brands. This is just what I personally like myself and should be taken as such. If you like another bar brand, that is fine, simply look at the dimension of the preferred handlebar and try to mimic that dimension to your favorite handlebar company. There are tons of handlebar companies out there, but for me, Renthal and Pro Taper are the bars that I prefer. Again as always for testing purposes, I tried a wide range of handlebars in my shootout so go give that podcast a listen when you can (Show #70). There are some great options out there. Again….This doesn’t mean other handlebars are crap. For transparency reasons, I am letting you know that these are the companies I prefer. I receive ZERO dollars from Renthal or Pro Taper.

• We are using 2020 models for reference, but if you have an older model and are concerned on which handlebar to run please feel free to email me at kris@keeferinctesting.com. 

• All Dimensions are in (MM). 

2020 HONDA CRF 450R/250R:

IMG_8707.JPG

Notes: The stock bar bend on the 2019/2020 Honda CRF 450R/250R has finally been updated to a bend that is lower and flatter than previous years. This bend is actually quite good and we usually leave the stock Renthal handlebar on the Honda. If you think you would like more flex you can try the optional bar bend below.  

Preferred: Stock Renthal 839 FatBar (W)802 (H)91 (R)52 (S)51 

Optional For More Flex: Pro Taper EVO SX Race (W)800 (H)87 (R)54.5 (S)54

Optional For 6’0-6’2: Factory Suzuki (W) 800 (H)92 (R)62 (S)47

Bar Mount Height: Stock 

2020 YAMAHA YZ450F/250F:

IMG_8289.JPG

Notes: Yamaha also did a good job on creating a bar that is fairly neutral for different sized riders, it’s just too bad their seat and footage height is all screwed up for taller riders. It’s lower height seems to fit a wide variety of riders (5’8-6’0), but taller riders may want to put the bar mounts in forward hole/back position.  

Preferred: Pro Taper EVO SX Race (W)800 (H)87 (R)54.5 (S)54

Optional 6’0-6’2: Renthal Fatbar 602 bend (W)801 (H)89 (R)59 (S)56

Bar Mount Height: Stock 

2020 KAWASAKI KX450/250: 

imagejpeg_0-4.jpg

Notes: 7/8 lives on! Kawasaki managed to keep the good ol’ 971 Renthal 7/8 bars, which are pretty damn good! I like a 7/8 bar and I actually stick with the 7/8 theme if I can. The 7/8 bar does bend a little easier, but you get a lot of flex when the track gets rough. If you’re an aggressive rider who likes a little more positive steering than go to a 1-1/8 handlebar for increased stiffness. 

Preferred: Renthal 7/8 983 bend (Villopoto/Stewart) (W)808 (H)95 (R)58 (S)55

Oversize Crossbar Option: Pro Taper Fuzion Henry/Reed (W)800 (H)92 (R)66 (R)40 (S)55

Optional For 6’0-6’2: Pro Taper EVO Factory Suzuki (W) 800 (H)92 (R)62 (S)47

Bar Mount Height: Stock

2020 SUZUKI RM-Z450/250:

FullSizeRender-13.jpeg

Notes: The stock Suzuki bend has some sweep to it, which makes the bike feel small at times. I prefer to open the cockpit up a little. 

Preferred: Pro Taper EVO SX Race bend (W)800 (H)87 (R)54.5 (S)54

Optional: ODI Podium Flight CountryBoy bend (W)803 (H)92 (R)56 (S)52

Optional For 6’0-6’2: Pro Taper EVO Factory Suzuki (W) 800 (H)92 (R)62 (S)47

Bar Mount Height: Stock

2020 HUSQVARNA FC450/250:

clean keefer inc -0206.jpg

Notes: Husqvarna comes with a very low bend and that fits the ergos of this bike, but the width of the bar is too long. I actually like the stock handlebar bend on the Husqvarna, however I cut the handlebar down to 803mm, which really helps the character of the Husqvarna when leaning into corners. 

Preferred: Stock Pro Taper EVO handlebar cut to 803mm (W)811 (H)80 (R)39.5 (S)51

Optional: Pro Taper EVO Carmichael bend (W)800 (H)77 (R)40 (S)55

Optional For 6’0-6’2: Pro Taper EVO Factory Suzuki (W) 800 (H)92 (R)62 (S)47

Bar Mount Height: Plus 5mm 

2020 KTM 450SX-F/250SX-F:

IMG_8778.JPG

Notes: The stock bar bend shape on the orange brigade is also decent, but it’s too stiff and long. If you don’t think it is too stiff, you can simply cut the bar to 803mm and run it! 

Preferred: Renthal 821 bend cut to 803mm (W)813 (H)78 (R)42 (S)54

Optional: Pro Taper EVO Husqvarna Stock cut to 803mm (W) 811 (H)77 (R)40 (S)55

Optional For 6’0-6’2: Pro Taper EVO Factory Suzuki (W) 800 (H)92 (R)62 (S)47

Bar Mount Height: Plus 5mm


ETS US MX 18 K2 Racing Fuel

Not everyone has the money to go purchase race fuel for their dirt bike. High end race fuel is something that maybe only a few serious racers really want. I can relate and understand this. That shouldn’t deter other media testing outlets away from testing such fuels, but it seems like you can’t find that much real world testing info about such things. This test may not be for everyone, but I feel like I wanted to really see how much of an improvement (on the track) race fuel can make in a machine when properly mapped for modern four-strokes. With most high end fuel, simply dumping it into your bike and riding is not going to benefit you in any way, so stop wasting your money if your bike/ECU isn't tuned for it. There are some other direct pump replacement fuels that DO NOT need re-mapping, but for this test I wanted to try and get the most out of what I am pouring in. I mean it’s $26.00 a gallon, so we have to be “ALL IN” when going this route right? More on that price later… ETS Racing fuels are based out of France and have been around for 12 years, but maybe you’re not too familiar with the company, so here is a breakdown of the ETS US MX 18 K2 racing fuel.

IMG_8539 2.jpg

About The Machine I Tested The Fuel With: I chose the 2020 KTM 450 SX-F Factory Edition to test the ETS Racing Fuel because it’s one of the 450’s that I feel that can benefit from quality race fuel the most. The KTM 450 SX-F has a smoother power delivery with a stock ECU setting that is slightly rich/lethargic feeling. I also have been doing some “other” modifications along they way with this model and have seen very solid improvements. Each modification that I have done to the orange brigade has made this machine better with each chunk of money that I have thrown at it. That is what you expect when you put money into your bike right? Well, that is not always the case because sometimes putting your money into your bike doesn’t mean it gets better. Putting the money into the right modifications is key and that is what we have done to this 2020 KTM 450 SX-F Factory Edition. Our 450SX-F has a XPR Performance Vortex ignition that is mapped for ETS US MX K2, VP MR Pro 6, and regular super unleaded pump fuel. The beauty of the Vortex ignition is that you have 10 preset maps that you can go back and forth from so it makes it simple to adjust when your pocketbook does. The simple fact that the ignition is super consistent and hasn’t given me any problems is just one reason why I went this route. The engine is completely stock (minus the FMF 4.1 Muffler System) and I wanted to keep it this way for durability reasons. I ride the crap out of the Factory Edition and I DO NOT need to be rebuilding it every 20 hours.  

IMG_7507.JPG

What Sparked My Interest To Test The ETS Racing Fuel: Number 1….Not a lot of people know about ETS Racing Fuel and who’s using it. Factory Red Bull KTM and Rockstar Husqvarna race teams use and endorse the fuel. In fact, ETS doesn’t “give” those teams fuel, because in reality both teams “purchase” the fuel. This sparked my interest because it’s not everyday that teams are “spending” money on pieces to their factory bike puzzle. Most of the time factory teams test parts and said companies provide them with that product for free (or even pay them to run their product)! Number 2…We have a ton of ethanol based super unleaded pump fuels around California and this has caused a couple fuel pump failures for me in the past on other machines. Number 3…Once Chad at XPR Performance put on the Vortex ignition he told me there was a map preset for VP MR Pro 6 and ETS US MX 18 K2 racing fuel, so I went ahead and got some of each. Number 4…I tested with the VP MR Pro 6 for a while and noticed a nice gain in pulling power (compared to pump fuel), but it boiled on warmer days in California. I really liked the power gains I felt, but after 16-18 minutes of hard riding the KTM began to run noticeably slower, had a dirty low end feel and ran inconsistent. This really sparked my interest to see if another competing race fuel could give me the same power gains, but more consistency over the course of longer motos. 

So How Did the ETS US MX 18 K2 Stack Up Against VP’s MR Pro 6 On The Track?: First thing’s first. This seems unimportant, but If you’re a die hard moto guy you will really love the smell of the ETS US MX 18 K2 racing fuel. It’s a sweet smell and if you have walked around the pits of an AMA Supercross, I am sure you have picked up the scent. However, other people may not appreciate the smell (like the wife), so you may want to store the fuel somewhere far away from the living room or kitchen area of your home (just in case your garage is close to these parts). Once the KTM fuel tank was emptied and the ETS was poured in, I headed out on the track to do a longer minute moto. I made sure to test all three fuels (VP, ETS, Pump) on the same day (over the course of a few days) in 90 degree temps for an apples to apples comparison. The first thing that I noticed with the ETS US MX 18 K2 racing fuel is that the KTM 450 SX-F had better throttle response (than that of the VP). Throttle response was slightly more crisp and instant with a better bottom end pulling power out of corners. You can just feel a little more “meat” when rolling on the throttle. Mid range was also improved slightly, especially when I was rolling sweeping corners in third gear. The KTM just seemed to pull better and have increased mid range RPM response. The VP and ETS fuels feel very similar up on top end as I didn’t notice any real difference there. To me the biggest selling point (besides increased power feeling) was the consistency the fuel had over the course of a 30 minute moto. With the VP MR Pro 6 I had a clean running engine feel up until 18 minutes and then it started to boil (on very warm days), but with the ETS fuel the KTM ran crisp and clean throughout the entire moto. This was huge for me! There were no remnants of fuel puking out the vent house and I could do a full day of motos with zero boiling issues. 

So How Did the ETS US MX 18 K2 Stack Up Against VP’s MR Pro 6 HT On The Track? Yes, VP makes a “high temp” MR Pro 6, but I noticed that I lose a little more pulling power with the HT versus the standard Pro 6. With the ETS MX 18 K2, the KTM not only doesn't boil, it simply outperforms the VP Racing Fuel “HT” in torque feel as well as excitement (throttle response).  

Cost And Where To Purchase: You may want to sit down for this. Ok, you ready? Are you sure? The cost of the ETS US MX 18 K2 racing fuel is $26.00 a gallon and comes in 15 gallon drums. Again, like I mentioned before, this is an expensive investment that is not for everyone, but if you’re serious about performance and getting that little extra, this is a great alternative race fuel that is CONSISTENT! The VP MR Pro 6 fuel is slightly more expensive compared to the ETS US MX 18 K2 fuel so if you’re already purchasing high end fuel, this will not be a big shock to you. You DO NOT need an aftermarket ECU to run this fuel, but you will need to get your stock ECU re-mapped (if available to you) to reap all the benefits of this fuel. The ETS fuel usually makes your machine run a little richer than that of the VP MR Pro 6, so leaning out your bike a little is a good way to go. There are plenty of engine builders who are familiar with mapping ECU’s to this fuel so please feel free to email me and I can give you some recommendations. If you are looking to get a drum of this fuel you can go to etsracingfuels.com and order through their website directly. They offer free shipping on orders over 40 gallons so it’s nice to have fuel delivered to your door. Any questions about this test please feel free to email them to kris@keeferinctesting.com 

TYPE | UNLEADED GASOLINE
RON | 102MON | 86OXYGEN | 3.9 %OCTANE | 94DENSITY | 762 KG/M3
REGULATION | AMA

Pirelli MX32 Mid-Soft Re-Visit

Pirelli may not be the most popular tire in the AMA Supercross/Motocross paddock, but one look around the MXGP circuit and you will see more Pirelli tires than any other brand. I tested the Pirelli MX32 MId-Soft back in early 2018, but since then, the MX32 Mid-Soft tires are said to have an improved spec, so I grabbed a couple to test for a few weeks. While I don’t have much information on what was improved or why, I did get confirmation that all of the old MX32 Mid-Soft spec tires have been out of circulation for a while. This was a concern to me as I thought some may still be floating around, but I was reassured that if a consumer purchases any Pirelli MX32 Mid-Soft tires, you will in fact be getting the updated versions. Pirelli also noted that they have dropped their pricing down on all their motocross tires $5.00-$15.00. They even have a “MX Extra” tire that has a price reduction of $50.00 a set.

IMG_7322.jpg

Once out on the track I quickly found out that one of the first things that impressed me the most was that the Pirelli Scorpion MX32 Mid Soft’s carcass gives the rider a blend of comfort and control on choppy/square edge terrain. I am usually on Dunlops around these Southern California test track, so I am very familiar on what these test bikes feel like when they get rough. When the track does get rougher, the Pirelli MX 32 Mid-Soft rear tire (120/80-19) gives more cushion than the Dunlop I have been riding on lately. The Pirelli carcass acts like another piece of your bike’s suspension and can really help a rigid feeling chassis become slightly better on choppy terrain. It impressed me so much that I tried it on a 2020 Honda CRF450R and it gave me less of a harsh feel. To me that was impressive on this machine, because the Honda needs more comfort and the MX32’s carcass did just that.

IMG_8100-2.JPG

Pirelli also offers a 120/90-19 size rear tire as well that was even better on square edge cushion feel, but the 120/90-19 also puts more weight on the front end of the machine, which increases front-end steering, but negatively affects the ride height. If you do decide to go with the 120/90-19 and feel like your rear end is too high after installation, I do recommend dropping your sag 1-2mm to prevent a high feeling rear end on de-cel (stink bug). 

The Pirelli MX32 Mid-Soft rear tire offers great traction on soft/intermediate terrain through ruts and coming out of soft corners. The MX32 works well under lean angle and that lean angle traction is one of Pirelli’s rear tire strong suits, as the rider is able to get on the throttle sooner (while leaning) without washing out. The contact patch that I get with a Pirelli at Glen Helen is unmatched. I feel like my lean angle is more controlled and that sudden line changes are easier with the Pirelli. When riding you want the largest “feeling” contact patchiest you can find from a tire and Pirelli has done this well with the MX 32 Mid-Soft.

Not only do you have a more controlled lean angle, but you are also able to start your lean sooner (compared to a MX33). Braking predictability gives the rider confidence to pivot and throttle out of flat corners without much hesitation. If you’re a predominately front end steering rider the Scorpion MX32 rear tire will provide you with less sliding ability and let you steer with the front tire more than the rear. If you're a rear end steering rider that likes to drift the back end around, this tire may not suit you as much as a Dunlop MX33/53. The only complaint I had is when the track surface was on the harder side, I could feel the side of the tire carcass roll when accelerating from flat corners. This gives me a pushing or loose feeling rear end that caused me to be more less aggressive with my throttle hand. To combat some of this it’s very important to run the correct air pressure (between 13.5-14.5 psi) for the Pirelli’s softer style carcass. I noticed that when the Pirelli tire gets half worn, the performance isn't as good if you don't pay attention to the tire pressure. When the tire gets worn, going to 14.5-15 psi helps the structure of the carcass stay firmer on its sidewall when under lean angle. I ran 13.5 on a half worn rear Pirelli and it felt very “washy” or vague so going up to 14 psi helped this roll sensation. Chunking wasn't an issue with the set of Pirelli’s I had, as I got well over 10 hours on a rear tire. You will also have to understand that Southern California conditions are much harder than east coast conditions, so lifespan would dramatically be better in softer east coast based dirt.  

IMG_7323.jpg

Attention! I am a picky son of a bitch when it comes to front tires! The Pirelli MX32 front tire is great for front-end feel and lean angle traction especially in heavy dirt. The softer the dirt the more responsive this front tire is. I prefer a tire that really digs into the dirt and lets you carve underneath blown out berms or ruts (happens a lot here in Southern California). The Scorpion MX32 Mid-Soft front tire actually makes the steering feel heavy at times because the tire is at maximum grip under initial lean in corners. Like I mentioned above, the MX32 is tailor made for a front wheel steering rider and can be leaned into corners earlier than you would come to expect. It took me a couple rides to fully trust this tire, but it has treated me well once I began trust it more. The only other front tire that has as much front end lean angle traction is a Hoosier MX25. This Pirelli front tire does suffer from predictability when the track is freshly watered while broken in/slick on top (think 1PM at your local track). The MX32 would give the front end a vague/push feel as the bike would have a tendency to slide unexpectedly through flat corners. Again, adjusting the air pressure can remedy some of this, so going up to 14 psi helps the tire not to roll so much. 

To me this is a pure soft natured front tire and if the conditions are soft to loamy this tire works great, but if the track gets hard pack, you will get some uncertainty when pushing the front tire’s limits with 13.5 psi. The wear of the MX32 front tire is superb and unlike most soft terrain tires, the Pirelli will NOT chunk. I typically get 10-12 hours on a MX32 front tire before I start to see some of the performance life start to dissipate. This is a performance based tire and should be purchased knowing this. 14 psi is a good baseline for this tire, but be sure to check the pressure after a couple motos. Tire pressure will rise with heat so make sure to have a good tire pressure gauge handy in the tool box. 

The updated Pirelli Scorpion MX32 Mid Soft is one of my favorite sets of tires to put on for Southern California tracks. The Pirelli tires will require more attention during the course of the day with your tire pressure gauge, but if you stay on top of the air pressure, you will be rewarded with a tire that rivals spec tire cushion feel. Look for a small tire shootout soon as we will take the top MX tires and put them to the test under a 10 hour evaluation soon!

If you have any questions about these tires please feel free to email me at kris@keeferinctesting.com.

FMF Factory Fatty Pipe/Shorty Silencer (2020 KTM 125SX)

Since the delivery of our KTM 125 SX, my son Aden has been riding it non stop. He also has been barking in my ear about getting a pipe and silencer so it “sounds cool”. While I am usually reluctant to add parts to my kid’s bike for the sake of just doing it, I thought this could be a good way to test a pipe and silencer to see if it actually helps the Austrian two stroke power plant. After I discussed “the conditions” to my kid, I called upon Lil D and the boys at FMF to send me a Factory Fatty pipe and Shorty silencer to try. 

IMG_5492.JPG

What were Aden’s “conditions”? The conditions were that he had to install the FMF products and help me write this test. I took it upon myself to ride the 2020 KTM 125 SX in stock form as well as with the FMF Factory Fatty/Shorty combo at couple tracks. The installation was fairly painless for my 13 year old. He learned how to use a spring puller for the first time as well as how to push the rubber grommets through the silencer mounting points without stabbing himself with a flat blade screwdriver. Once he got the FMF pipe/silencer installed he of course had to start his bike and see how it sounded and I will have to admit, it sounds pretty bad ass. The pitch of the KTM 125 SX with the FMF pipe/silencer is more of a crisp/barking sound rather than a richer/raspy sound that the stock pipe/silencer comes with. Ok, now that we smoked out the garage and pissed mom off, we loaded up the bike and went riding! 

IMG_5706.jpg

I went back and forth with the stock set up as well as the FMF a couple times at a few different tracks and I will say that the FMF Factory Fatty pipe/Shorty silencer combo did help throttle response as well as low end grunt. Coming out of corners (with the FMF Fatty/Shorty) the KTM 125 SX has a little more acceleration pull on corner exits and could be shifted a little earlier without falling off. The mid range pull was also longer and overall crispness of the mid range seemed improved. The FMF Fatty/Shorty seemed to lean out the bottom to mid range (in a good way) and made the KTM feel more playful around the track. RPM response was improved throughout the power and the throttle felt more connected to the rear wheel. 

IMG_5708.jpg

The top end pulling power/over-rev was slightly shorter than the stock set up so I wanted to play with jetting to see if I could get some of that back. I went back and forth on a few different main jets as well as needle jets, but came back to this set up below: 


Jetting Specs:

Needle position: 3rd position from top

Jet needle: 6BFY43‑71 

Main Jet: 520 (500 Stock)

Idling Jet: 35 

Choke nozzle: 80

Needle Jet: S‑7

Idle Air Adjusting Screw: 1.5 turns out/open

With this jetting the KTM 125 SX pulled longer up top and gave Aden/I more over-rev in 2nd-3rd gears. To me these two gears are the most important for Aden as he learns how to improve his corner speed as well as technique. Sometimes Aden will leave it in second or third gear too long (instead of shifting) and having this jetting allows the KTM 125 SX to pull a little longer. This jetting was good for sea level up to 3500ft. Anything higher than 3500 feet elevation and I would go back up to the 2nd needle position. 

IMG_5710.jpg

Overall, there is some performance gains to be had with the FMF Factory Fatty/Shorty Silencer. Aden has put over 14 hours on the system and the silencer still sounds good and not blown out. He did manage to put a small ding in the bottom of his pipe and that made him mad, but he’s ok with it after he took some WD-40 and Scotch Brite to the thing! Proud dad moment! The Fatty is $249.99 and the Shorty costs $134.99. A lot les expensive than a four-stroke system! 

Below is Aden’s opinion of the FMF and stock pipe/silencer. I wanted to let him have free range on what to talk about, so he can try to get better at communicating his thoughts into a testing format. During the course of this test I never shared my thoughts about the FMF Fatty/Shorty for confidential purposes. His opinion is unedited, but I did clean up a few grammatical errors for the sake of reading. After reading his opinion, I couldn't help but write down my thoughts about his opinion. It seemed too good not to share with you all. Enjoy! 

Aden Keefer Opinion: 

The differences between the stock pipe vs the FMF Fatty/Shorty pipe is that the FMF pipe hits stronger coming out of corners, but on the other hand the stock pipe is a little bit more linear coming out of corners. The stock pipe takes a while for the power to kick in which was ok on hard pack desert tracks that I rode. I did like the FMF pipe more because it was aggressive and you can put the bike anywhere knowing that it’s gonna have the little extra power. The one reason I do like the stock pipe is that since it’s more of a longer silencer I can control it better when I get tired because it’s not so aggressive. Don't get me wrong though! I think the FMF pipe and silencer is one of the best pipes out there. Not does it only make your KTM 125 SX faster, it makes it look super cool and it sounds way better than the stock pipe. I also noticed when we put VP C12 in the stock pipe/silencer it made it run aggressive, but when we also tried out VP C12 with the FMF pipe/silencer it ran like a race bike. It made it so fast that I was pulling all the 450’s going up Mt.St.Helens at Glen Helen. I also think cleaning the FMF pipe/silencer is rewarding. My dad loves to vacuum because he said he can see his progress with his work. I like cleaning my FMF pipe and silencer because I can see my progress as I scrub it with an SOS pad. So to wrap this up, I think that the FMF pipe and silencer is the best pipe out there for any 125's out there.


Dad’s Thoughts About Aden’s Opinion: 

-I appreciate some of these testing comments and at least it shows that he is listening to me a little. So you’re saying there’s a chance! Hallelujah!  

-I like that he could feel that the FMF Fatty/Shorty had more bottom end. That shows me that any kid could install this product and feel the difference. 

-It’s funny that he recognizes how the KTM works on different terrain and can appreciate a smoother power at times. I am glad he’s not a balls out rider! Safety first!

-Pulling 450’s up MT. Saint Helens? Eaaaaaaasy there tiger!

-Of course when I was his age I also thought something that was aftermarket was way cooler! Why? Because it wasn't stock! Duh! After reading his opinion it seems that he’s into the styling of the “Raw Fatty look”. Me too, Aden, me too! 

-Here we go with the C12 talk again! That is all this kid was talking about for a few weeks! “Dad, let’s get some C-12”! “Dad, let’s get some C-12”! I broke down and got some. The C12 did make the KTM’s pulling power stronger, but also leaned it out enough to warrant the jetting change. However, the jetting change that worked with the VP C-12 also worked with pump gas too. Don’t be scared to run that jetting with either fuel. Aden wanted it because of the smell! Mom’s still mad because her kitchen smells of C12 and Maxima Formula K2. Sorry, babe! Not really, because our house smells like a race shop now! :)

-Aden coming in hot with the vacuum reference! Wow! My secret is out now. Great!

-Good job Aden. We have some work to do, but good job son! Love, Dad!      


X-Trig Rocs Pro Clamps (2019 Honda CRF450R)

I have been getting ready for the first two AMA outdoor nationals and knew that I was going to be running an aftermarket triple clamps and those clamps would be X-Trig. Since my practice bike was my test bike, I thought it would be beneficial to get a set of X-Trig clamps to ride/test with to make sure I could get the “feel” of an aftermarket triple clamp, since I am so used to riding with the stock clamps on the 2019 Honda CRF450R. Like I have spoken about before, it’s tough to find aftermarket triple clamps that perform better than stock these days. So much R&D is involved (at the OEM level) in making a triple clamp that flexes enough, but also has enough rigidity to aid the machine under load/through corners as well. With the triple clamp flex character so important to each specific chassis (on all motocross bikes) sometimes it’s tough to find anyone that can make a “comfortable” set of aftermarket triple clamps. Why do you need aftermarket triple clamps? Well sometimes it’s just for looks with some riders, but there are occasions where you might want another offset to help you get more stability or a sharper turning character out of your machine. In this case I was simply wanting to make sure that I wouldn't be trading comfort for stiffness on the Honda CRF450R somewhat finicky chassis setting.

IMG_6465.jpg

Enter X-trig’s ROCS Tech Triple Clamps and PHDS Mounts. “ROCS” stands for “Revolutionary Opposing Clamp System”. The ROCS clamp allows for precise alignment of the fork tube with opposing clamping surface patterns, the stiffness of the steering stem is specifically tuned to the respective motorcycle model, the steering-head bearing is already mounted on the shaft tube for convenience, a special fork slot and clamping area for precise fork operation, precise clamping with special screws for low torque specs, OEM attachments can be mounted without auxiliary material, and flexibility that is adapted to the fork with anodizing in the technical factory OEM look. The difference between the ROCS “Tech” and the ROCS “Pro” is the “Tech” uses a standard offset with a pressed shaft tube. The “Pro” has two offsets you can choose from by simply adjusting the shaft tube (or steering stem). I felt it would be beneficial to try another offset with the Honda CRF450R for testing purposes, so I went with the ROCS Pro clamps. 


The PHDS (Progressive Handlebar Dampening System) is a system supported by elastomers designed to absorb engine and chassis vibrations. The system also dampens the forces acting on the handlebar in a horizontal and vertical direction, maintaining steering precision. The handlebar can be adjusted in 12 different positions when the PHDS is mounted. The Honda vibrates more in the handlebar area than any other 450 aluminum framed motocross bike, so this is something that I feel the Honda needs, in my opinion. 


Installation of the ROCS clamp is fairly straight forward (with the pressed shaft tube). All you need to do is grease up the steering head bearing and slide the bottom clamp up in the head tube of the frame. All of the front fender mounting points and even the OEM hour meter bolts up the same way with the X-trig clamps. Super clean! Mounting up the PHDS bar mounts is a little tricky as the mounts themselves have a lot of moving parts, so make sure to read the instructions to ensure proper mounting. Technical Touch offers optional PHDS bar mount elastomers that come in soft or firm, but I chose to run the stock medium style elastomers, which seem to be just fine for motocross conditions. 

IMG_6471.jpg

I am super picky about bar positioning, shocking I know, so I went with the mounting hole closest to me (when sitting on bike) on the triple clamp with the PHDS mounts forward. This handlebar position gave me a +1 mm bar position (forward from stock), which I preferred as the stock Honda rider triangle is just fine for my 6’0 frame. The PHDS bar mount itself is the same height as the stock bar mount, which also was good for me and I mated the clamp/mount with a Pro Taper EVO SX RACE handlebar. Having so many positions available for the rider is definitely a huge positive for adjustability with these ROCS clamps. If you feel like you need a higher PHDS handlebar mount, X-trig also offers spacers to go under the PHDS mounting system. You can pick from 3mm, 5mm, and 10mm spacers.

IMG_6473.jpg

So what did the X-trig ROCS Tech Triple Clamp and PHDS handlebar mounts do on the track? My goal for this test was to not gain front end rigidity, get a more precise front end feel through corners, without getting deflection on hard pack/rough straights. Basically trying to NOT get a harsher ride on the Honda, tough to do right? The good news is that this is exactly what I found with the X-trig ROCS Tech/PHDS system, but there is some fine print that I want to fill you in on. The X-trig ROCS Tech clamp on the CRF450R provided enough flex and doesn’t feel like it negatively affected front end bump absorption, but was also stiff enough to give me a positive front wheel feel through flat corners. The ROCS Tech clamp is most noticeable when diving deep into a rut where there is a huge load put on the front end, forced by the rider. The chassis positivity through this area is better than the stock clamps. The stock clamps has a tendency to flex too much and give the rider a wiggle immediately off throttle (on deeply tilled tracks or soft dirt) or give the rider an unsettled (dive) when dropping into a long/deep rut (this sensation can only be felt mostly by faster or heavier riders). The X-trig ROCS Tech clamp gives the front end less wallow (firmer) and more cornering stability (without upsetting chassis balance). Straight line stability is as good as stock and front end bump absorption is only minimally stiffer feeling on braking bumps/square edge. 

Optional Setting: I have tried the ROCS “Tech” with the pressed steering stem shaft as well and that set up is a little firmer of a feel as well as provided a little more rigidity (I found out this when I went to ride my race bike, which has the “Tech” installed). The differences are small, but I did feel it nonetheless. Going to a 24mm offset on the ROCS “Pro” helped the Honda settle down on faster tracks. Running the fork up 4mm with a 24mm offset really helped calm this chassis down for 2:00PM motos (AKA ROUGH TRACKS). The 24mm offset did affect the Honda’s turn in capabilities and made it feel slightly heaver through corners. If you’re looking to slow the chassis down on faster tracks try going to the 24mm offset, 105mm’s of sag, and the fork up 4mm. 

The PHDS mounts do not vibrate nearly as much as the OEM rubber mounted bar mounts. The PHDS bar mounts flex as good as stock with the standard elastomers (up and down), but dampen vibration noticeably better around the track (especially at higher RPM’s). Slap down landings are improved slightly and front end positivity (entrance into corners) are as good as an OEM feel. Simply put, the vibration characteristics the PHDS mounts provide are well worth their weight in gold. I use “weight” because they are heavier than stock ones by quite a bit, but I will gladly take some extra ounces over vibration any day. 

The cost of the X-trig ROCS Tech Triple Clamps and PHDS handlebar mounts are $900.00. The cost is more expensive than other triple clamps out on the market by a couple hundred bucks. However, there are only two triple clamps that I have tested, that to me, are as good or better than stock. If you're looking to get a set of clamps for the temperamental Honda CRF450R “vibes” pick up some front end cornering stability, get an optional offset, and even improve the looks of your Honda, X-trig has some really nice clamps and handlebar mounts available for your red motocross machine. You can check out and purchase all of the X-trig products over at technicaltouchusa.com.   


If you have any questions about this test please feel free to email me at kris@keeferinctesting.com


FMF Factory 4.1 Slip-On (2019 Yamaha YZ450FX)

Story By: Michael Allen

The simple fact that more manufacturers are offering off-road closed course competition bike’s brings a smile to my face since at heart I’m an off-road lover. That being said I feel like most manufacturers should know that 99% of all off-road racing organizations require race bikes to be equipped with a spark arrestor. Although the bikes are really good in stock trim, this issue has opened up a nice market for aftermarket exhaust manufacturers to be able to come in and save the day while making bikes race legal. I recently ran into this issue when I decided to race our 2019 Yamaha YZ 450FX at a local District 37 Sprint Enduro and realized last minute that I needed a legal muffler. I made a couple calls, but before I knew it FMF saved the day and I had a slip on Factory 4.1 on its way (two days before heading to the race). 

IMG_3591.jpg

When I got the new 4.1 slip on muffler I immediately installed it, which was very self-explanatory and the fit and finish of the stainless can mated to the carbon endcap was top notch. Now here is the part of the story where Kris gave me crap about the spark arrestor… Admittedly I was putting on the muffler last minute and rushing to get all of my stuff ready to race the next day and I did what everyone says not to do; I assumed…. I assumed that the muffler came from FMF with the spark arrestor screen already installed, so I didn’t even think twice before loading up my bike and heading to the race. Well… I soon found out (thanks to my friend Brendon) that I didn’t have a spark arrestor because as Kris warned me about (and I forgot) FMF puts the insert in the bottom of the muffler box, where it stayed in my recycle bin until I got home that night. Luckily I was able to squeak through sound and spark arrestor testing and go to the start line. 

IMG_3594.jpg

Initially what I noticed when I fired the 450FX up was that the new muffler was slightly louder (without the screen insert) than the stock muffler. This slightly louder sound was deeper than the somewhat raspy sounding stock muffler. The performance of the stock muffler was by no means hampering the 450FX power character, in fact it was quite good, but like I said, I needed a spark arrestor. The new 4.1 has a larger opening than the stock muffler, which in turn gives the 450FX slightly less back pressure. With a little less back pressure the FX lost a touch of smoothness in the very bottom end, giving the bike a more on/off feel. The tradeoff for the on/off feeling on the other hand was that the bike gained some over-rev and seemed to pull slightly longer into the RPM range. During the race I changed maps to try and smooth out the bottom end which helped, but didn’t completely remedy the bottom end touchiness. After getting home, going into my recycle bin (thankful the trash man didn’t come) and installing the spark arrestor insert, the bottom end delivery smoothed back out. With the insert comes a quieter sound, which was welcomed as well as some added back pressure. The back pressure gives this bike a little more lugability without wanting to flame out, so I didn’t have to worry as much about covering the clutch in tighter sections of the trail. 

IMG_3590.jpg

The bottom line is that all bikes marketed to off-road racers should come with spark arrestor inserts, they don’t. That being said, FMF has done a great job at providing the off-road community a multitude of choices for whatever their specific type of riding entails. From full titanium systems, to more affordable aluminum slip on mufflers, FMF seems to have all the bases covered. At $449.99 for the stainless/carbon slip on that I installed, I think it’s a good combination of not breaking the bank while still looking slick at the track (not to mention that it takes almost two full pounds off your bike). If you have any  questions, or just want to tell me I’m a dumbass for not seeing the spark arrestor in the box, feel free to reach out to me at Michael@keeferinctesting.com . 

Raptor Titanium Footpegs 


There are many aftermarket parts that are easy to improve upon with stock motorcycles, but there are also some that are pretty damn good in production form. Some people don’t realize how much goes into making a stock footpeg work so well, but listening to Keefer talk about how much he has tested production footpegs got me thinking. Footpegs basically don’t get the recognition they deserve because frankly, if you aren't talking/complaining about them, that means they are doing their job. You never hear a rider say “hey bro, my footpegs are working great out there”. No instead, no news is good news, when it comes to footpegs. However, there are many aspects to look at such as pitch, sharpness, folding ability, etc. About a year ago I bought myself a personal bike, a 2006 YZ125, which has been a blast, but after many off-road rides, the pegs were looking a little tired, dull, and tattered. Kris saw my beat up pegs and said I should try a set of the Raptor pegs he had in the shop and since most all current Yamaha pegs are the same, they bolted right up to my 2006 personal steed.

IMG_3513.jpg

The look of the Raptor pegs are quite aggressive with large, pointy, titanium edges that appear hungry to eat any boot sole they come in contact with. The fit and finish of the Raptor pegs are top notch and being a metal fabricator myself, I can truly appreciate the craftsmanship of quality material/good looking welds. On my initial ride with the new pegs I noticed the slightly larger than stock platform which I like because it adds some comfort when standing. I also noticed that the pegs sit flat and not upward like smoother aftermarket pegs we have tried in the past. Although they do look aggressive they don’t seem to chew up boot soles any quicker than stock foot pegs.  My foot placement/grip is slightly better than stock when it comes to forward and back movement, but when it comes to side to side movement, I think the raptor pegs are somewhat lacking in grip. The reason I say this is because if you look at most stock foot pegs, the three or four outside teeth are taller than all the others, which helps keep your foot from sliding off the side of the pegs. The Raptor pegs are flat all the way across, there aren’t any built up teeth near the end of the peg, which led to my feet slipping off the sides of the pegs a couple times when the riding got wet/slippery. One other negative thing I noticed with the Raptor pegs was that the brake side peg, when folded up, started putting a small crease in my brake pedal where the pivot bolt is. This didn’t cause a problem, but I could possibly see over time, with a big enough hit, this possibly being an issue. 

IMG_3509.jpg


After many HARD off-road miles on the Raptor pegs they show no sign of wear and because of the strong titanium material, they take abuse without ever bending, denting, or getting dull. Like I said in the beginning of the story, there are some parts that are hard to improve upon and I think Raptor did a good job of improving the stock foot peg in some areas, but also came up slightly short in others. Footpegs are very much a rider preference part and for me I’ll take the couple shortcomings in order to have an overall stronger foot peg that will stay sharper for a longer period of time. 

If you have any questions about the Raptor pegs feel free to reach out to me at Michael@keeferinctesting.com. -Michael Allen