Motocross

Brake Modifications And What They Do On The Track

You can only go as fast as your brakes allow you to slow down. That doesn’t sound quite right, does it? But if you don’t have good stopping power on your dirt bike, chances are you will not be able to get around the track or clip down that trail at any reasonable rate of speed without missing your mark or crashing. Most of today’s off-road motorcycles come stock with fairly good brakes and are usually plenty capable for 90 percent of the riders out there. But what about those 10-percenters who want just that little extra or maybe are super picky about how their brake engages or feels? We wanted to “brake” down several ways that you can alter your brakes’ performance to get the most out of that lever and pedal.

Who comes with the best stock brakes, out of all the new off-road machines? KTM has used Brembo brakes, Galfer rotors, and steel-braided brake lines for quite some time. This combination has proven to be the most powerful, yet the most progressive, way to get stopped or slowed down from an off-the-showroom dirt bike. If you’re on a Nissin brake system, using some of these modifications below will get your bike to this point, or using all of these mods will get you past it.

Fixed Or Floating?

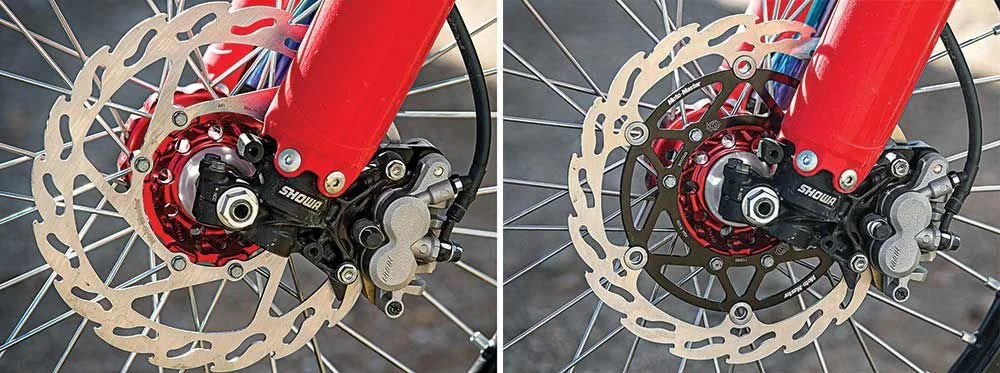
A fixed brake rotor is a simple, solid, one-piece rotor. A fixed brake can also increase lever pressure and power but is susceptible to more warpage when hot due to its solid mounting points. Fixed rotors are lighter than a floating rotor, and, remember, rotors are unsprung weight, which is key to a bike’s handling on motocross machines. A floating rotor system uses bushings that attach a mounting bracket to the brake area where the pads grab. The bushings offer a slight bit of play, allowing for a more centered or equal grab by pads, leading to more even pad wear. Also, in case of an impact, floating discs can take more abuse than a fixed disc. However, floating discs are heavier and more expensive.

On The Track: A fixed rotor has a more positive feel at the front brake lever and can be grabby at times. A floating rotor is not as positive and can require a little more lever pressure to help stop the machine, but is also more linear feeling.

Oversize Rotors:
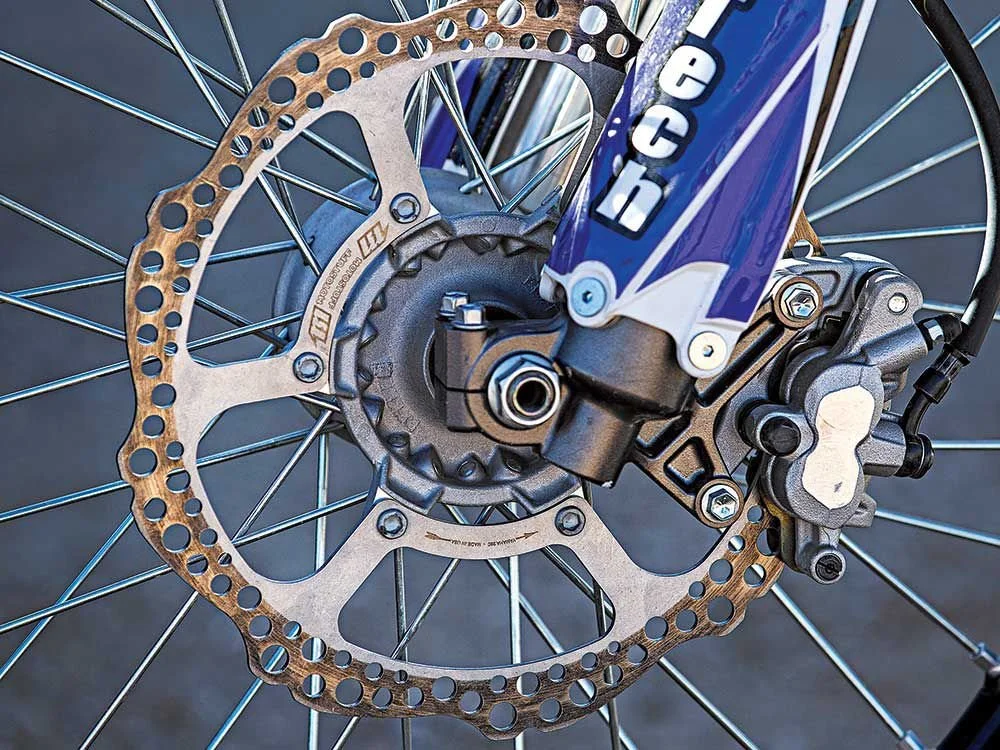
This is the most common of all brake purchases. An oversize rotor can dissipate heat more (due to its larger circumference), increase brake pad life, and increase the stopping power to your front brake lever because of its extra leverage. Most stock competition off-road bikes come with a 260mm or 270mm front rotor and a 240mm, 245 and 250mm rear rotor. Aftermarket brake companies usually offer their “oversize” front rotors in either 270mm or 280mm. When going to a larger rotor than stock you will need to also change the caliper carrier, which usually comes with the rotor.

On The Track: A noticeable improvement in braking power. Note that when going to a larger rotor than stock, the brake can become more responsive (or grabby) to the touch of the lever.

Steel Braided Brake Lines:

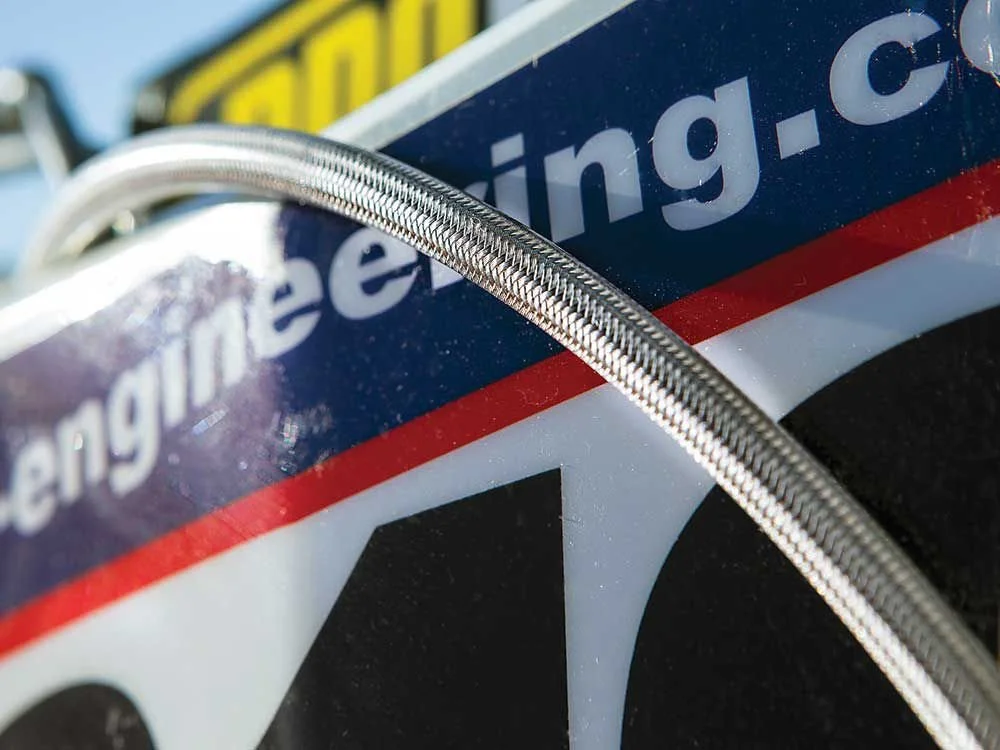
Steel-braided lines reduce expansion when the brake fluid gets hot. This keeps the lever engagement consistent and in the same spot over a longer period of time. The life span of a steel-braided line is longer than a standard rubber/nylon line that comes on most machines. You get more consistent feel at the lever, and consistency is key for any rider.

On The Track: Just purchasing a steel-braided brake line alone with your stock brakes can increase stopping power, especially in longer races. With a steel-braided line and oversize rotor the braking power becomes more intimidating to less skilled riders, but faster riders usually love how easy it is to get the bike slowed coming into corners.

Brake Calipers:

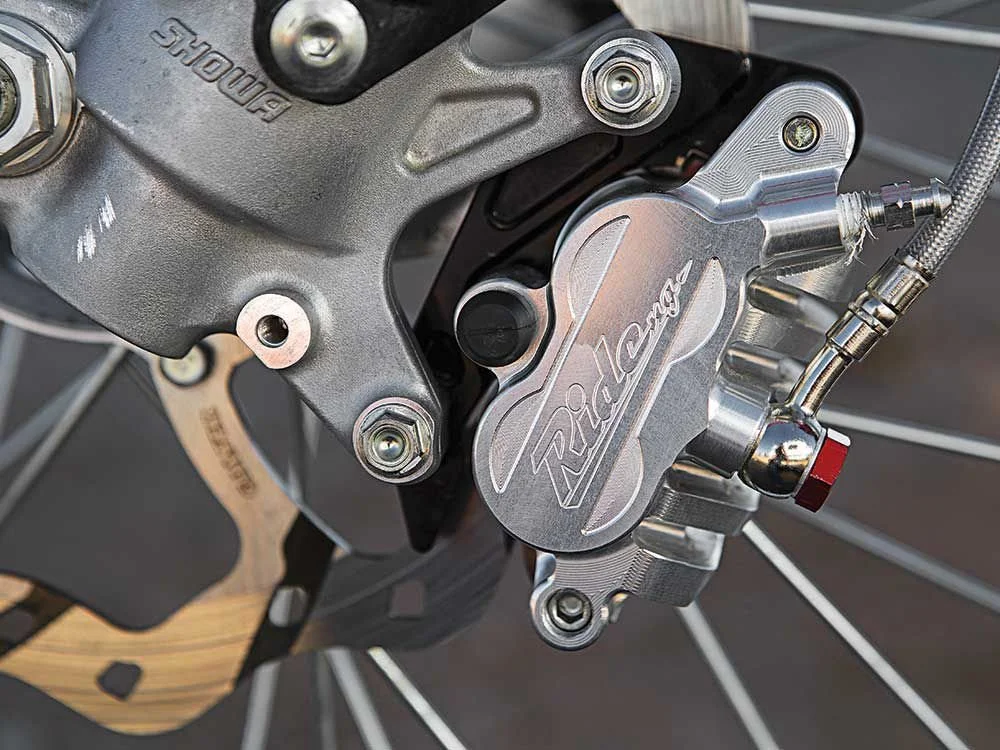
Another option for Nissin brake riders is installing an aftermarket brake caliper. A couple companies offer different calipers (Ride Engineering and MotoStuff) that can dramatically increase your stopping power. An aftermarket caliper has pistons that are larger than a stock Nissin caliper, and with this comes increased power at the lever. But unlike just going to an oversize rotor, a caliper can give you a more progressive feel. Going to larger pistons changes the leverage ratio when using the stock 11mm master cylinder that most Nissin-equipped bikes come with (Honda, Kawasaki, Suzuki), so it feels more gradual and less grabby. Flex is also reduced and airflow is increased with wider fins.

On The Track: The front brake lever has a slightly softer feel to it with the Ride Engineering caliper, but braking power is increased and is more progressive. Going to an aftermarket caliper gives you a better feel at the lever for increased tire traction when pulling in the front brake or dragging through ruts/corners over a longer throw. Along with a steel-braided line and oversize rotor it becomes easier to consistently ride faster and get into corners. It is also more lever friendly to all types of skill levels.

Brake Levers:

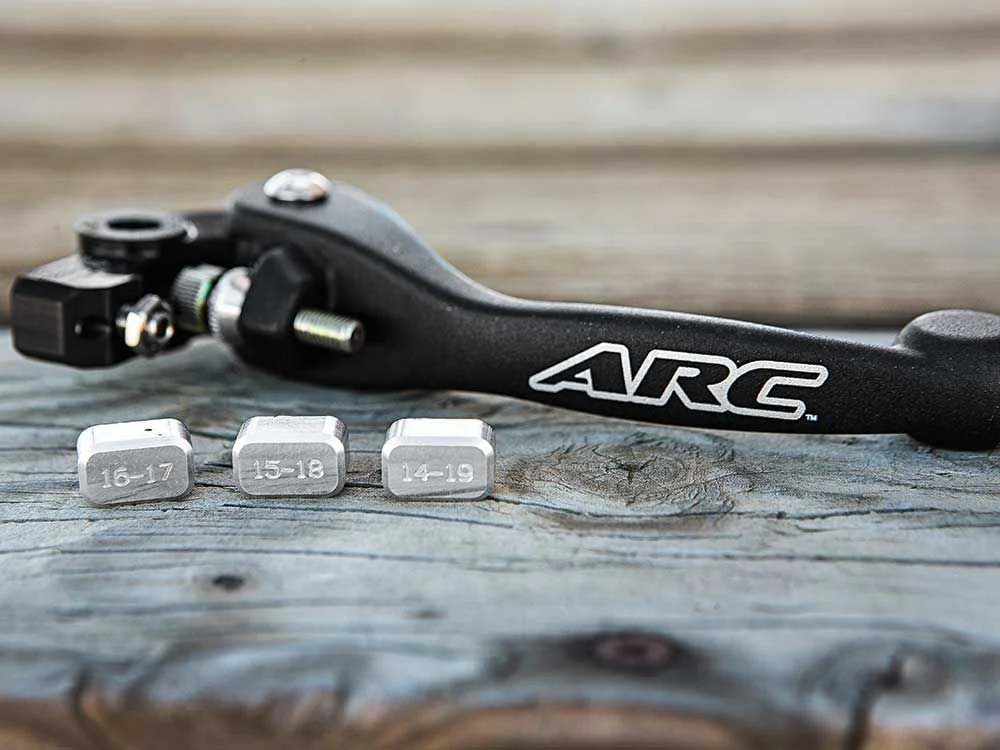
If you’re a picky rider and want to take it even further for that personal touch, there is the ARC adjustable front brake lever. The ARC lever lets you choose from three degrees of lever ratio that will let you dial in where you want the lever to grab. Some riders like a very touchy lever right at the beginning of its pull, and some riders like the lever to grab closer in to the handlebar. With the ARC adjustable front brake lever you are able to dial in your personal setting.

On The Track: This is for the pickiest of riders. If you love to tinker and really dial in your lever engagement placement, this is a great lever. It comes in aluminum and Memlon materials

Brake Fluid:

People often ask if they should use DOT 4 or 5 brake fluid. There is nothing wrong with sticking to DOT 4 brake fluid. Its boiling point is plenty high for any modification that you have read about here. However, do not mix DOT 4 and 5 together. DOT 4 is a glycol-based oil and DOT 5 is silicone based. If mixed, your brake will start to feel mushy and less powerful. DOT 5.1 is glycol based and can be added to DOT 4 if necessary, but it is also wise to flush your brake fluid out completely before adding anything different.

On The Track: No performance difference was felt on the track with DOT 4 or 5 brake fluid, but the lever can feel less spongey when going to fresh fluid.

Brake Pads:

Many companies offer the option of brake pads made with different types of material to alter the response and power of the pads’ feel.

On The Track: After some time riding on rotor-kit-specific brake pads and using stock OEM pads, I say stock pads usually wear more consistently (longer) and have a less grabby feel than most aftermarket pads. Some sintered pads were as powerful as OEM, but nothing proved to be any better than a standard OEM brake pads. We experienced more noise (squeak) on some rotor-kit-specific pads when dragging the brakes, more so than OEM pads. Riders who are known to be brake draggers preferred sintered pads, as heat buildup wasn't quite as bad as OEM pads that were not sintered.

What Do I Think?

All of these mods above will help your stopping power, but it is how you want that stopping power delivered that should guide you on which of these mods you make to your machine. If you feel like you have enough braking power, then by no means do you “need” any of this stuff, but if you would like to stop quicker and maybe be able to dive into a corner harder, one of these mods could be advantage. I normally will not do all of these mods together, as I normally would stick to one or two of these per machine at most.

Raptor Titanium Offset Footpegs (Yamaha YZ250F/450F)

If you’re a Yamaha guy, chances are you may be looking to get your cockpit a little more roomy right? The Yamaha YZ450/250F needs a better rider triangle in stock form so I scoured the internet to see if I could find a way to improve it. A lot of factory motocross teams run Raptor Footpegs and up until recently I didn’t even know they made custom offset pegs for current motocross machines. I discovered that Raptor Titanium makes two separate custom offset pegs that are 10mm back as well as 7mm down and weigh in at 300 grams per set. I ordered up both to see if it could help my cockpit woes.

IMG_4150.jpeg

Raptor Titanium is located in the UK and make these custom offset pegs to order, so there is some lead time on each order. I ordered my two sets and got them in approximately 25 days, which I was just fine with. Raptor pegs are developed in collaboration with OEM manufacturers and factory motocross/supercross teams, offer superior strength, crafted by British engineers using hand-fabricated, aerospace-grade 6Al-4V titanium and the latest manufacturing techniques to produce some of the most cleanest welds I have seen, they are CNC-machined back-end for precision fit, are ultra light-weight at only 300g per set (including springs), have razor-sharp teeth, a wider 24-tooth platform offering a greater surface area and come with a set of stainless springs. 

The Raptor pegs are works of art and are very light when holding them compared to the stock pegs. Installation was fairly painless, but you will notice that the Raptor pegs will slightly have an upward bend to them unlike the stock pegs which sit fairly flat. I thought the slightly upward bend would bother me, but it actually keeps the ends of the pegs from dragging up faces of jumps or from digging into the ruts as much as the stock pegs (even with the different offsets). I decided on the RX003 design which has a middle bar/cleat (with teeth), but Raptor does have a peg that offers an open cleat design which really deters mud from packing in if you prefer that route. The teeth are super sharp and offer a superb standing platform and make it easier to feel more confident when standing on the balls of your feet. Sometimes with stock pegs, the teeth aren’t sharp enough for you to ride on your toes and you will slip off the peg easier. The Raptor pegs invite you to ride on your toes/balls of your feet more and offer you the security to get into the right foot position. Below are the two offsets that I tried from Raptor Titanium and how I felt about each position on a 2021 YZ450F. 

IMG_3479.jpg

10mm Back: 

I tried this position first and quite honestly was surprised that I didn’t like it more. The position of the peg put my knees in an awkward position when I was braking which upset my technique. I also felt that by putting the pegs 10mm back, it made shifting and braking a little more difficult to get to for my size 10 feet. I am 6’0 and I personally think going 5mm back would be a better fit for me and my stature. I do like the position when seated going through corners as it prevents my knees from getting too close to the handlebars or from smacking them with my knees. 

7mm Down:

This is was my favorite setting as it helped the cramped seated position of the stock pegs and allowed me to move around on the bike more freely because it allowed me to stand up easier without having to get too crouched. I also like that it didn't affect me when I scrubbed a jump or went through deep ruts. The 7mm down position still gave me enough ground clearance for both. Having the pegs 7mm down also gave me a more relaxed feel with the Pro Taper SX Race bar bend that I have on my bike and makes the dip in the stock seat not as apparent. If you’re 6’0 or over, I feel like a tall seat along with the 7mm down pegs could really change the way you feel on the Yamaha for the better. 

Overall:

Yes, these are pricey, but if you’re looking for a more comfy feeling out of your Yamaha then going with one of these Raptor Peg options are a god send! There are only a couple companies that make offset pegs for the Yamaha, but the Raptor pegs seem to have the most quality out of the bunch. If it was any other bike than the Yamaha, I wouldn’t spend $300.00 American dollars for a set of footpads, but the Yamaha really needs this mod to help my tall lanky ass feel more comfortable when I am riding. To me it’s spendy buy, but necessary if you’re needing some cockpit help. Head over to www.raptortitanium.com to see more and place an order.

Since these are pricey, if you have any questions, please feel free to email me at kris@keeferinctesting.com

Akrapovic Evolution Muffler (2021 Yamaha YZ450F)

The Akrapovic Evolution muffler system is one of the most beautiful looking systems out there in the market today, is well built, and has quality welds all the way around it. Once hot, the titanium color of the headpipe is the most dynamic blue you will ever see from any muffler manufacturer, which just makes you feel that much more factory on the starting line right? The Akrapovic Evolution titanium muffler system is 1.5 pounds lighter than the stock YZ450F system and tucks under the right side panel much cleaner than other systems that are on the market. When putting on the system, make sure to leave the headpipe loose and then connect the mid pipe, so that the slip fit joint slides in easily. Once those two pieces are connected, tighten the headpipe bolts and mid pipe bolt just snug. The Akrapovic uses your existing stock heat shields or you can purchase carbon heat shields separately. The Evolution muffler uses an aluminum spacer in the rear hole to give the muffler enough clearance (from the brake caliper) once the suspension is fully collapsed. This system is one of the easiest to install and I have been putting a ton of systems on this blue bike lately. I did notice that there is a small screen deep inside the core of the muffler, however I was told that this isn't a spark arrestor, but a noise insert. Note: Leave the insert in, as the muffler performs better with insert in and is much pleasant to the ear. Once rear section (muffler) was installed, I went around and tightened up the remaining bolts. Doing it this way ensures there is absolutely no binding going on between each slip fit joint. 

IMG_8290-2-2.jpg

Out on the track the Akrapovic Evolution muffler has a deeper sound and is much quieter than the stock system. I started the test with the “TP 3.0 and stock” maps installed inside the 2021 YZ450F (if you don’t know what the TP 3.0 map is, email me at kris@keeferinctesting.com). Roll on power delivery was smoother than stock out of corners (with either map) with the Akrapovic, compared to the stock system. I have grown to love the smoother roll on power that the Evolution system delivers as it really helps me roll my corners better without getting the chassis upset. The connectivity of the Akrapovic muffler is second to none as you will notice more rear wheel connection under heavy throttle. 

The Akrapovic system really comes to life once out of corners as the Yamaha now starts pulling harder and longer than the stock system down straights. Second and third gears can be stretched longer by the rider with the Evolution system and rolling third gear in corners is slightly easier on the rider as well (with stock gearing). Over-rev is better through each gear with the Akrapovic and the overall engine feels like it revs a little quicker/freer. The freer feel takes away some engine braking sensation on de-cel and also helps the Yamaha handle slightly better coming into corners. Yes! All from a muffler! 

IMG_8285-2-2.jpg

In conclusion, I feel the Akrapovic Evolution muffler system is an excellent system once you can dial in your favorite desired Yamaha Power Tuner App setting. You will not be getting more bottom end than a stock system, but the gains through the mid-top end are a noticeable difference. It will be up to you if that difference is worth the $1300.00 you will spend on the Evolution titanium system. Akrapovic’s website is a very informative, clean, and one of the best aftermarket muffler websites to browse around on if you have the time. There are dyno charts, a sound tool that lets you compare the stock system to Akrapovic’s muffler pitch, documents of replaceable parts, and technical data about the system itself. You can head over to akrapovic.com and punch in what bike you want to geek out on. I did, for a while!

keefer 2.JPG

Extra Credit: If you’re like me and still want more power yet even more connectivity, look at getting a Vortex ECU mapped by Chad at XPR Motorsports for this 2021 YZ450F. You might think that putting a Vortex on a YZ450F is over kill but what you're getting is a faster, yet easier to ride Yamaha that will allow you to ride it harder. Less on/off feel with this muffler system and the Vortex ECU. I have created a couple maps with Chad on this Vortex and along with this system has made this machine easier to ride. I have let other R&D test riders ride my test bike with these two mods on and they were blown away.

Email me if you have any questions or concerns about this test kris@keeferinctesting.com. 

Zero Resistance Throttle

I am one to usually change my throttle tube out several times during the lifespan of my test machines. Plastic tubes wear out and it can get tough to pull the throttle after some use. I am not a huge fan of aluminum throttle tubes because they help throttle resistance minimally and usually give me a more rigid feeling through the right side of my bars. Yes, I am sensitive to rigidity and no not everyone will feel more rigidity when going to aluminum throttle tubes. I’ve had a ZRT Throttle in my possession for quite sometime, but have been hesitant to try it for a couple of reasons. Full disclosure, I dragged my ass on this test because you’re required to cut your handlebar down 1/2 inch on throttle side to compensate for the bearing and I am picky SOB when it comes to bars and like I mentioned previously it was an aluminum tube. I put my ego to the side and strapped on my clear minded testing brain and came away with these thoughts: 

IMG_2095.jpg

How does it work? Simply put, there are two radial ball bearings on each end of the tube. One located inside the throttle housing and one on the end of the handlebars. This gives the throttle assembly an ultra smooth action and a claimed longer lifespan. Unlike traditional plastic throttle tubes, the weight of the rider either pushing or pulling on the throttle will create some type of “friction”. The longer this goes on, the more the throttle and handle bars deteriorate and I have seen the right side of my bars look like slot car tracks in the past. Inserting two bearings within the throttle tube helps eliminate wear and friction, making your throttle assembly ultra smooth.

IMG_2097.jpg

So does it work? Yes, it does and sometimes too well! What I mean by “too well” is that it works so good that sometimes I get whiskey throttle when I get tired or have massive arm pump. This throttle is so smooth that it can be easy to grab a handful when sometimes you weren’t expecting to. However, once I got used to the buttery twist, my whiskey became less and less. This is by far the biggest difference I have felt from an aftermarket throttle tube. The fears I had of cutting my bars and getting a different feel quickly went away when I rode out on the track. The 1/2 inch of bar loss was made up by the ZRT and my 802mm of bar width remained the same. Oh and trust me, if it didn’t feel the same, I would have felt it. Now when I go back to other test bikes that don’t have the ZRT tube on, it feels stiffer and harder to pull. We have been running the ZRT tube on our Husqvarna FC450 machine for almost 30 hours and have done nothing to it. I like that it feels as good as when we put it on and we have done zero maintenance to it.  

Of course there is a downside and the downside is that it costs $179.95! Now to most this is outrageous right? But to some, this costly part is worth it. For example, I would want a ZRT if I owned a KTM/Husqvarna/Gas Gas. Why? I am not a lock on grip guy, so I would normally go straight to an aftermarket throttle tube and instead of purchasing a cheaper plastic tube or an aluminum throttle, I would spend the money to get the ZRT. If you plan on keeping your bike for a few years or even if you get a new bike every year (albeit the same brand) this throttle tube is worth the cost. You can order your Zero Resistance Throttle at zrtthrottle.com. Any questions email me at kris@keeferinctesting.com

Tire Pressure Settings Bible

Riding several tires as well as compounds over the years, I decided to write some of the optimal tire pressures that I felt worked the best in a variety of conditions. Here are five major brands and their pressures, that I thought could be some benefit to you. If you're wondering what PSI to run in your new tires, look no further than the tire pressure bible below. Yes, you will see that some soft terrain tires are still categorized under the “Intermediate/hard Terrain”. That is because some soft terrain tires have an optimal feel in intermediate conditions. These tire settings are for: 80/100-21, 120/80-19, 110/90-19, 100/90-19, 120/90-19.

IMG_8002.JPG

Pirelli:

Soft Terrain:

MX32 Mid Soft Front/Rear: 13.5/14 PSI

MX 32 Mid Hard Front/Rear: 13.5/13 PSI

Intermediate/Hard Terrain:

MX32 Mid Soft Front/Rear: 14/14 PSI

MX 32 Mid Hard Front/Rear: 13.5/13 PSI

IMG_3200.JPG

Dunlop:

Soft Terrain:

MX 33 Front/Rear: 12.5/12.5 PSI

MX53 Front/Rear: 13/13.5 PSI

MX3S Front: 13.5 PSI


Intermediate/Hard Terrain:

MX 33 Front/Rear: 12.5/12.5 PSI

MX53 Front/Rear: 13/13.5 PSI

MX3S Front: 13.5 PSI

Bridgestone: 

Soft Terrain:

X20 Front/Rear: 13/12.5 PSI

X30 Front/Rear: 13/12.5 PSI

Intermediate/Hard Terrain:

X20 Front/Rear: 13/12.5 PSI

X30 Front/Rear: 13/12.5 PSI


Michelin:

Soft Terrain:

Starcross 5 Soft Front/Rear: 13.5/13 PSI

Starcross 5 Medium  Front/Rear: 13.5/13 PSI

Intermediate/Hard Terrain:

Starcross 5 Soft Front/Rear: 13.5-14/13.5 PSI

Starcross 5 Medium  Front/Rear: 13.5/13 PSI

image3-4.jpeg

Hoosier: 

Soft Terrain:

MX25S Front/Rear: 13/14 PSI

MX30 Front/Rear: 13/13.5 PSI 

Intermediate/Hard Terrain:

MX25S Front/Rear: 14/14 PSI

MX30 Front/Rear: 14/13.5 PSI 


Vortex Ignition For 2020 YZ450F

The Yamaha YZ450F comes with the Yamaha Power Tuner App that allows you to change the parameters of the bLU cRU’s ECU settings. It allows the consumer to customize their YZ450F power delivery, so that they can enjoy a more friendly power character or a more aggressive type of delivery. While this system works very well for the average consumer what about the rest of us that may want to tune their YZ450F even further? What about having an ECU that has wider parameters and an ECU that can give you more horsepower, but make it rideable as well? Can we make our YZ450F even better with an aftermarket ECU? Is there a big enough difference in power delivery that it warrants spending an extra grand on an electrical part? I wanted to find these questions out, so I called upon Chad at XPR Motorsports to see if he could map a Vortex ignition for my 2020 YZ450F in order to see if it wold actually make it that much better. 

IMG_8422.jpg

Unlike a KTM 450 SX-F it is very difficult to improve upon the Yamaha’s engine character. The YZ450F is the best production motocross machine made at this moment, so the gains are tougher to get through the aftermarket unlike the orange model. With a KTM I can slap on a Vortex ECU and immediately notice a huge difference in power as well as traction. However, I have been playing with the Vortex ECU on the Yamaha YZ450F for almost a year now and found out that it’s not that easy to make the Yamaha’s engine “better”. Chad at XPR Motorsports is one of only two people in Southern California that I would trust to help me with ECU testing (the other being Jamie at Twisted Development). I told Chad that I don’t necessarily want “more power” from the YZ450F, but I wanted more rear wheel traction with a broader, longer power (similar to a KTM 450 SX-F power spread). I can roll my corners really well on a KTM because it is so damn smooth off the bottom and I wanted to see if we could get some of that character on ol blue here.  

I am not going to sit here and tell you that getting a map that actually made me happy was easy because I think I gave Chad a headache more than once while doing this test. However once we honed in on what I was looking for, it was something that the stock Yamaha Power Tuner simply couldn’t do. With the help of XPR’s mapping and the desired power that I was looking for, I now had an easier to corner Yamaha YZ450F, with more traction out of area 3 (end of corner), as well as a broader/longer overall top end/over-rev. 

I wanted to keep the third gear lugability, but also make second gear more usable so I could make shifts later once exiting corners. This wasn't easy to achieve as Chad and I quickly found out. I got a longer second gear, but was losing some of that easy to ride third gear lugability because the engine was much freer feeling with the Vortex ECU. With a lighter engine feel you get less de-cel pitching, which is great because the chassis stays calmer, feels more exciting, has better recovery, but you also get less chugability when lugging your engine. Chad went went back to the drawing board and gave me another map that split the difference for me and made me really happy. I now had most of that third gear roll on lugging power, but still retained that free feeling engine feel that I loved when the track got rough. Having less engine braking on the YZ450F really helps this chassis stay calm when diving deep into corners with large bumps. 

IMG_8290-3.JPG

I like that the Yamaha YZ450F is easier to start as well as fires up sooner with the Vortex on, so having this ECU on could really benefit a dead engine type of off road rider. With the XPR mapped Vortex, the mapping seems crisper/cleaner and never had a de-cel pop that I sometimes experienced with the TP 3.0 map. We mapped the Yamaha to a Pro Circuit exhaust and originally started with VP Pro 6 fuel, but that was simply too much power down low for me, so creating a map for VP T4/pump fuel made the Yamaha engine much more manageable in hard pack situations. 

The bad news about going to the Vortex ECU is that you lose all of your Power Tuner functions like the maintenance schedule, running time, etc. The Vortex comes with 10 pre-programmed maps as well as three fuel trim knobs that can help with your “Lo”, “Mid” and “High” rpm ranges. This is not an inexpensive mod, but it can help broaden the Yamaha’s power, make the hit more seamless down low as well as help the chassis when pushing the machine when the track gets rough. 

Is the stock ECU good? Yes! If you feel like the stock ECU/Power Tuner App has enough parameters and you’re happy, you DO NOT need an aftermarket ECU like this. 

Do I feel as though the Vortex ECU makes as big of a difference on the Yamaha like it does on the KTM 450 SX-F?  No, I don’t. The Vortex ECU on the Yamaha helps make it easier to ride, but Yamaha R&D did such a great job with their mapping that it may be hard for less picky riders really notice. KTM’s stock ECU mapping is not nearly as good off the show room floor, so the difference from going to a stock ECU to a Vortex on a KTM is noticeable by a wider range of riders.  

Who is this Vortex ECU for? This specific ECU on the Yamaha is for riders who love the stock engine character, but want a little more control off the bottom and more pulling power from second and third gears. Oh and how could I forget that this is not a cheap mod (at around a $1000.00), so you might have some coin saved up in your bank. 

Would I purchase this mod myself? Yes, but I am the type of guy who still likes to be competitive at the ripe old age of 42, likes to have a linear, longer power delivery and loves to tinker with stuff. If you’re like me this mod will make you smile. 

Conclusion: Overall I am happier with the Vortex ECU on the 2020 YZ450F because the bike has more controlled power and it makes it less work for me to ride harder. The downside is coming up with the 1K to purchase it! Guess I will be impatiently waiting on my stimulus.

Contact: Chad @ XPR Performance (951) 813 8873


2020 Honda CRF450R Three Way Muffler System Comparison

The 2020 Honda CRF450R is a popular machine. After all of my years with Dirt Rider Magazine as well as doing my own thing over here at Keefer Inc. Testing there has been one thing that hasn't changed… The amount of page views and questions that I get about the Honda are always more than any other color! As a test rider, I like the Honda CRF450R because it’s one of the most difficult bikes to set up for a wide variety of tracks, so that keeps me trying different products and thinking of ways to try and make it better. As a consumer or a local racer, the 2020 Honda CRF450R can drive you nuts at times right? It’s super fun to ride, but sometimes can be a handful at certain types of tracks.

In this article I am going to test the Yoshimura RS-9T, FMF 4.1 RCT, Akrapovic Evolution titanium muffler systems for the 2020 Honda CRF450R and give you some feedback on each one’s engine delivery character. I picked these three muffler systems because they have been one of the best three that I have tried on this particular machine. This isn't a shootout as much as what each system can bring to the table. These three muffler systems have similar characters in some areas of the powerband, but also have enough differences in which you can make a decision based on what type of power you want from your Honda.

Fun Fact: I tested these mufflers on the 2020 Honda CRF450R as well as the 2020 Honda CRF450RWE just to see if the ported head, that the RWE comes with, would change the way each muffler delivered its power. After going back and forth on each machine, the character of each muffler system was the same on the stock cylinder head as it was on the hand ported Works Edition head. The description/results below is accurate for both machines.

IMG_0280.jpg

FMF 4.1 RCT Muffler System:

The FMF 4.1 muffler system has more bottom end and throttle response than the other two muffler systems in this class. The Honda doesn't necessarily need more bottom end, but the way the FMF system delivers its power can give the rider some added freedom when trying to ride third gear through corners. The bottom end comes on strong and the Honda keeps its exciting, crisp RPM response feeling, but lets you run third gear through corners more than the stock, Yoshimura and Akrapovic muffler systems can. Using second with the FMF system almost makes the Honda a little too much too handle (on roll on) through very tight corners. When going to the FMF 4.1 system I reverted back to map 2 (mellow map) instead of map 1 (standard map) and ran 14/52 gearing. By using map one and going to this gearing ratio, it helped calm the Honda’s chassis down in second gear a little, but still kept its fun natured, snappy engine character. Mid range is broader and pulls farther than the stock muffler, but isn't as good as the Yoshimura system in this area. Up on top end the FMF system almost mimics the Yosh in pulling power feeling on the track with maybe slightly less over-rev than the Yosh system. What I like about the FMF muffler system is that it allows the rider to ride a gear higher in some areas of the track and rewards riders that like to lug their bikes more. The Honda in stock form is not the best lugging machine, but with the FMF system it gives the red bike more of a lazy man’s type of feel by allowing me to use third gear more. The FMF system is louder than the Yoshimura or Akrapovic systems by quite a bit even with the inserts in, but keeps that racey deeper sound. 

The good news is that the muffler packing has lasted longer than I expected. We are over the 12 hour mark on the 4.1’s and they still sound good. I used to get only 8-10 hours on other single FMF muffler systems, but these duals have proved to be more durable. 

IMG_7808.jpg

Yoshimura RS-9 Muffler System With Works Edition Headpipe: 

Once installed and on the track the Honda’s exhaust note turned from high pitch 250F’esq to a deep throaty more traditional 450 factory race bike sound. The crack of the throttle (or RPM response) is slightly smoother and less crisp than the stock or FMF systems, but to me this is a good thing for the Honda chassis. Rolling out of corners, while in second gear, the Honda feels like it has more traction than the FMF and was more controllable while accelerating out of hard pack corners. The slightly smoother RPM response takes away the Honda’s excitement feel ever so slightly, but helps you gain a little more control coming out of corners. The mid range pull is healthier than stock, but with the Yoshimura system you will not be able to pull third gear through tight corners as well as you can with the FMF system. The Yoshimura system is very controlled and has more mid range torque than any other muffler in this test. Even though the Yoshimura system doesn't have that bottom end throttle response like the FMF system the recovery is still very good. With just the flick of the clutch lever (in third gear) the Honda will be in the meat of the power once again and you will be down the straight in a hurry. I noticed top end and over-rev was as good as stock (which is great), but not as good as the Akrapovic. To me the Yoshimura system is like the YZ450F of the muffler world. It does everything “pretty well” and gives you more rear wheel consistency that the Honda needs. You could tell Yoshimura was focused on smoothing out the bottom to mid-range pulling power when they designed this muffler system and they succeeded in doing so. It is also impressive that they didn’t lose any top end/over-rev in the process and gain a little more control.

The muffler packing that the Yoshimura RS-9 mufflers come with is superb and will last you longer than any other packing in this group. Yoshimura also offers the customer refurbishing, just in case you don’t want to DIY. The stickers on the mufflers themselves also last longer and will not turn color as fast as the others in this group.  

IMG_7428-2.JPG

Akrapovic Evolution Muffler System:

Once I swapped to the Akrapovic Evolution muffler system, I could immediately tell this system helped the Honda chassis calm down the most. The Evolution system lets the Honda’s engine roll on smoother at low RPM’s and that smoother feel helps the rear wheel connection as well as provides less pitching (off throttle) than any other system in this test. AKA MORE COMFORT!!! The Honda CRF450R now builds a smoother roll delivery and a pulling power that is longer through the mid range than the FMF or Yoshimura. This type of character can allow you to use second gear in corners more because that second gear hit is not as abrupt or quick, so that doesn't upset your technique or the chassis. The Akrapovic also allows the rider to shift later out of corners and that means second gear is more usable with its increased over-rev capabilities . Pulling power up top is increased slightly as your shifting points can be altered now because of the longer pull in each gear. I ran the 14/52 gearing with this muffler system but decided on going back to the stock 13/49 gearing in order t get some mid range recovery back. The Akrapovic doesn't have the the bottom or mid range throttle response like the FMF or Yoshimura systems so this can give the Honda a slightly heavier feel on tighter tracks. The Honda has so much power to work with that a little less “hit” as well as “recovery” can actually help on faster/flowier tracks, but can also make it slightly heavier feeling than the other two mufflers when moving the Honda side to side. I really like that the Akrapovic system relaxes the engine as well off throttle and provides the CRF450R with less engine braking. This really comes into play on tracks with hard pack chop and small de-cel bumps.

The sound/pitch of the Akrapovic is ridiculously quiet when on the track and will almost give you that MXGP sound and feel. It still has that racey, crisp sound on higher rpm’s, but just not that raspy high pitch tone of the stock muffler. I preferred the quiet inserts left in because it created more back pressure and gave me more traction at the rear wheel (out of corners) in all three engine modes. I was normally a map two guy with the stock muffler, but with the Akrapovic installed I am now a map one guy all day long because of the added rear wheel/friendlier connection. The muffler packing has proved to be durable but the stickers on the mufflers turn color quickly and get blown off.

Overall: I always let people know if you have no problems with your stock muffler system and like the way your Honda runs then by all accounts you can disregard this test. Just because I test something here doesn’t mean you absolutely 100% NEED it! If you’re in the market for a muffler system, have some extra money and want to know which direction to go then study up! If you want to alter or change your Honda’s engine character slightly, this test can help you decide on which direction you want to go. To me all of these systems in this test are better than the stock system because it helps the Honda’s chassis in one way or the other and offer spark arrestor inserts for the off-road guy. The Honda doesn't need more power as much as it needs a broader more forgiving connection to the rear wheel. These systems help the Honda in this area. 
Breaking The Systems Down:

Bottom End: FMF

Mid Range: Yoshimura 

Top End: Akrapovic

Over-Rev: Akrapovic

Low RPM Response: FMF

Mid RPM Response: FMF

Top RPM Response: Yoshimura

Controllability/Connection: Akrapovic

Weight: 

FMF: 8.5 lbs.

Yoshimura: 8.4 lbs.

Akrapovic: 8.4 lbs.

Sound/DB:

FMF: 121.1 DB

Yoshimura: 116.8 DB

Akrapovic: 116.1 DB

Pricing: 

FMF: $1499.99 www.fmfracing.com 

Yoshimura: $1499.99 www.yoshimura-rd.com 

Akrapovic: $1549.99 www.akrapovic.com 

If you have any questions about this test, please feel free to email me at kris@keeferinctesting.com. I am here to help if needed!


WP XACT Pro Components Real World Review

When deciding to spend a few thousand extra dollars on suspension for your ten thousand dollar KTM/Husqvarna, you want to know if it’s going to make a difference immediately. Is it going to make me a better rider? Will I be able to ride faster with it? Do the WP’s XACT Pro Components that much better than stock? These are a few of the questions I get when the consumer is trying to make a decision on getting a set of WP XACT Pro Components. I have pounded hundreds of laps and a ton of hours on the stock WP AER fork/shock as well as the XACT Pro Components (on the 2020 KTM 450 SX-F and Husqvarna FC450) to see if it’s worth the risk of your wife losing her mind when she sees the charge on the bank statement. 

GF vet-7.jpg

What Are WP XACT Pro Components and what are the differences between older WP Cone Valve/Trax components? 

WP's Pro Components line is aftermarket suspension designed for riders who want the highest quality components and are willing to pay a reasonable amount of money for them. Pro Components are manufactured to tight tolerances using high quality materials, fine surface finishes, and low-friction coatings. This reduces friction compared to WP’s OEM suspension components, and is perhaps their most significant advantage. In fact, to achieve a similar feeling of stiffness to the OEM suspension, all Pro Components required much stiffer damping. The additional stiction in the OEM components is all due to friction. Friction is perhaps the one thing in suspension where no compromise is involved: less friction is always better. When setup appropriately for the rider, Pro Components can deliver high confidence at high speeds.

The Xact Pro fork is the next evolution in "Cone Valve" technology. It retains the same Cone Valve technology and is available in three basic variants: closed cartridge with coil springs, closed cartridge with air spring, and open cartridge with coil springs. The Cone Valve itself is nothing too extraordinary as it's simply a shimless mid-valve. The cup-in-cone valve actuates via a coil spring, providing the variable orifice function that shims normally handle. The Cone Valve spring rate is linear, unlike shims which are more progressive. Also unlike shims, it does not have a maximum safe deflection distance. It can be setup stiffer and with less float than a shimmed valve without getting too much of a rigid handling ride.

The Xact Pro shock features an updated version of the Trax mechanism used in previous Trax shocks. WP’s Trax system is created to reduce rebound damping when the rear wheel is off the ground, helping get the tire back to traction as quickly as possible. The Trax system is now externally adjustable with a screwdriver, which makes the Trax function much easier to use and understand. The shock uses the same high-end construction as the Xact Pro fork and as a result, it sees a similar reduction in friction compared to OEM shock. It uses a nitrogen bladder instead of a piston separator, which has lower friction, but can require more frequent services compared to WP’s traditional piston separator setup. As with past Trax shocks, it separates high-speed compression and low-speed compression into two separate adjusters instead of one dual compression control (DCC) adjuster. The Trax shock shaft includes a rebound separator valve, which isolates compression and rebound adjustments, and increases low speed compression damping at the mid-valve (which can aid in pressure balance)

 WP’s XACT Pro Components are usually found on all of my KTM’s and Husqvarna’s I race with. Why? I get more consistency and performance out of the XACT Pro Components than that of the stock AER fork/stock WP shock. I tested the stock suspension settings on the 2020 KTM 450 SX-F back to back with the WP Pro Components and came away with this opinion: 

IMG_5973-2.JPG

On The Track:

The first thing I noticed when I go out onto any type of track with the XACT fork is that the KTM turns slightly slower than the AER fork on initial lean (into corners), which is exactly what out of the KTM. The KTM does have a slightly rigid feel to it and can be a handful when riding fast, choppy tracks. You can actually feel the extra weight right away (in the front end) compared to the stock AER fork, but it wasn't a bad feeling. I was just surprised I could feel it as much when entering corners. Usually I run the fork flush on previous Cone Valve forks, but with the slower turn in feel and a the longer length of the new style XACT fork I went with a 5mm height. Along with the extra weight feeling however I gained more front end traction through every corner (especially flat corners). The XACT fork leaves you with a more front tire contact patch sensation on lean angle and you can start your lean earlier in ruts without getting the high front end, vague feeling like you do with the AER fork. With the AER fork I get some pushing in the front end through the middle to end of corners, which made makes me roll off the throttle to try and compensate. With the XACT fork I can lean in the corner and the fork stays planted, which lets my front end settle and bite. The WP XACT fork also feels less active on braking bumps. I am able to jump in and out of bigger bumps that each track I tested at offered, without having the fork rebound too quick and be too active. If I wanted to pound through the bumps, the fork had better damping control feeling through the middle to end part of the stroke. 

IMG_5994.jpg

The most notable change was to my wrists when over jumping/flat landing with the XACT fork. I could get more aggressive with obstacles and have the bike settle into corners better in areas of the track I wasn't able to with the stock suspension. The downside to the XACT fork is that it can make the KTM feel like it has less flex up near the head tube area. This feeling is not as rigid as a Honda CRF450R, but it does give you a firmer feel through your hands on small bumps, compared to the AER fork. The key to the WP XACT fork is getting it set up for you. WP does a great job of getting you the XACT fork with a “ballpark” setting, but going through an authorized dealer that can set it up for your personal needs is the best way to ensure your investment works the best. I tested the XACT fork with their customer setting and although it was better than stock, I could have used a little more hold up on hard braking or when their was deeper braking bumps.

IMG_6017.jpg

The XACT shock holds up better than the stock shock for me on high speed compression and you are able to get more aggressive around the track. I can hit the faces of jumps harder and the KTM did not give me an empty/low feeling sensation that the stock shock sometimes gave me. In order to combat that feeling with the stock shock I would have to crank in the high speed compression so much that I would lose the comfort coming out of corners (and rear wheel traction). The XACT Pro shock provides you with more high-speed damping and you still get a decent amount of acceleration comfort on choppy corner exits. I also noticed a little more connectivity to the the rear wheel (when hard on the gas) on flat corners with the XACT Pro shock compared to the stock shock. The XACT Pro shock is firmer so there is less wallow in the rear end when accelerating, so the rear of the KTM 450 SX-F tracks straighter and doesn't upset the KTM’s chassis as much at speed. “Balanced” is a great word to describe both ends of the KTM, but I did notice the harder I pushed the more it rewarded me. If I tried to ride smoother/slower, the action of the shock wasn't quite as comfortable as the stock shock. This XACT Pro likes to be pushed and will reward the rider that is aggressive because of its much more consistent nature (compared to the stock shock). Again, going to a WP authorized dealer and having it set up for you is key. Thinking that you’re just going to go purchase A-Kit level suspension, slap it on, and then magically be in heaven on the track is completely foolish! Get it set up for your weight, riding ability, and the type of rider you are will ensure that your money is spent correctly. 

Conclusion:

Do you “need” these WP Pro Components on your machine? If you’re a casual rider, of course not. However if you’re a KTM/Husqvarna rider and race consistently, I think the WP Pro Components are worth the price. For around $3499.00 for the fork and $2199.00 for the shock it’s an investment that you should take seriously. If it was me, had one bike, was on either a KTM or Husqvarna, I would invest in a set of WP Pro Components because when I ride/race, I want the most consistent feel I can get. I also know that if you are the type of rider that gets a new KTM/Husqvarna every couple years, you’re able to roll these WP Pro Components over to your new bike. This is an investment that you can continue to roll over with each passing model year. I think it’s safe to say that KTM or Husqvarna will not change their motocross models until the year 2022, so your WP Pro Components will fit at least until then. Even if KTM/Husqvarna change their machines drastically, chances are these newer WP Pro Components will bolt on. 

IMG_6510.jpg

FAQ: 

“Keefer, have you tried a set of standard re-valved WP AER forks and shock”? The answer is yes and although the comfort was improved (over the standard/stock set of suspension), the consistency just wasn't as good as the WP Pro Components. I would say that a set of stock re-valved stuff will definitely be good for your local racer that simply can’t afford new Pro Components. Companies like Race Tech, Kreft, and Enzo all have very good re-valved stock suspension settings. 

E7734C7C-E581-4535-88DB-BE07658EB09E.JPG

“Keefer, is there something I can do about the rigidity I am gaining with the WP XACT Pro Component fork”? Yes, going to a WP/KTM Factory Triple Clamp will help with some of the rigidity that the stock clamps come with. Also, you can go to a bottom triple clamp torque spec of 9N/m. Both will help with comfort on braking bumps, slap downs, as well as get you less rigidity feel through your handlebars. 

If you have any questions about this test, feel free to email me at kris@keeferinctesting.com 


Wrench Rabbit Yamaha YZ125 Engine Rebuild Kit

By Michael Allen:

Although one of the main perks or being a part of Keefer Inc. Testing is getting to ride the latest and greatest bikes, there are times when you need to have your own bike. I needed my own bike because I was going to race the Los Ancianos Tecate Enduro that is run in Mexico and I needed to be able to show proof of registration. After a lot of looking around I found the perfect bike, a somewhat abused 2006 YZ 125. I raced it for two years in Mexico and would randomly ride it here and there when I wanted to feel like I was going fast. Here is where the embarrassing part comes in, this last winter we had an abnormal amount of rain in California, which was great, but I was admittedly a little lazy in the maintenance department.  I figured “it’s wet, how dirty could my air filter be getting”? Well after not checking my air filter for about three rides, my $1,800 Yamaha YZ125 decided to come to a quick stop in the middle of a snowy trail ride. As I was on the pipe climbing a sandy canyon the wheel locked up and I came to a skidding stop. I luckily was within pushing/coasting distance back to the truck, but when I got there and pulled the seat off, I immediately knew what happened and felt really stupid. You see when I got the bike I did the current plastic re-style kit from Polisport and when I re-installed the air box, apparently I didn’t do a good job with the hose clamp (that holds the air filter cage onto the air box). To my surprise my air filter and cage was just sitting in the bottom of the air box and I had been sucking dirt into the engine for who knows how long. Fail!  

IMG_6381.jpg

Needless to say when I tore the engine down there was grit everywhere from top to bottom. I knew if I wanted to do it right the whole engine would need to be rebuilt, but I also knew that replacing bearings, seals, gaskets, a top end, and crank with OEM parts would cost more than I purchased the bike for. After talking to Kris he mentioned that Wrench Rabbit sells complete engine rebuild kits and from what he remembered they weren’t all that expensive. After that conversation with Kris, I reached out to them and got the ball rolling on rebuilding my little 125. 

IMG_6730-2.jpg

The Wrench Rabbit kit (Part Number WR101-081) really does come with EVERY bearing, seal, and gasket you need to do a complete rebuild on your bike. To be completely honest I had done a bunch of top ends on previous two-strokes, but this was my first time splitting cases and doing my own rebuild. I took it slow and really tried to do good job of keeping everything organized when I took it apart. Upon disassembly it was then that I realized that it wasn’t as scary as I imagined it would be. When the engine was torn down I found that my issues were a scored piston (luckily the cylinder wasn’t bad enough that it needed to be re-plated or replaced), a blown out rod bearing, and main bearings that were ready to come apart at any time. The Wrench Rabbit kit comes with a brand new crank/rod from Hot Rods already assembled as well as new main bearings to go with it. In the past I had been scared to use aftermarket engine parts, but the quality of the Wrench Rabbit parts were very impressive and every part fit just as good as the factory parts that came out of the bike. 

IMG_7066.jpg

As I buttoned up the cases and slid the cylinder onto the new Vertex piston I was pretty excited to get my 125 running after looking at it sit in the garage for the past five months. I slapped the engine back into the frame at about 11pm and was so excited to get it running I ran to the gas station that night to mix some gas and wake up my neighbors. The child like smile on my 32 year old face said it all when it came to life on the third kick and I was able to take it down the street for an initial heat cycle a midnight. After a few more heat cycles I was able to moto down and I’m happy to report that my 125 runs better than ever. In fact, the rebuild is done just in time for me to head back down to Mexico in about a month for more trails, tacos, and beer. 

IMG_6739.jpg

I learned three main things from this whole process… The first lesson is to never be lazy about maintenance, no matter how well you think you know your bike. The second is to not be scared to do your own bike work, even if you have never done it before. With an OEM Owner’s Manual and a proper set off tools, you are more capable than you may think. I did go out and buy a Motion Pro case splitter (Part # 08-0605), a Motion Pro flywheel puller (Part # 08-0026), Motion Pro bearing driver set (Part # 08-0551), and some Yamabond Liquid Gasket (Part # ACC-BOND4-MC-00) to make the rebuild a little easier  The third and most important is to not shy away from quality aftermarket parts. After adding it up, I saved over $350.00 by using Wrench Rabbit parts. OEM parts are great, if you can afford it, but finding quality aftermarket parts are like riding a unicorn and by the looks and sound of my YZ125, I have found Pegasus. With all the parts supplied, the Wrench Rabbit kit only set me back $514.95. Reason #158 why I love two-strokes! So if you have either a worn out engine (no matter two or four stroke), or in my case are an idiot and blew your bike up because of negligence, give Wrench Rabbit a try, you won’t be disappointed. Also keep in mind that Wrench rabbit doesn’t just have kits for engines, in fact they offer replacement parts for all facets of rebuilding a motorcycle.  You can email me if you’re interested in ordering some parts and getting the Keefer Inc. discount. michael@keeferinctesting.com.

image1-4.jpeg

OR YOU CAN CLICK ON www.wrenchrabbit.com TO SEE WHAT PARTS YOU MAY NEED.


Yamaha YZ125 Wrenh Rabbit Kit Part Number WR101-081 ($514.95) includes-

  • Vertex piston kit (standard compression piston, rings, pin and clips).

    • Premium quality Vertex piston.

    • Complete set of nitride coated or chrome-plated piston rings.

    • Fully case-hardened wrist pin.

    • Circlips.

  • Hot Rods heavy-duty crank (stock stroke - includes wrist pin bearing for two strokes).

    • Factory assembled and trued to O.E.M. specifications, Hot Rods cranks will meet or surpass the O.E.M. in performance and durability.

  • Hot Rods main bearing / seal kit.

    • Like other Hot Rods products, these main bearing and seal kits are built to the highest quality standards that meet or exceed those of the O.E.M.

  • Hot Rods transmission bearing kit (includes transmission bearings, output shaft collar and sprocket lock washer).

    • A must-have for any new transmission or engine case installation or repair.

    • Includes trusted Hot Rods bearings for the primary and secondary shafts of the transmission.

    • Also includes the special needle bearing for the shift drum and the output shaft collar and washer (where applicable).

  • Hot Rods counter balancer bearing kit.

    • A must-have for any new counter balancer or engine case installation or repair.

    • Includes trusted Hot Rods bearings for the counter balancer shaft of most modern 4-stroke engines (where applicable).

  • Hot Rods water pump bearing and seal kit.

    • Hot Rods water pump repair kit includes water pump cover gasket or O-ring, water pump shaft bearing(s), and seal(s) to repair a leaking water pump seal and/or a failed bearing.

    • Precision micro-bearings provide O.E. quality and durability.

    • High pressure / temperature mechanical and rubber seals.

  • Hot Cams cam chain.

    • Replacement cam chain.

    • Meets or exceeds O.E.M. specifications.

  • Vertex complete gasket kit, including seals and O-ring kit (covers top and bottom).

Tools For The Job: 

  • Motion Pro Case splitter Part # 08-0605

  • Motion Pro Flywheel puller Part # 08-0026

  • Motion Pro Bearing driver kit Part # 08-0551

  • Yamabond gasket maker Part # ACC-BOND4-MC-00


YZ450F GYTR Tall Seat

Yamaha has an accessory division called GYTR and when it comes to accessories for your YZ they have tons to offer. I wasn't quite happy with the “pocket” feel that the stock 2020 YZ450F seat has to it once the foam is broken in, but managed to stumble across the Yamaha Accessories tall seat while out testing one day. I am usually not a fan of taller seats, but being that I wasn't completely happy with stock seat, I managed to steal one from the Yamaha R&D guys to try and came away actually impressed. The GYTR taller seat (part number BR9-F47C0-V0-00) is 3/4 inch taller through the middle of the seat and comes complete with seat base, foam, and gripper seat cover. 

IMG_5497.jpg

Once the stock YZ450F foam is broken down (around 15 engine hours) it can feel like you’re riding in the bike too much instead of on top of it and that can make the rider triangle feel uncomfortable for riders 5’11 and up. Installing the GYTR taller seat helped with the rider triangle feel for me when sitting. The seat wasn’t so tall through the middle where I felt like I was too high above the machine, but instead had a firmer feel than stock and enough height to help my form on the bike. I am fan of the Yamaha stock bar bend, but with the stock seat it can almost make the bar bend seem too high at times because of that pocket feel. With the taller seat it puts me into a more neutral/attack position coming into corners, which forces my arms to stay bent, instead of dropping down and relaxing too much. 

5567AD12-8E81-4FF3-AE44-F1DD6CC9C7DB.JPG

The transition from sitting to standing is better and requires less effort under throttle. Seat bouncing is needed at times, but when you’re taller (and old), it’s tough to get off your ass to soak up a jump immediately out of a corner. Having just that little bit of extra foam in the middle of the seat makes it easier for me to get off my ass because I don’t have so far to travel to stand. Yes, 3/4 of an inch doesn’t seem like a lot, but it actually makes a difference. In fact I think a 1/2 an inch would have been enough, but I am not hating on the flatter profile of the 3/4 inch height. I had a couple other testers try this seat that were shorter than me (5’9-5’10) and they even thought it was better for them. The gripper cover that comes stock on the GYTR tall seat is as good as the stock seat, but if it was me, I would be looking into getting a GUTS ribbed cover for increased traction while rolling the throttle on out of corners. GUTS seat covers are made well and last.  

To me a $129.99 for a complete seat is worth it for a roomier rider triangle feel as well as making it easier to be in the attack position while riding. You can check the seat out here: 

https://www.shopyamaha.com/product/details/yamaha-tall-seat?b=Motocross+Accessories&d=42|42&f=2020|141&ls=yamaha-motor-company


Dunlop MX53 Tire Review

Dunlop recently introduced their new MX53 intermediate to hard terrain tires last week to the media at Perris Raceway. I was excited about the new tire from Dunlop because quite frankly there hasn't been an intermediate to hard terrain tire that I have been over the moon about in a very long time. I usually am stuck with running a soft to intermediate tire at most tracks, but that always isn't the best decision once second motos roll around. I have been able to ride with the new Dunlop MX53 tires at more than five different tracks, with several types of soil, over the span of seven days. I have put almost 10 engine hours on the tires as well as experimented with air pressure settings. Here is what I know about the new Dunlop MX53 tires.

GEOMAX_MX53_FRONT_MED.png

Tread Pattern (From Dunlop):

Front Tire: Dunlop has introduced a horseshoe shaped cluster of knobs to the front tire of the MX53. This horseshoe pattern acts as a giant claw to dig into the ground in order to try and give the rider more traction on hard-packed terrain as well as maximize braking grip. This bold new pattern features hollowed out portions of the center of the tread. The hollow area of this horseshoe cluster results in less stiffness in the center of the tire, in order to give riders better feedback and more compliance. The MX53 also has a taller profile than the previous MX52, providing gentler handling, a higher lean angle and better maneuverability. Additionally, each of the blocks are 1 mm higher than the MX52. This extra height is crucial in allowing the MX53 to perform better in intermediate terrains than the MX52 ever did.

GEOMAX_MX53_REAR_TREAD_MED.png

Rear Tire: The rear tire enhancements include a reemergence of Dunlop’s Tornado Wave block distribution. The staggered placement of the rear tire blocks provide a more linear land ratio for a better ride compliance. The consistent placement of knobs along the shoulder of the tire increases confidence at greater lean angles. However, the interior blocks have more separation, which allows loose soil from softer terrains to clear the spaces more easily, while also exposing more surface area of the knobs to the dirt when more traction is needed for harder surfaces 


Progressive Cornering Block Technology:

Dunlop’s patented Progressive Cornering Block Technology has become an industry standard. A smaller block within the traditional knob, commonly known as Block-In-A-Block, has been incorporated into Dunlop’s rear off-road tires for many generations of tire patterns. Dunlop continues to raise the bar by evolving this traditional block into altered shapes to increase durability and tire performance. 

Block-In-A-Block: The new Geomax MX53 now also features Dunlop’s patented Block-In-A-Block technology on the front tire, which allows enhanced flex on each knob resulting in ultimate grip and even more biting edges. The tie bars connecting the base of the knobs add heightened durability to enhance performance in harder terrains. The individual flex of each knob improves linear tracking and aids in steering, as the block can now flex around various terrain elements. 

The Block-In-A-Block technology in the rear tire incorporates the Diamond Block design that was introduced with great success on the MX33. The diamond shape of this altered knob increases the surface area of the block, enhancing stability and slide control. Two additional angles increase the number of biting edges to dig into the dirt. The updated Block-In-A-Block shape has also been added to the rear tire along the shoulder. This wider knob provides a steady base to maximize traction along the outer edge of the tire’s surface.The compound for the MX53 tires has a higher number of molecular polymer particles. This results in a higher fracture strength, meaning more durability. Dunlop has also added more fine carbon particles. The carbon par-ticles are responsible for grip.

Construction: In the construction process of the MX53, Dunlop has added Advanced Apex Design technology. This component of the tire’s construction is present in both the front and rear tire. The Apex of the tire previously consisted of a small strip of material wrapped around the apex of the bead. By extending this apex further into the tire’s natural construction, Dunlop is able to increase ride compliance by spreading the forces of weight on the tire across the breadth of the profile. Distributing the force in this manner increases bump absorption and allows more flex and better ride compliance. Incorporating this element strikes a perfect balance between a plush ride and a firm feel. 

IMG_5255.JPG

On The Track: I managed to ride five different types of tracks and I will be completely honest here; I came away with a more positive outlook on these tires than after the first day of testing, at Perris Raceway. As you may or may not know I am a front end steering type of rider and I am not a fan of the Dunlop MX33 or MX52 front tires at alI. I am a picky SOB when it comes to front tires!! I was forced to purchase any remaining MX3S front tires that were available and mix matched my way around Southern California with different front to back tread patterns. 

The Dunlop MX53 front tire impressed me on the first day of testing, but it wasn't until after day two (at Glen Helen) that I realized that I could actually like an intermediate to hard terrain front tire better than a soft terrain front. The MX53 front tire lean angle traction inspires confidence in terrain that is anywhere between soft-hard pack. In pure sand conditions the front end is a little loose feeling on entrance of corners, but if the track is still fresh in the morning with tilled up loam, the front tire tracks very well. I can predict where the side of the MX53 will break loose, how much I am able to lean through corners, and that feeling never waivers throughout the course of any day. Unlike the other MX33/52 compounds where they washed unexpectedly on initial lean, the MX53 bites and give the rider predictability. Another positive aspect to the MX53 is lack of front tire sliding when braking. Grabbing a handful of front brake (lean angle or straight line) into a corner leaves the rider with a sensation of a more contact patch feel that is wider than any other Dunlop I have tried to date (especially on lean angle braking).

Flat corners (while on throttle) or medium lean angle sweepers gives me a more secure/planted feel than a MX33 or MX52 and doesn't leave me with a feel of washing the front end out. As much as I love the MX3S front tire, even that tire isn't as good in this area of the track. The carcass of the front MX53 tire also has enough cushion to where it doesn't make your front end feel harsh on braking bumps like the MX33 can do at times on intermediate/hard pack tracks. For as much time as I have on the front tire the reliability also seems to be better than the MX3S, but I will continue to put more time on the tire to see where its “breaking” point is. The overall integrity/feel of the tire still remains intact with almost 10 hours on it. The only real negative I have found to this tire is the air pressure setting is crucial, so running a 13.5 air pressure setting is the number you will need to achieve. Going higher in air pressure will leave you with less lean angle grip on dry/wet slick surfaces and going lower will leave you with a carcass that is extremely soft feeling on braking bumps. 

dunlop mx53-7244.jpg

I am not as picky when it comes to a rear tire, but the MX53 rear tire has a narrower “terrain window” than the front tire. However, it’s still impressive on intermediate-hard terrain, it just doesn’t have much forward bite or tracking when the track has deep sand sections. If the track is softer in nature the rear tire doesn't bite into the ground as good as the front does, so if you're a rear end steering rider you may want to stick with a MX33 in softer stuff. The MX53 has a comfortable carcass feel on square edge and braking bumps, but just know 13.5 or even 14 psi is recommended. I tried Dunlop’s recommendation of 12.5, but found myself feeling the tire squish too much on the rim on acceleration bumps. When it comes to entering shallow hard pack ruts I have yet to feel anything better than a MX53 in this area of the track. The rear end tracks into the ruts superbly with a positive lean angle and lets you get on the gas earlier because the rear end of the bike feels planted sooner. Another area I gave the MX53 high marks was under braking. When braking into corners there was much less slide with the MX53 than the MX33 and that really helps when you’re asking your motorcycle for traction/bite when diving hard into a corner.

If you're a rear end steering rider, having a rear tire that slides a little more under braking might be better for you, so look into a MX33 if you’re that type of rider. Just like the front tire, being on the gas while under a medium lean angle suits the MX53 rear tire. The contact patch that the rear tire lays down for you is better than any other intermediate to hard pack terrain tire I have tried as well as allows for a more controlled scrub up faces of dry/hard pack jumps. The rear end will not want to wash as quickly up the faces of jump when leaning, which can allow for a lower trajectory. With almost 10 hours on the rear tire, its performance hasn't dwindled a huge amount and is consistent enough for me to continue to put time on it. 

On wet/slick track conditions (think hard pack with water on top) the MX53 front/rear tires fling sticky mud out from in between the knobs well enough for me to be fairly aggressive, but just note that I have yet to find a production tire that works extremely well in that type of condition. Overall, these Dunlop MX53 tires have changed my outlook on running an intermediate to hard terrain tire on a wide variety of tracks. Having a tire that is consistent enough to run in the early morning motos as well as the late afternoon motos is tough to do, but Dunlop has done a good job with providing us a tire that is capable of doing this. 


Forecasting Questions: Before my email inbox blows up with MX53 questions, let me answer some that may come through the pipeline. 

Kris, what do you like better? The MX3S or MX53? As of right now I can stand here and say for California tracks I would like to run the MX53 tires 9 months out of the year. If we get a lot of rain and the tracks are soft I will run a MX3S front and MX33 rear. If you’re an east coaster and ride soft conditions I would run a MX3S front and a MX11 rear. 

Kris, what about durability? Will these knobs chunk off? At the 10 hour mark these MX53 knobs haven't chunked off. The MX3S knobs have chunked on me around this time, but you have to know what type of tire buyer you are. Are you a performance or durability based tire purchaser? It is extremely difficult to get both of these into one tire. For me I would rather take a 10-12 hour tire that has excellent grip than a 20 hour tire that has low grip/high. However, not everyone is like me, so if you’re a weekend warrior and do not care about performance as much, but want more durability, then you might want to look into a cheaper tire manufacturer price bracket. 

Kris, what sizes do the MX53 tires come in? Dunlop offers the MX53 for all size bike ranging from 50cc-450cc including 18 inch sizes for you off-road guys. 


If you have any more questions about the Dunlop MX53 tires or even the MX3S front tire that is making its way back into production, please feel free to email at kris@keeferinctesting.com


Tusk Impact Wheelset (2019 Yamaha YZ450F)

Mounting up some hubs/wheels is one of the first aftermarket modifications riders do to their ride. Do all dirt bikes need aftermarket wheels/hubs? No they don’t, but some can benefit from a beefier wheelset (like the Honda CRF250/450R and Yamaha YZ250/450F), so we decided to try the Tusk Impact wheelset and put some abuse on them to see if they really are a great purchase for your used or new steed. 

IMG_6602.jpg

Yes, this test took a while, but we have put numerous hours on these wheels to see how they would hold up, because quite frankly we don’t want to push something on you if it’s a P.O.S. Tusk’s aluminum hubs are forged from 6061 T-6 aluminum, not cast, and CNC-machined for a quality fit. The Tusk hubs come with high-quality bearings, seals and hard anodized wheel spacers. We have over power washed these areas to see how they have held up and we were surprised that we didn't encounter any issues while testing. The rims are anodized and made from 7075-T6 aluminum. They aren’t the more popular D.I.D. or Takasago rims, but come from a Tusk supplier. The spokes are 3024 stainless steel and are heavier than other spoke choices (more on that in a minute). Tusk wheels come completely assembled and will interchange with the stock OEM wheel components, which is very seamless and nice for the consumer. 

IMG_6603.jpg

Tusk’s Yamaha hubs are anodized blue, but aren't quite that “deep blue” we see on other hubs, which isn't a bad thing, but took sometime to get used to. The hub color is more of a light baby blue that offsets the black rims nicely. Tusk offers all of the colors of the manufacturer carousel so DO NOT worry they have every color for your ride. Yes, the Tusk wheelset is heavier than the standard OEM wheelset on the YZ450F, but if you’re reading this test I assume that weight isn't an issue for you. If you’re looking for a lower cost hub/rim than you shouldn't be looking at weight numbers, but we will give you the difference anyway. The Tusk front wheelset weighs in at 7 pounds 14 ounces and the stock OEM front wheelset weighs in at 7 pounds 11 ounces. NOT A HUGE DIFFERENCE! The Tusk rear wheelset weighs in at 11 pounds 9 ounces and the stock OEM rear wheelset comes in at 10 pounds 10 ounces. NOT THAT HUGE OF A DIFFERENCE. 

IMG_6604.jpg

So how do they work on the track? Installing aftermarket wheelsets can change a bike’s character on the track. Some wheelsets can make a bike feel rigid and stiff, especially on slap down landings and on braking bumps. I DO NOT use Excel A-60 rims/Talon hubs because of the rigidity on square edge and braking bumps. These hubs immediately change any bikes handing character. The Tusk hub/rims are only slightly more rigid feeling than that of the stock Yamaha hubs/rims and DO NOT give me that harsh feeling on the track. Yes, it’s slightly firmer than the OEM hub/rims, but they aren’t so stiff that I wanted to take them off ASAP. If you’re purchasing these, give yourself a couple rides to adjust to them, but I am sure you will get acquainted fairly quickly. If they do feel slightly harsher than your stock wheelset try speeding up your rebound on your fork and shock 1-2 clicks to see if that helps. Trust me, it helps in almost every condition with stiffer wheelsets. This allows the wheel to follow the ground better and absorb some of that new found firmness of the hub/rim. 

IMG_6599.jpg

Rear.

Front.

Front.

So how did they hold up? Look… You can count on two things… I am a hard ass when it comes to wheels and clutches. These Tusk hubs/wheels have held up surprisingly well for a lower price point wheelset. The spokes needed to be checked after every ride for the first couple weeks of riding, but after that I didn't have to fuss with them that much. You especially need to keep an eye on the spokes closest to the rim lock, so if you’re lazy (which some of you are) and you don’t want to go around the complete wheel, use the first few spokes as a guide to judge if the others might be loose. In other words if the ones closest to the rim lock are loose then check the whole damn wheel! After almost 30 hours the rim did get a couple whoops in them, but nothing that warranted me to get a new wheel laced up. You know that feeling (when you’re in the air) and your wheel is bouncing around because it has a couple good whacks to it? Yeah, that feeling never happened to me over the course of this test. Good news! The anodizing will fade over time so be forewarned that if you use harsh chemicals like Simple Green or 409 to wash your machine, the hubs will discolor somewhat. I usually use Bike Wash from Blud Lubricants or Slick Products because they are less harsh on our bikes. 

So is the Tusk Wheelset worst it? If you’re looking for another set of wheels that you can take to the track (in case of a flat) for a spare, want a set of practice wheels, or just looking to freshen up your older machine with some bling, the Tusk Wheelset is a great choice. Are these the wheels that I would take to a Supercross? Not necessarily, but for 98% of us they are plenty strong enough. For $549.99 a set, this Tusk wheelset is a really good choice for the working man that loves to go rip on the weekends, wants to look cool, or maybe just wants a back up set so he doesn't have to change a tube/tire at the track between motos. 


I also understand that some people on my social media page say they have had bad luck with these wheels. I understand there is an exception to every evaluation, but I have put in a ton of hard hours on these and have seen zero failures on my end. This doesn't mean that this product is 100% bulletproof, but I would have zero issues riding with these wheels and or recommending these to all of you. If you have any questions about this test or product please feel free to email me at kris@keeferinctesting.com. You can order the Tusk wheelset at rockymountainatvmc.com and choose from an array of sizes and colors

X-Trig Rocs Pro Clamps (2019 Honda CRF450R)

I have been getting ready for the first two AMA outdoor nationals and knew that I was going to be running an aftermarket triple clamps and those clamps would be X-Trig. Since my practice bike was my test bike, I thought it would be beneficial to get a set of X-Trig clamps to ride/test with to make sure I could get the “feel” of an aftermarket triple clamp, since I am so used to riding with the stock clamps on the 2019 Honda CRF450R. Like I have spoken about before, it’s tough to find aftermarket triple clamps that perform better than stock these days. So much R&D is involved (at the OEM level) in making a triple clamp that flexes enough, but also has enough rigidity to aid the machine under load/through corners as well. With the triple clamp flex character so important to each specific chassis (on all motocross bikes) sometimes it’s tough to find anyone that can make a “comfortable” set of aftermarket triple clamps. Why do you need aftermarket triple clamps? Well sometimes it’s just for looks with some riders, but there are occasions where you might want another offset to help you get more stability or a sharper turning character out of your machine. In this case I was simply wanting to make sure that I wouldn't be trading comfort for stiffness on the Honda CRF450R somewhat finicky chassis setting.

IMG_6465.jpg

Enter X-trig’s ROCS Tech Triple Clamps and PHDS Mounts. “ROCS” stands for “Revolutionary Opposing Clamp System”. The ROCS clamp allows for precise alignment of the fork tube with opposing clamping surface patterns, the stiffness of the steering stem is specifically tuned to the respective motorcycle model, the steering-head bearing is already mounted on the shaft tube for convenience, a special fork slot and clamping area for precise fork operation, precise clamping with special screws for low torque specs, OEM attachments can be mounted without auxiliary material, and flexibility that is adapted to the fork with anodizing in the technical factory OEM look. The difference between the ROCS “Tech” and the ROCS “Pro” is the “Tech” uses a standard offset with a pressed shaft tube. The “Pro” has two offsets you can choose from by simply adjusting the shaft tube (or steering stem). I felt it would be beneficial to try another offset with the Honda CRF450R for testing purposes, so I went with the ROCS Pro clamps. 


The PHDS (Progressive Handlebar Dampening System) is a system supported by elastomers designed to absorb engine and chassis vibrations. The system also dampens the forces acting on the handlebar in a horizontal and vertical direction, maintaining steering precision. The handlebar can be adjusted in 12 different positions when the PHDS is mounted. The Honda vibrates more in the handlebar area than any other 450 aluminum framed motocross bike, so this is something that I feel the Honda needs, in my opinion. 


Installation of the ROCS clamp is fairly straight forward (with the pressed shaft tube). All you need to do is grease up the steering head bearing and slide the bottom clamp up in the head tube of the frame. All of the front fender mounting points and even the OEM hour meter bolts up the same way with the X-trig clamps. Super clean! Mounting up the PHDS bar mounts is a little tricky as the mounts themselves have a lot of moving parts, so make sure to read the instructions to ensure proper mounting. Technical Touch offers optional PHDS bar mount elastomers that come in soft or firm, but I chose to run the stock medium style elastomers, which seem to be just fine for motocross conditions. 

IMG_6471.jpg

I am super picky about bar positioning, shocking I know, so I went with the mounting hole closest to me (when sitting on bike) on the triple clamp with the PHDS mounts forward. This handlebar position gave me a +1 mm bar position (forward from stock), which I preferred as the stock Honda rider triangle is just fine for my 6’0 frame. The PHDS bar mount itself is the same height as the stock bar mount, which also was good for me and I mated the clamp/mount with a Pro Taper EVO SX RACE handlebar. Having so many positions available for the rider is definitely a huge positive for adjustability with these ROCS clamps. If you feel like you need a higher PHDS handlebar mount, X-trig also offers spacers to go under the PHDS mounting system. You can pick from 3mm, 5mm, and 10mm spacers.

IMG_6473.jpg

So what did the X-trig ROCS Tech Triple Clamp and PHDS handlebar mounts do on the track? My goal for this test was to not gain front end rigidity, get a more precise front end feel through corners, without getting deflection on hard pack/rough straights. Basically trying to NOT get a harsher ride on the Honda, tough to do right? The good news is that this is exactly what I found with the X-trig ROCS Tech/PHDS system, but there is some fine print that I want to fill you in on. The X-trig ROCS Tech clamp on the CRF450R provided enough flex and doesn’t feel like it negatively affected front end bump absorption, but was also stiff enough to give me a positive front wheel feel through flat corners. The ROCS Tech clamp is most noticeable when diving deep into a rut where there is a huge load put on the front end, forced by the rider. The chassis positivity through this area is better than the stock clamps. The stock clamps has a tendency to flex too much and give the rider a wiggle immediately off throttle (on deeply tilled tracks or soft dirt) or give the rider an unsettled (dive) when dropping into a long/deep rut (this sensation can only be felt mostly by faster or heavier riders). The X-trig ROCS Tech clamp gives the front end less wallow (firmer) and more cornering stability (without upsetting chassis balance). Straight line stability is as good as stock and front end bump absorption is only minimally stiffer feeling on braking bumps/square edge. 

Optional Setting: I have tried the ROCS “Tech” with the pressed steering stem shaft as well and that set up is a little firmer of a feel as well as provided a little more rigidity (I found out this when I went to ride my race bike, which has the “Tech” installed). The differences are small, but I did feel it nonetheless. Going to a 24mm offset on the ROCS “Pro” helped the Honda settle down on faster tracks. Running the fork up 4mm with a 24mm offset really helped calm this chassis down for 2:00PM motos (AKA ROUGH TRACKS). The 24mm offset did affect the Honda’s turn in capabilities and made it feel slightly heaver through corners. If you’re looking to slow the chassis down on faster tracks try going to the 24mm offset, 105mm’s of sag, and the fork up 4mm. 

The PHDS mounts do not vibrate nearly as much as the OEM rubber mounted bar mounts. The PHDS bar mounts flex as good as stock with the standard elastomers (up and down), but dampen vibration noticeably better around the track (especially at higher RPM’s). Slap down landings are improved slightly and front end positivity (entrance into corners) are as good as an OEM feel. Simply put, the vibration characteristics the PHDS mounts provide are well worth their weight in gold. I use “weight” because they are heavier than stock ones by quite a bit, but I will gladly take some extra ounces over vibration any day. 

The cost of the X-trig ROCS Tech Triple Clamps and PHDS handlebar mounts are $900.00. The cost is more expensive than other triple clamps out on the market by a couple hundred bucks. However, there are only two triple clamps that I have tested, that to me, are as good or better than stock. If you're looking to get a set of clamps for the temperamental Honda CRF450R “vibes” pick up some front end cornering stability, get an optional offset, and even improve the looks of your Honda, X-trig has some really nice clamps and handlebar mounts available for your red motocross machine. You can check out and purchase all of the X-trig products over at technicaltouchusa.com.   


If you have any questions about this test please feel free to email me at kris@keeferinctesting.com


Pro Circuit Ti-6 Pro Titanium Muffer System


The 2019 Yamaha YZ450F won the Keefer Inc. Testing shootout this year because it has all tangibles that are needed to let a rider go fast on the track with the least amount of work. I am a fan of the stock muffler system on the 2019 YZ450F, but was looking for a full system to help me lose some weight and gain a little more mid range pulling power without sacrificing low end delivery, that the stock system does so well. I went to Pro Circuit to seek out Mitch Payton and see if he would give me a Ti-6 Pro Titanium System to try out. I managed to walk out with a system, but missed out on the opportunity to speak with Mitch. He probably doesn't even know who the hell I am, but I appreciate that he got me a system to test out. I haven't tested that much Pro Circuit products in 2018, but our next couple project builds will have some PC products on board or 2019. 

IMG_1071.jpg

The Pro Circuit Ti-6 Pro full system was created for professional racers competing in a series such as AMA Supercross or AMA Motocross to ensure they pass AMA/FIM sound regulations. The Ti-6 Pro Titanium Exhaust System is constructed of titanium throughout the head pipe, mid pipe, and canister while the end-cap is carbon fiber. I wanted the “Pro” system because I have learned that loud mufflers are not the best mufflers for power feeling on the track and sometimes putting an insert in “some” mufflers actually helps power delivery.

IMG_1073.jpg

Installation of the PC system was painless to install (for Yamaha standards), but always make sure to install the headpipe on the cylinder head studs and then connect the mid pipe. Once the mid pipe is slipped onto the headpipe you can begin to tighten the headpipe nuts. This assures that the mid pipe doesn't bind and is free. 

IMG_1063.jpg

So how does this sucker feel out on the track? The exhaust note on the Pro Circuit Ti-6 Pro is not near as loud or weird sounding as the Ti-6 or T6. The exhaust note on the “Pro” is deeper and slightly quieter, which I personally like more. The power delivery is slightly smoother down low, but only on throttle opening. At 0-5% throttle position there is a slightly softer RPM response, which I didn't mind on nasty, dry, choppy tracks in Southern California. If I needed more bottom I simply ran a more aggressive map and that helped the “pop” I was looking for out of corners. I usually ran the TP 2.0 map with the Pro Circuit system and it made me happy with the amount of smooth roll on power I had. The rear wheel definitely feels connected to my throttle hand and in comparison the PC system has more bottom end power than that of the Akrapovic that I tested a couple months ago. The mid-range is where I wanted more power out of the Yamaha and this is where exactly the PC system delivers. The meat of the Ti-6 Pro’s power out of corners and accelerating down the next straight is much better than stock. I am able to use second and third gears longer with the PC system (compared to stock) and even though the low RPM response is slightly softer than the stock system, the mid-range RPM response is much more instant. Mid- range RPM response is crisp and makes the Yamaha feel “lighter” when trying to hop over square edge choppy areas of the track when accelerating. Top end pulling power is as good as stock as the PC Ti-6 Pro doesn’t pull harder up top, but the PC system does have slightly more over-rev. I am able to be slightly lazier with my shifting and can decide to shift later after each corner. 

I was impressed how the Pro Circuit Ti-6 Pro delivered and spread out its power and to me made the Yamaha even more fun to ride. If that is possible? The PC Ti-6 Pro Titanium System runs $1,064.95 and is available over at procircuit.com. I will be doing a 2019 Yamaha YZ450F Muffler Shootout Podcast in the very near future, so if you want to hear how it stacks up against its competitors listen and subscribe to the Rocky Mountain ATV/MC Keefer Tested Podcast right now. 

If you have any questions about this test please feel free to email me at kris@keeferinctesting.com.


GUTS Racing Firm Seat Foam And Gripper GR1 Seat Cover 


If there is one area that the 2018-2019 Yamaha YZ250F/450F is lacking in, it would have to be the seat foam/seat cover area. Yamaha firmed up the seat foam for 2019, but to me it just wasn't enough for my skinny ass. If you have a Kardashian butt it might be ok, but for us skinnier riders we need a foam that doesn't sink into the fuel tank when slamming into corners. While I was searching for a firmer foam, I thought why not get a seat cover that has some ribs on it, in order to keep my but in place when coming out of corners as well! 

So I called up Andy over at GUTS Racing and he sent me their standard firm foam (not Phantom foam) and GR1 ribbed seat cover with extra padding sewn into the sides of the seat cover. Guts offers many different styles of covers and foam densities so make sure to check out gutsracing.com for all of their offerings. Swapping out seat foam isn’t that hard, it just takes patience and some trial and error to get the new cover on the seat. The foam shape is pretty much identical to the stock foam and went on the seat base without issue. The seat cover went on without much of a fuss either, but there might be a little extra material that you may have to trim once all of the staples are in.

IMG_0706.jpg

So when you think of the words “hard” or “firm” you may think of uncomfortable right? Well in this case you would be wrong. The “firm” GUTS foam is just what the doctor ordered, especially when I am slamming into corners. The stock 2019 YZ450F foam is a little better (than the 2018 foam), but lacks density on the sides where my butt is forcing the foam down. With the GUTS firm foam the density is harder in the middle of the foam, but also on the sides of the foam where you need it (especially when riding aggressively). Your butt is not always placed directly in the middle of the seat when you're riding, so why just make the middle part of the foam firm? GUTS thought of this because all of us riders need to have a firm feel on each side of the foam as well. The GUTS Racing foam provides the correct amount of density so I am not pushing my tushy through the foam and into the plastic of the fuel cell. My butt bone thanks you GUTS Racing! 

The GR1 GUTS Ribbed Seat Cover is unique because of the extra padding that is sewn into the cover on each side. Since the Yamaha seat is designed so thin near the middle portion and on the sides, I felt like I could use a little extra padding when working the sides of the seat through flat corners. Not only did I feel like the extra foam on the sides helped me through flat corners with the slightly wider nature of the seat cover (due to the foam inserts), but it helped me grip the Yamaha better with my legs. Not to go full Ryno on you, but using your legs is crucial to going fast on a motorcycle. Gripping the machine with your legs is sometimes overlooked to an amateur rider, so with these extra foam inserts inputted into the seat cover, it really helps me grip the side of the Yamaha when I am getting tired. It may not be the most attractive looking cover (due to its width), but it sure does do what its supposed to do. The ribbed portion of the seat cover also keeps me in place, but the gripper material isn't so gnarly that it is chaffing my ass on long test days. Some gripper materials out there are so aggressive that you can only ride one full day on it before you have to have your wife rub chamois cream on your ass. 

IMG_0708 2.jpg


If you own  2018-2019 Yamaha YZ250F/450F do yourself a favor and get a GUTS Racing firm seat foam and ribbed GR1 cover. Your ass can thank me later. The GUTS Racing standard height/firm seat foam will run you $89.90 and the ribbed GR1 seat cover with foam inserts on each side will cost you $149.90.     

Ride Engineering's 2019 Honda CRF450RWE Triple Clamp 


Matt Sirevaag is your average dirt bike fanatic. He works overtime just so he can purchase extra “goodies” for his 2019 Honda CRF450R. He is only “allowed” (you married guys out there know what I am saying) to buy stuff for his bike if he makes extr…

Matt Sirevaag is your average dirt bike fanatic. He works overtime just so he can purchase extra “goodies” for his 2019 Honda CRF450R. He is only “allowed” (you married guys out there know what I am saying) to buy stuff for his bike if he makes extra cash. Matt works side jobs and puts in OT just so he can get his bike just the way he likes it. To me this is a real world test because of the test rider that has written it. -KK


I am just the average nine to fiver and weekend warrior. I get up at 4AM, go to work, and think about dirt bikes (probably like most other riders out there). I walk through the race pits, drool over the factory machines, and wish I could just have one piece of eye candy that graces the factory riders machines. This is where Ride Engineering decided to give their CRF450R clamp that factory Honda like touch. They took their CRF450R clamp, moved the logos, and anodized them cherry red just like Ken Roczen’s factory machine. The Ride Engineering factory 450RWE triple clamp retains the stock 22mm offset that comes on 17-19 CRF450’s and can be used in conjunction with the stock bar mounts or Ride Engineering’s one piece bar mount.

Ride Engineering worked to try and make this Honda triple clamp retain the stock clamp characteristics (flex/rigidity balance). They also used 2024 aluminum, which is the same alloy aluminum that a lot of the factory teams use for their clamps. Just to add to the factory flare we put the new clamp on the scale and it weighed in at 7.9oz. lighter than the OEM clamp! The 450WE clamp fits both the previous 48mm and the new 49mm Showa forks. It also fits 2013-2019 Honda CRF450R, 2017-2019 CRF450RX, 2014-2019 CRF250R and let’s not forget the 2019 CRF450RWE. This is not Ride Engineering’s first rodeo as they have been building triple clamps with different offsets to help change the character of motocross machines for years. 

FullSizeRender-5.jpeg

Installation was a breeze as any novice mechanic can handle this job with a little time in the garage. I would suggest using the owner’s manual as torque specs are always crucial when it comes to suspension components. The torque spec on Keefer’s 2019 CRF450R test bike is: (upper pinch bolt 16 lb-ft, lower pinch bolts 15 lb-ft, and steering stem nut 80 lb-ft). As I hit Sunrise MX on my usual Saturday track day, I was not only excited to ride after a long work week, but I was hoping one of my favorite aspects of the new Honda (front end feel) was not gone. To my delight it was really hard to pick apart any huge differences between the two clamps on the track. As I put down my 30+2 lap moto (Thank you Kris Keefer! Yes, that is sarcasm) the Honda retained that front end feel that I loved with the stock clamp, but I did notice two small differences after I put more time on them. The Ride Engineering clamp does make the front end “turn in” slightly easier and also gives me a little firmer front end feel on hard pack square edge. This wasn't a drastic difference, but it is something I noticed after a few hours on the clamps. I am a heavier guy at over 200 pounds so a little firmer feel wasn't a deal breaker for me. I am the type of rider that is very sensitive to vibration or any unwanted feed back through the bars so I was pleased that I didn't get any increased vibration. Ride-Engineering utilizes the stock rubber’s for their bar mounts and this helps retain that OEM comfort while adding cushion over some other solid mounted bar mounts I tried last time. If you’re a vet rider and are looking for more comfort, make sure your bar mounts are rubber mounted! The Honda’s cornering manners were kept in tact, but with just a little more positive lean in, I did notice that the bar position was slightly more comfortable which I discovered most on deeply tilled up tracks/soil. The Ride Engineering clamp only has one location to mount the bars, but I did notice that the bar position was slightly more comfortable. The mounting position on the Ride Engineering clamps locates the bars three millimeters forward over the OEM mounting location. If you don’t like this bar location you can always turn around the stock bar mounts to pull the bars back.

FullSizeRender-4.jpeg


As you can tell the Ride Engineering CRF450RWE triple clamp is more of a factory look than a clamp that gives more performance. Having said that Ride Engineering does offer different offset triple clamps for the Honda CRF450R that come in 20mm, 21mm, and stock 22mm offsets. They also come in a black or red colorway. These other offset sizes are not the “450RWE” clamps and will have a Ride Engineering logo on the side. On a side note; try to keep the Ride Engineering colored triple clamps covered up from the bright sun. Too much sun (like sitting in the pits for an extended period of time) will fade the color a little. I simply put a towel over my bars to help shade the triple clamps as much as I can. The CRF450RWE clamp includes the top clamp, bottom clamp, pressed in stem, and lower bearing and it retails for $549.90. You can check out all of Ride’s accessories over at Ride-Engineering.com and take a look at what they have to offer for your trusty steed.

Matthew Sirevaag 205lb Novice

Full Time Electrician/Husband/Father/Dirt Bike Fanatic


Maxxis Maxxcross MX ST Tire Review


I am not going to sit here and blow smoke up your asses and tell you I was a big fan of the previous generation Maxxis Maxxcross tires. They didn't provide consistent lean angle grip and had problems with side knob chunking way too soon in my opinion. Fast forward to the summer of 2019 and Maxxis has introduced a brand new performance tire that was developed with “The King” Jeremy McGrath exclusively for us die hard moto guys called the Maxxcross MX ST. The ST features an all new tread pattern designed to optimize traction while giving the rider more confidence and predictability in intermediate to soft soil, an all new compound and a lighter pliable carcass. At first glance it almost looks like a Pirelli Scorpion MX32 tread pattern design with a slightly different side wall. I ran a set of 80/100-21 and 110/90-19’s MX ST’s for almost ten engine hours and wanted to compare these new MX ST’s with the older Maxxis Maxxcross design as well as sprinkle in some comparisons with other big name brands. We tested the Maxxis tire on our 2018 Honda CRF450R test bike and came away these findings: 


IMG_1878.jpeg


I found that the first thing that impressed me was that the Maxxis Maxxcross MX ST rear tire offers great forward bite (traction) under acceleration in intermediate/soft terrain through ruts and coming out of corners. The Maxxis side knob design works well under lean angle and traction is one of the MX ST’s (rear tire) strong suits, as the rider is able to get on the throttle sooner (while leaning) without washing out. You are also able to start your lean sooner (than any other Maxxis tire I have tried in the past) while coming into a corner and the MX ST remains planted to the ground. Braking predictability is also increased as it gives the rider confidence to pivot and throttle out of flat corners without much hesitation. Previous Maxxis tire compounds would step out (or wash out) on you once you completed your braking and were back on the throttle, but the MX ST lets you pivot/lean under throttle through flat corners adequately. One complaint I had is that when the track surface was freshly watered/slightly hard, I couldn’t get as much predicability from the rear tire as I wanted. It gave me a pushing or loose feeling rear end until the track tacked up somewhat. Running the correct air pressure in the MX ST tires is crucial as I found the happy setting at 13 psi for most conditions. The softer nature of the MX ST carcass flexes and absorbs bigger bumps/square edges much better than the previous generation tire, which is great news for us older riders out there. MORE COMFORT!  When you get a hard carcass feeling tire like the previous generation Maxxis Maxxcross you will notice your machine will deflect and feel harsh on braking bumps and acceleration chop, but the new design doesn’t feel anything like this. I did notice around the 8 hour mark that the Maxxis rear tire performance gets less predictable and feels much like a worn Dunlop MX3s tire, which to me is to be expected, but nonetheless needs to be noted. The Maxxis MX ST rear tire loses most of that “predictability” (when 8 hours old) on lean angle (coming into corners), which causes the rear end to wash out easier. Kudos to Maxxis for making a rear tire that doesn’t chunk before the 10 hour mark. I have chunked some Dunlop MX3S tires before the ten hour mark (under normal intermediate terrain), but as of right now the Maxxis rubber hasn’t broken apart . If you are using the MX ST rear tire on pure sand, the lifespan of the tire goes up exponentially, so just know this. Also note that if you’re using this tire in hard pack conditions the compound/knob will wear much sooner. This is by far the best rear tire Maxxis has put out to date and I assume we can thank Jeremy McGrath for some of that right? 


DSC06954.JPG


I am a picky SOB when it comes to front tires! The Maxxis MX ST directional front tire is so much better for front-end feel and lean angle traction, especially over the older Maxxcross versions in EVERY condition. The MX ST front tire actually can now bite not only in soft soil, but also in looser hard pack soil as well. The MX ST is not as grabby on lean angle as a Pirelli MX32 or Dunlop MX3S, but it can be somewhat grabby if you're not used to it and can cause some oversteer, in softer conditions (on de-cel). The MX ST front tire will accommodate the moderate front end steering rider and is able to be leaned into corners fairly aggressively. The contact patch feel on lean angle is much wider on the MX ST than a Bridgestone 403 and has enough lean angle performance to be compared to a Dunlop MX33. Did I ride them back to back? No, I didn't, but I have spent enough time on all kinds of tires to know that the MX ST is in the ballpark now at least. Previous generation Maxxis front tires were NOT even in the conversation, but now we can at least put them in the mix with the other “big four” (Dunlop, Pirelli, Bridgestone, Michelin). Acceleration on lean angle traction (on the MX ST) is not quite as predictable as it is on de-cel however. If accelerating on a fast sweeper, the front tire does want to “hunt and peck” somewhat. What is “hunt and peck”? Hunt and peck is a testing term we use when the tire feels like it is moving underneath you and doesn't feel planted. Off-throttle planted sensation is great, but on-throttle sensation, I notice the front tire moves around and deflects a little more than I would like. When the track had just been freshly watered (similar to the rear tire) and was slick on top (think of the second moto in late afternoon at a Southern California type of track) the MX ST also loses a little predictability. This kind of condition would give the front end a vague feel (pushing sensation) as the bike would have a tendency to slide the front-end through flat corners more. I found that going up slightly in air pressure helps this out tremendously and gives the front end less push. The best recommend air pressure is 13.5 psi as you can feel the tire roll if you get into the 12-13 psi range. Yes, going up 0.5 psi does help! The wear of the MX ST front tire is also much better and hasn't shown signs of chunking yet, which is also another improvement for the Maxxis brand. 


IMG_1903.jpeg


Maxxis has improved their premiere motocross tire exponentially! This is the most improved motocross tire for 2018 and can be a serious option for the motocross consumer. The MSRP on the front is $120.00 and the rear goes for $140.00 and comes in an 12,14,16,17,18,19,21 inch sizes. I will be continuing to put more time on these and will be doing a side by comparison on the Maxxis MX ST to the other “big four” in the coming weeks.