Enzo Racing Spring Perch And Sub-Tank System For 2018 YZ450F KYB SSS Fork Product Review 

The 2018 Yamaha YZ450F is the best suspended motocross bike that is available, but that doesn't mean I’m going to leave it alone. When I got the call from Enzo Racing’s Ross Maeda to see if I wanted to test a couple fork parts, I was more than happy to see if we can make the KYB SSS fork even dreamier. 

IMG_6627.jpg


We didn't go with a fork re-valve as we wanted to see if the parts provided made a noticeable change to the existing stock 2018 valving. I personally like this approach because if you're currently happy with your valving and just needed to fine tune this was a great test to see if the Enzo parts provided could make a difference. I am 170 pounds and a front end steering rider, but I felt the stock fork setting (once broken in) was a little soft on de-cel and jump faces/transitions. Ross installed a 5.1 fork spring (5.0 is stock) and sent me out on the track to see if I liked that change, which I did. It provided a little more hold up and I could ride over the front more while being more aggressive. It did give me slightly less front end traction on lean in (coming into corners), but the trade off for me was well worth it. I did however need a little more comfort on the top part of the fork’s stroke (acceleration, light bump absorption).


enzo_technica_spring_perchMX.jpg

Next up, Ross installed the Enzo Technica fork spring perch. This perch flows more oil and is a machined aluminum piece that Ross at Enzo makes for several different models. Once the spring perch was installed, they sent me back out on the track and I immediately noticed a difference on lean angle traction. The front end traction that I lost with the 5.1 front fork spring I gained back and then some. With the spring perched installed I immediately felt more front end bite coming into corners, especially on flat corners. Where the front tire felt like it was riding more on top of the dirt now I could feel the knobs digging into the terrafirma more when I went to cut down into a rut. Another part of the fork’s action that was improved was on braking bumps. The stock Yamaha fork isn't harsh by any means, so I guess the best way to describe what I felt was more of a plush feel when hitting bumps (on or off throttle). Let me try and describe what I am feeling to you all while you are sitting there reading this: Let’s say the stock fork is a basketball that you drop 10 feet up in the air, to the ground. The Enzo fork with their spring perch installed is like dropping the same basketball to the ground, but now from only from 5 feet up in the air. This is the sensation that I get when riding that is most describable to you all. It cuts the KYB fork’s hit to each bump (or sensation to your arms) in half. I was so amazed that I had to go back to the stock spring perches just to be sure what I was feeling was in fact that much better. If you listen to my podcast, you know how I rate each test as it’s off of a numeral system. On my sheet the numeral system would look something like this: Stock fork = 3 baseline. Enzo Fork with spring perches installed = 3.5. A noticeable, positive change! 


IMG_7317.jpg

For the last test Ross installed the Enzo Sub-Tank System that was so popular several years ago. However, this is not the same system that was around back then, this is more like a 2.0 version of the Sub-Tank System. The Enzo Racing Sub-Tank system is adjustable by bleed setting screws on the side. This adjustment is tunable using a small flat blade screwdriver. The standard setting is 4 complete turns out (counterclockwise) from maximum (all the way tight clockwise). This adjustment setting creates a restriction in the tanks which will control the air compression volume depending upon the speed that the fork is compressing. In simpler terms, the tighter the adjustment, the sooner the firmness of the fork will occur. If you are experiencing bottoming, you should turn the adjuster clockwise IN 1 turn at a time. If the action feels too stiff, turn the adjuster counterclockwise OUT 1 turn. I left it on the stock setting for this test, just to get a feel for what it does. What I can tell you is that the fork still has that plushness and front end bite it had with the Enzo Spring Perches, but I can feel more of a damping feeling near the end of the fork’s stroke now with the Sub-Tanks installed. This wasn't a huge improvement, but I could hit faces of jumps harder and flat land singles further. Basically this system works great if I was racing and getting aggressive while trying to make the pass on a rider. I like how putting these Enzo Sub-Tanks on did nothing to my newfound front wheel traction that the Enzo spring perches gave me. 

IMG_7329.jpg


At the end of the day I got an even better (more comfortable) feeling front end and didn't have to re-valve my fork. I will be trying a full Enzo re-valve in the future, but I thought for keeping the stock Yamaha’s valving in and only adding a few pieces to the fork, it really helped the fork’s action and ride attitude of the bike around the track for the better. The spring perches and sub-tank system are available now. You can call Enzo at (714) 541-5218 for pricing or visit www.enzoracing.com 

For any questions about this test or any other burning questions please feel free to email me at kris@keeferinctestingcom.   


FMF Factory 4.1 RCT Full Muffler System Product Review

It’s hard sometimes to get more power out of newer four-stroke models nowadays with aftermarket mufflers systems. To be honest with you most stock systems are pretty damn good and aftermarket muffler companies like FMF work really hard to try and give you that little extra bit out of a system. I can sit here and tell you that FMF is one company (of only a couple in existence) that will take the time to listen to the proper feedback (either from me or other media testing outlets) and make the necessary changes to alter a new four-stroke machines power in the right direction. The key word here is “alter” and maybe not “gain”. Yes, in this article you will hear me talk about “gaining” a little pulling power, but to me the configuration of the 2018 Kawasaki KX450F FMF 4.1 RCT Muffler System power delivery is more “altered” from stock than anything. 

IMG_7283.jpg


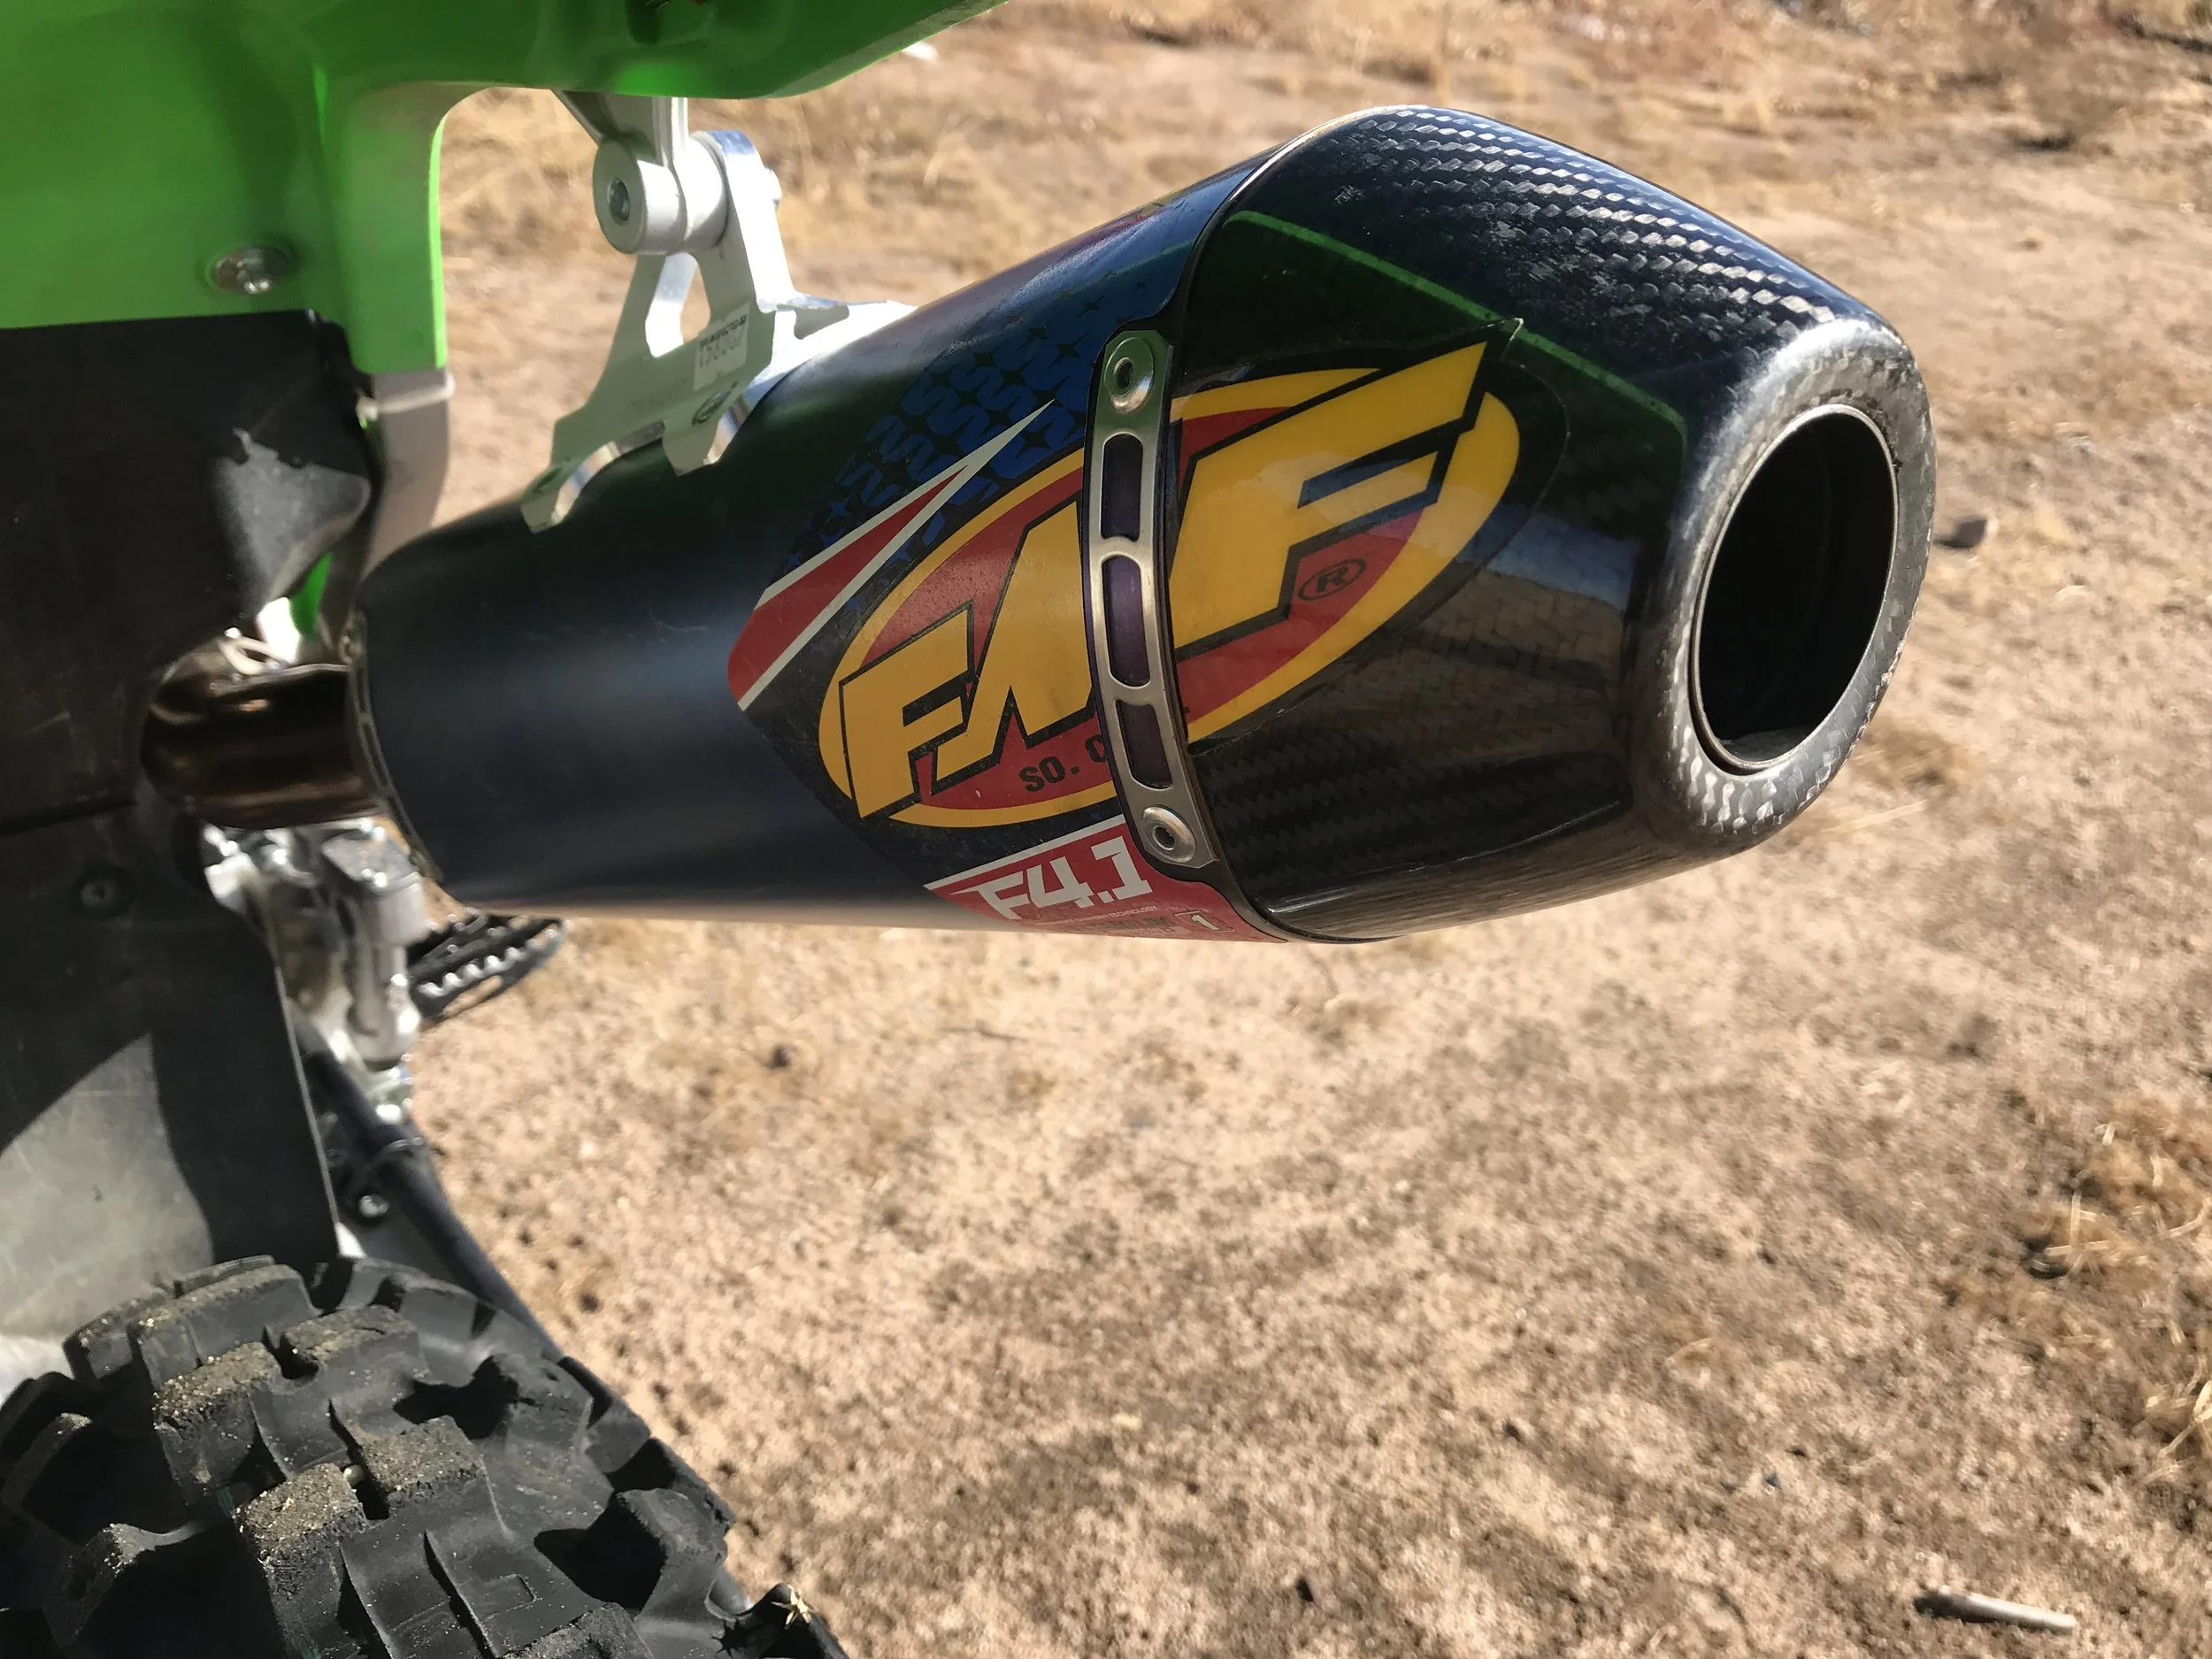
The stock power of the Kawasaki is unchanged for 2018, but that doesn't mean it’s not a great bike. The engine has a snappy throttle response with a free feeling, on de-cel, without much engine braking. Once rolling on the throttle, the power is not as strong as the Honda or Yamaha, but still creates a lightweight feeling on the track. I didn't necessarily need more rpm response with the KX450F, but would like more meat through the mid to top end range. Bolting on the KX450F FMF Factory 4.1 system is bar far the easiest system I have bolted on for 2018. It took me literally two full songs on the Metallica Pandora station to change the muffler. The Kawasaki is a light bike stock, but I chose to go with the full titanium system that let me drop 1.8 pounds from the stock system! Visually the titanium FMF system is one of the most stunning aftermarket mufflers you can put on a bike. I love the blue anodized finish as it looks good on almost every make and model machine. 


IMG_7286.jpg

On the track the FMF 4.1 on the KX450F makes as much bottom end power delivery as stock and keeps that peppy/exciting RPM response. Where the FMF 4.1 system really impressed me was mid range pulling power when exiting corners. The stock system feels empty in this area, but the FMF fills the power-feeling in through the mid-range. What I mean by “fill the power in” is that the FMF system actually feels like it pulls as soon as you shift into third gear unlike the Kawasaki’s power where it feels like it lacks some pull through the mid-range. There is a dip in the Kawasaki’s mid to top end power and the FMF brings back some meat through that area, which in this case “fills in” that area. Top end is also increased slightly and you get increased pulling power near the end of each straight with the FMF. 


I did go back and forth with the couplers on the KX450F and came to the conclusion that although the lean coupler is better for bottom-mid range power, the standard coupler is slightly better from mid to top end. I will have to say when you do go to the lean coupler that the KX450F will pop more on de-cel with the FMF system than the stock muffler. With the standard coupler de-cel pop is minimal and not as noticeable with either system. 


IMG_7288.jpg

At the end of the day the FMF 4.1 RCT full muffler system is better than stock and that is not easy to do these days. It takes off some weight and looks better than the stock monstrosity. To me there is no negative with the FMF system and that is rare in an aftermarket muffler. I have tried other FMF mufflers, on some other models with some negatives, but the KX450F muffler is a good buy. Please note that re-packing of the FMF muffler is important for the can’s lifespan. The muffler portion (or can) will start to leave hot spots/scarring when the packing starts to burn out inside. Once you start seeing these “hot spot scars or markings” on the muffler, remove and re-pack is recommended. FMF sells re-packing kits and taking the can apart to re-pack is not that hard to do. I get around 10 hard engine hours (these are pro type hours) before I see these markings and have to re-pack. If you run it past the recommended time, you run the chance of hurting performance and damaging the core (or perf) inside the muffler. Kudos to FMF for building a good KX450F system and moving the power around slightly and gaining a little as well. If you have any questions about this test please email me at kris@keeferinctesting.com 


Bonus: If you listen to my Keefer Tested podcast you know that I rate some parts and motorcycles by a numeral system. I wanted to break down the FMF system to the stock system for you all below. If you don’t know what these numbers mean, please go listen to show #3 “How To Test” and you will understand better what these numbers mean. 


Stock/FMF:

Bottom End: 3/3

Mid-Range:  3/3.5

Top End:      3/3+

Over-Rev:    3/3+

Bottom End RPM Response:  3/3

Mid RPM Response:               3/3.5

Top End RPM Response:       3/3+

Think Technology Lite Seat Foam and Lite Seat Cover 

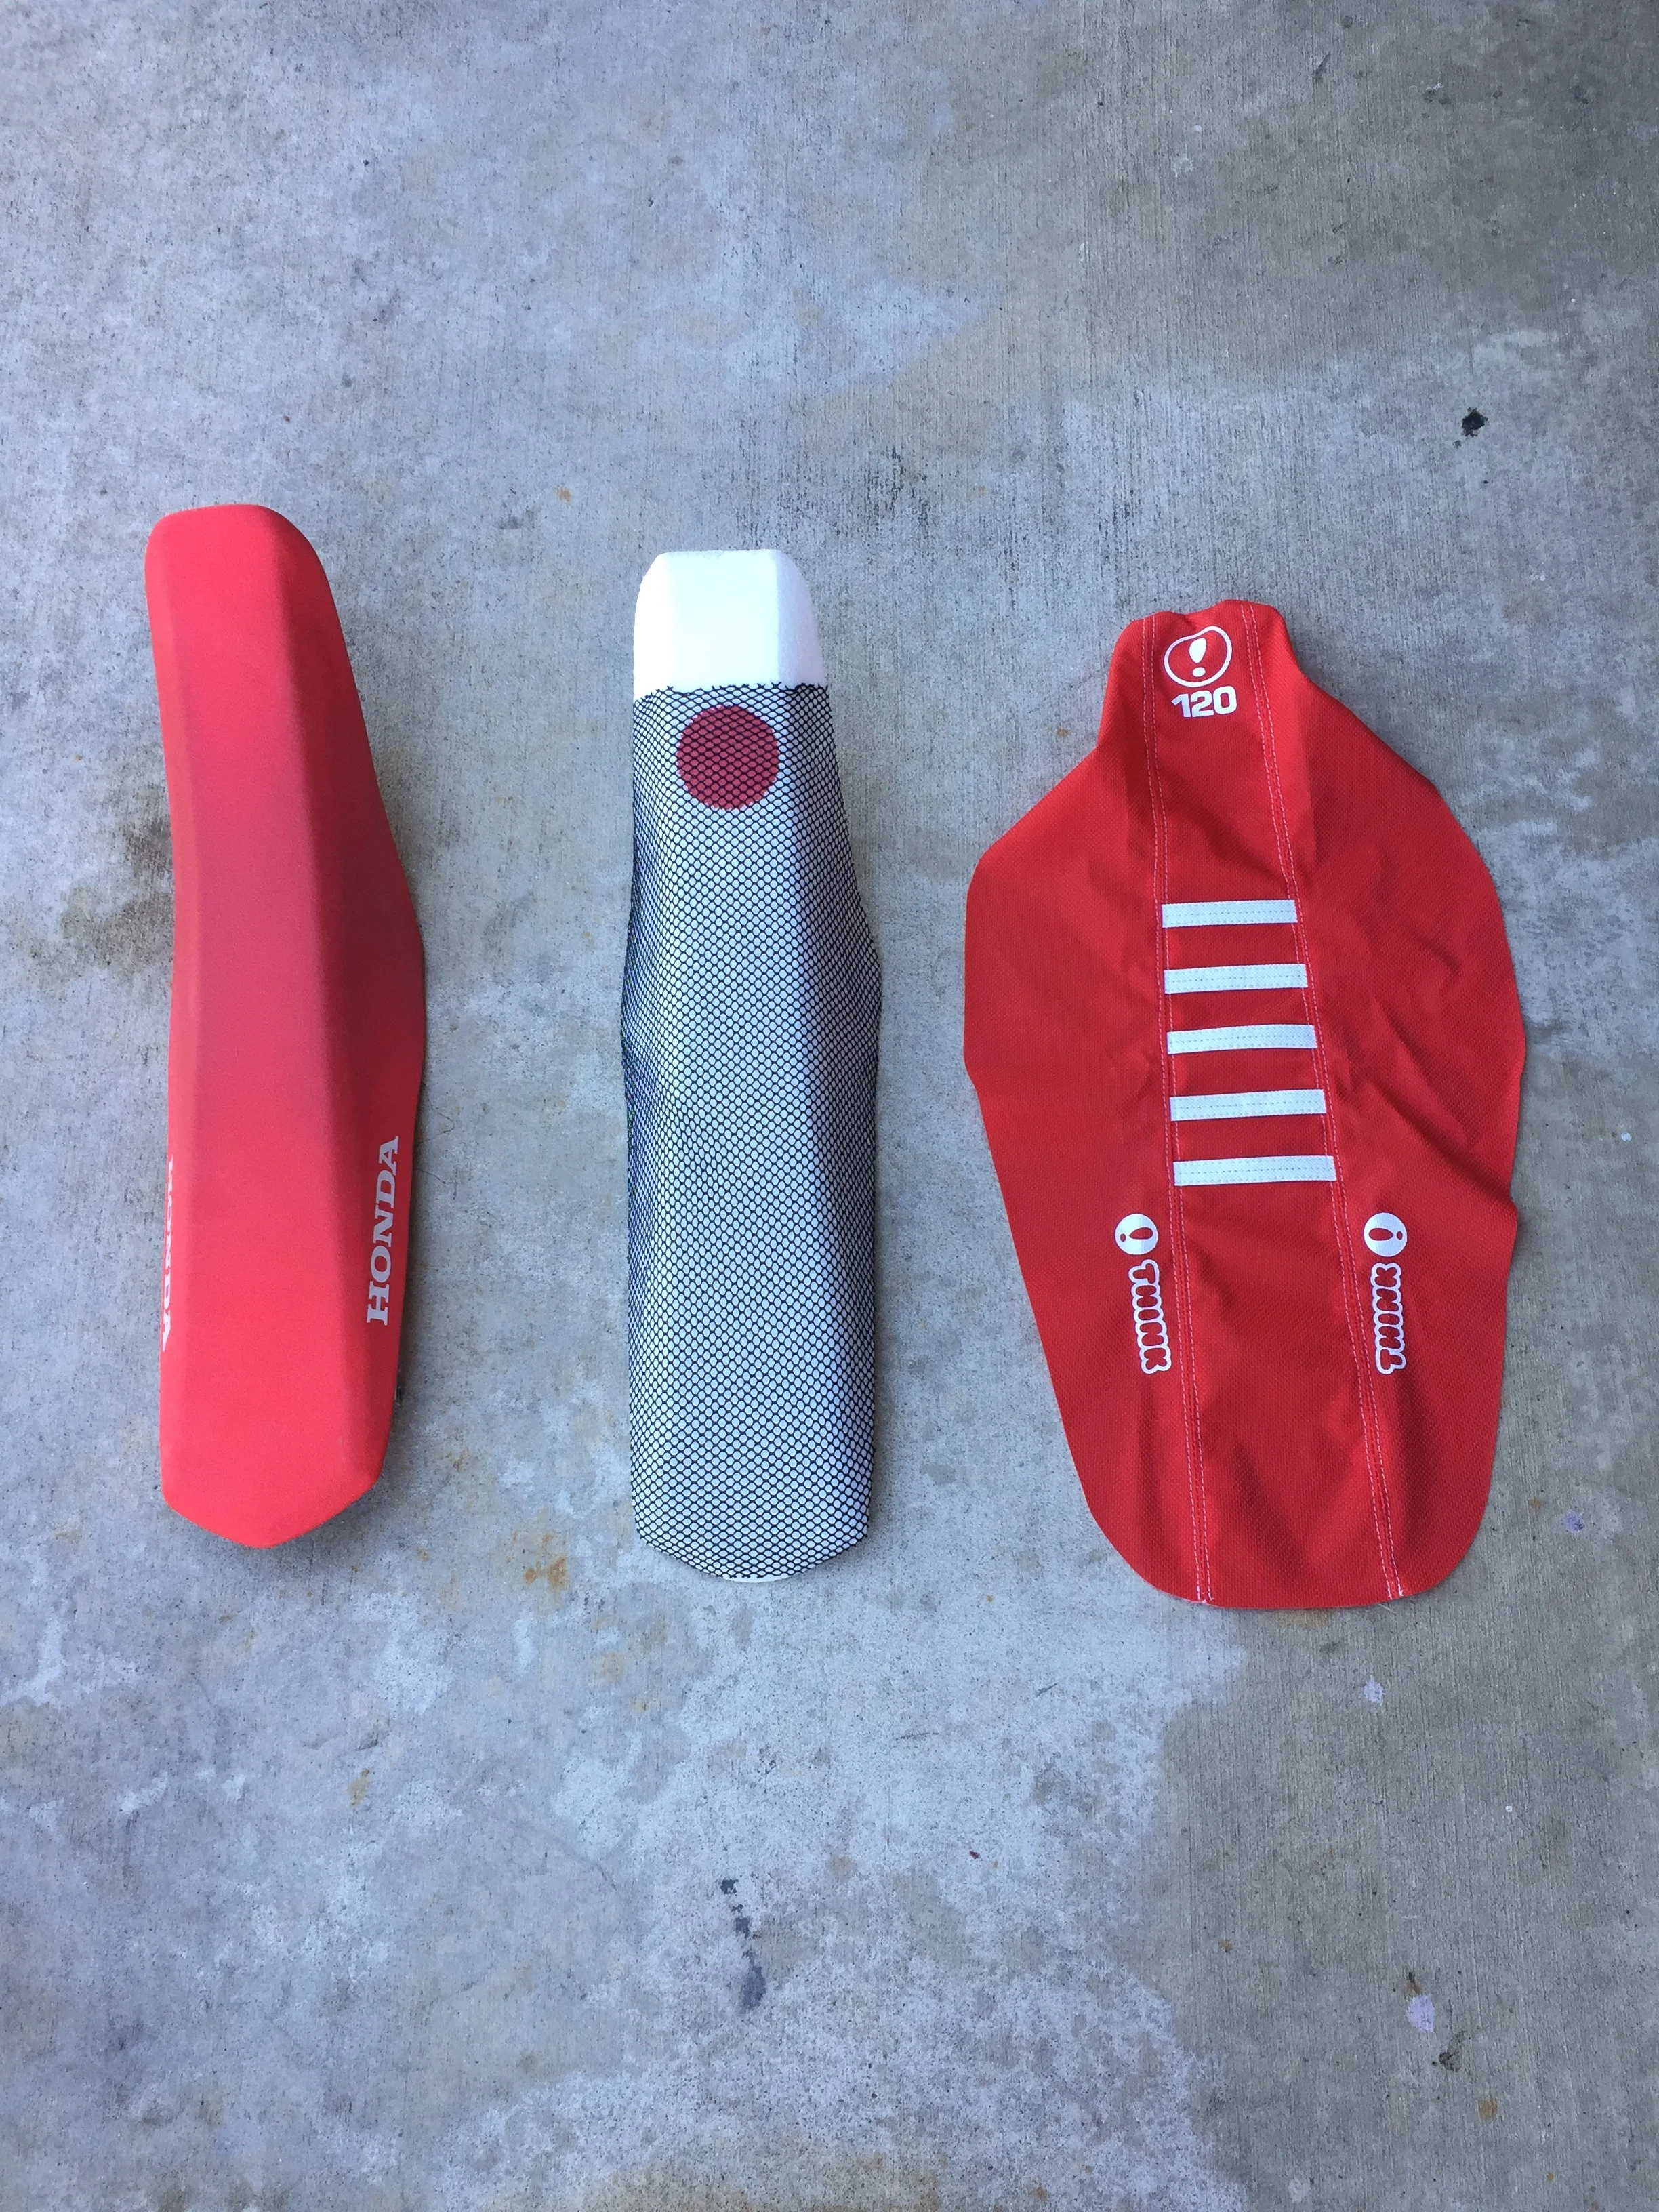
 There is a saying in racing that goes something like this “worry about the ounces and the pounds take care of themselves”, and Think Technology seems to live by this saying in everything they do. Think sent us replacement “lite” seat foam as well as a “lite” seat cover to go with the long term 2018 Honda CRF250R that I have had for some time now and I thought they forgot to put the foam in the box when UPS dropped it off (I’m not kidding, it’s that damn light!). I never really thought about seat foam and covers being a factor when it comes to the overall weight of a 200+ pound motorcycle, but when I felt compared foams, side by side, I was rather impressed. I honestly didn’t weigh them side by side since the scales I have don’t register that low, but I can tell you that the feeling in your hand is impressive and the claimed difference Think Technology says is close to one pound! I believe it, because it actually feels more than a pound on my human hand scale. 

Stock seat with Think foam and cover not installed yet.JPG

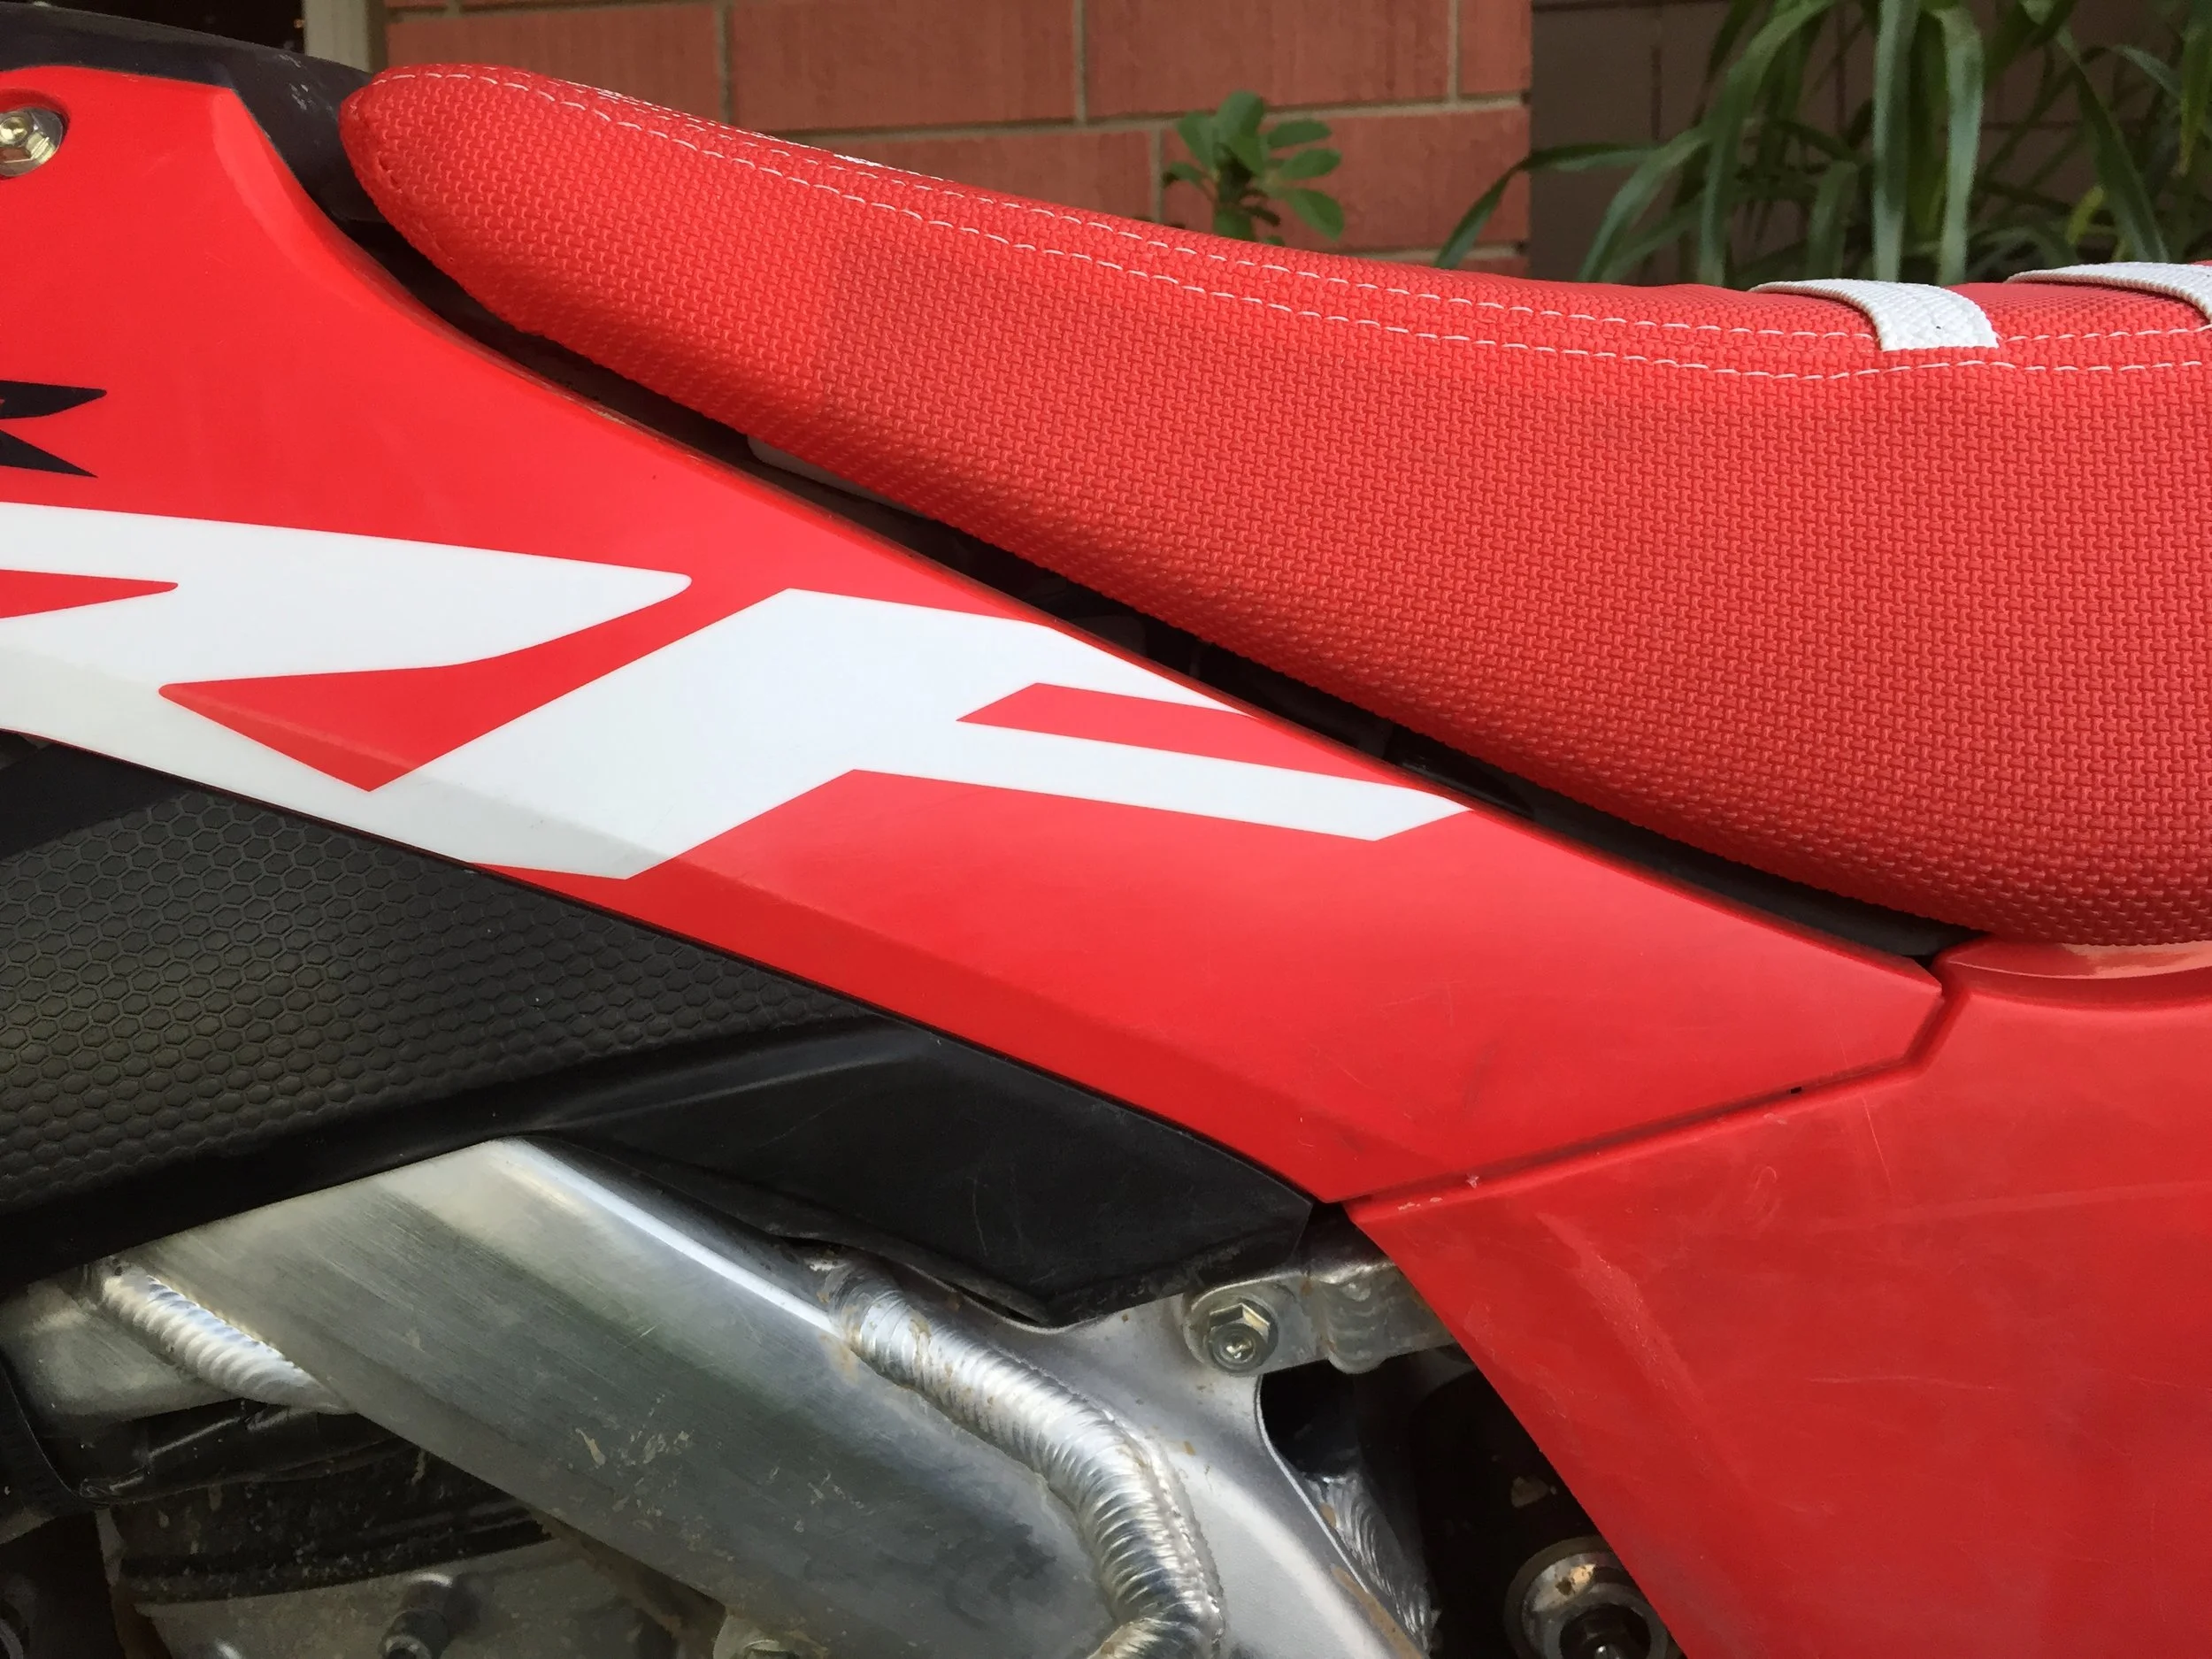
When I took off the original seat cover and foam I initially noticed the stock foam was still slightly wet from the recent washing a couple days before. The second thing I realized was that the stock foam not only goes on top of the seat pan, but the side overlaps and slightly goes around and under the stock seat pan. After all the stock parts were removed and I went to put the new foam on I realized that the foam no longer wrapped around the side and under the seat pan, which didn’t seem like a big deal at the time. The foam fit nicely on top of the pan and the new cover wrapped around the foam nice and tight with plenty of material left over on the bottom to staple. 

hink installed right side.JPG

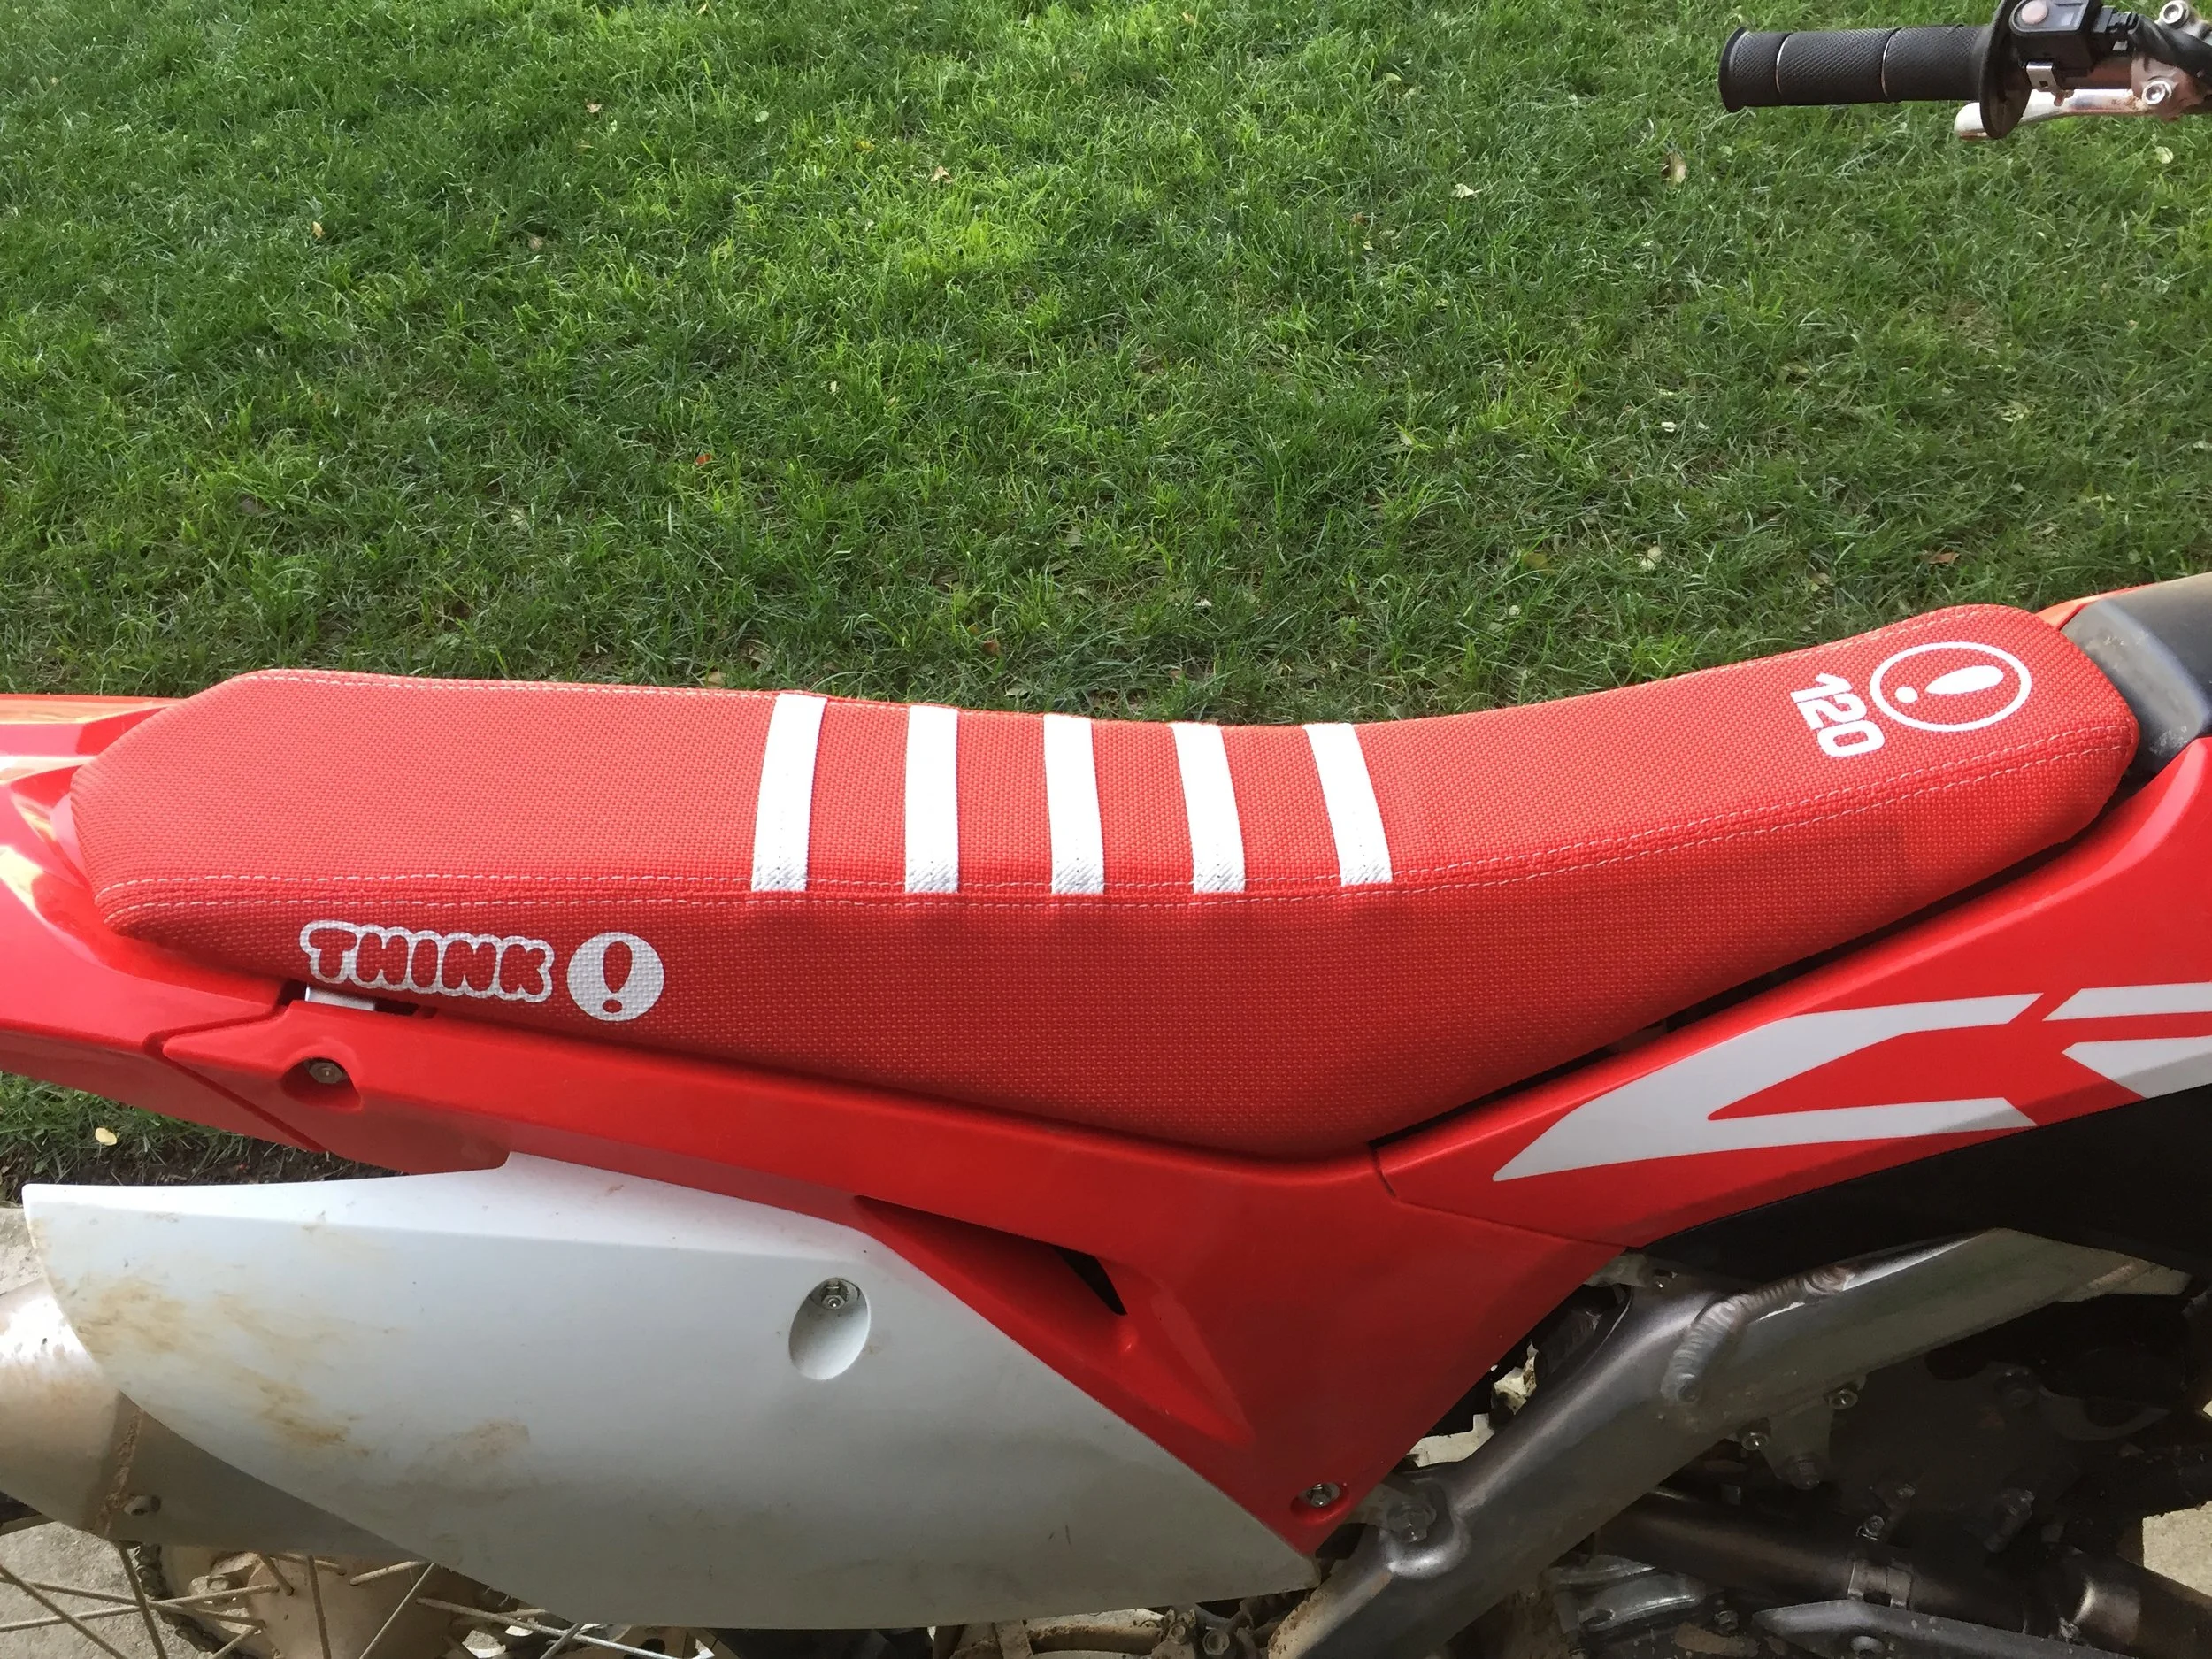
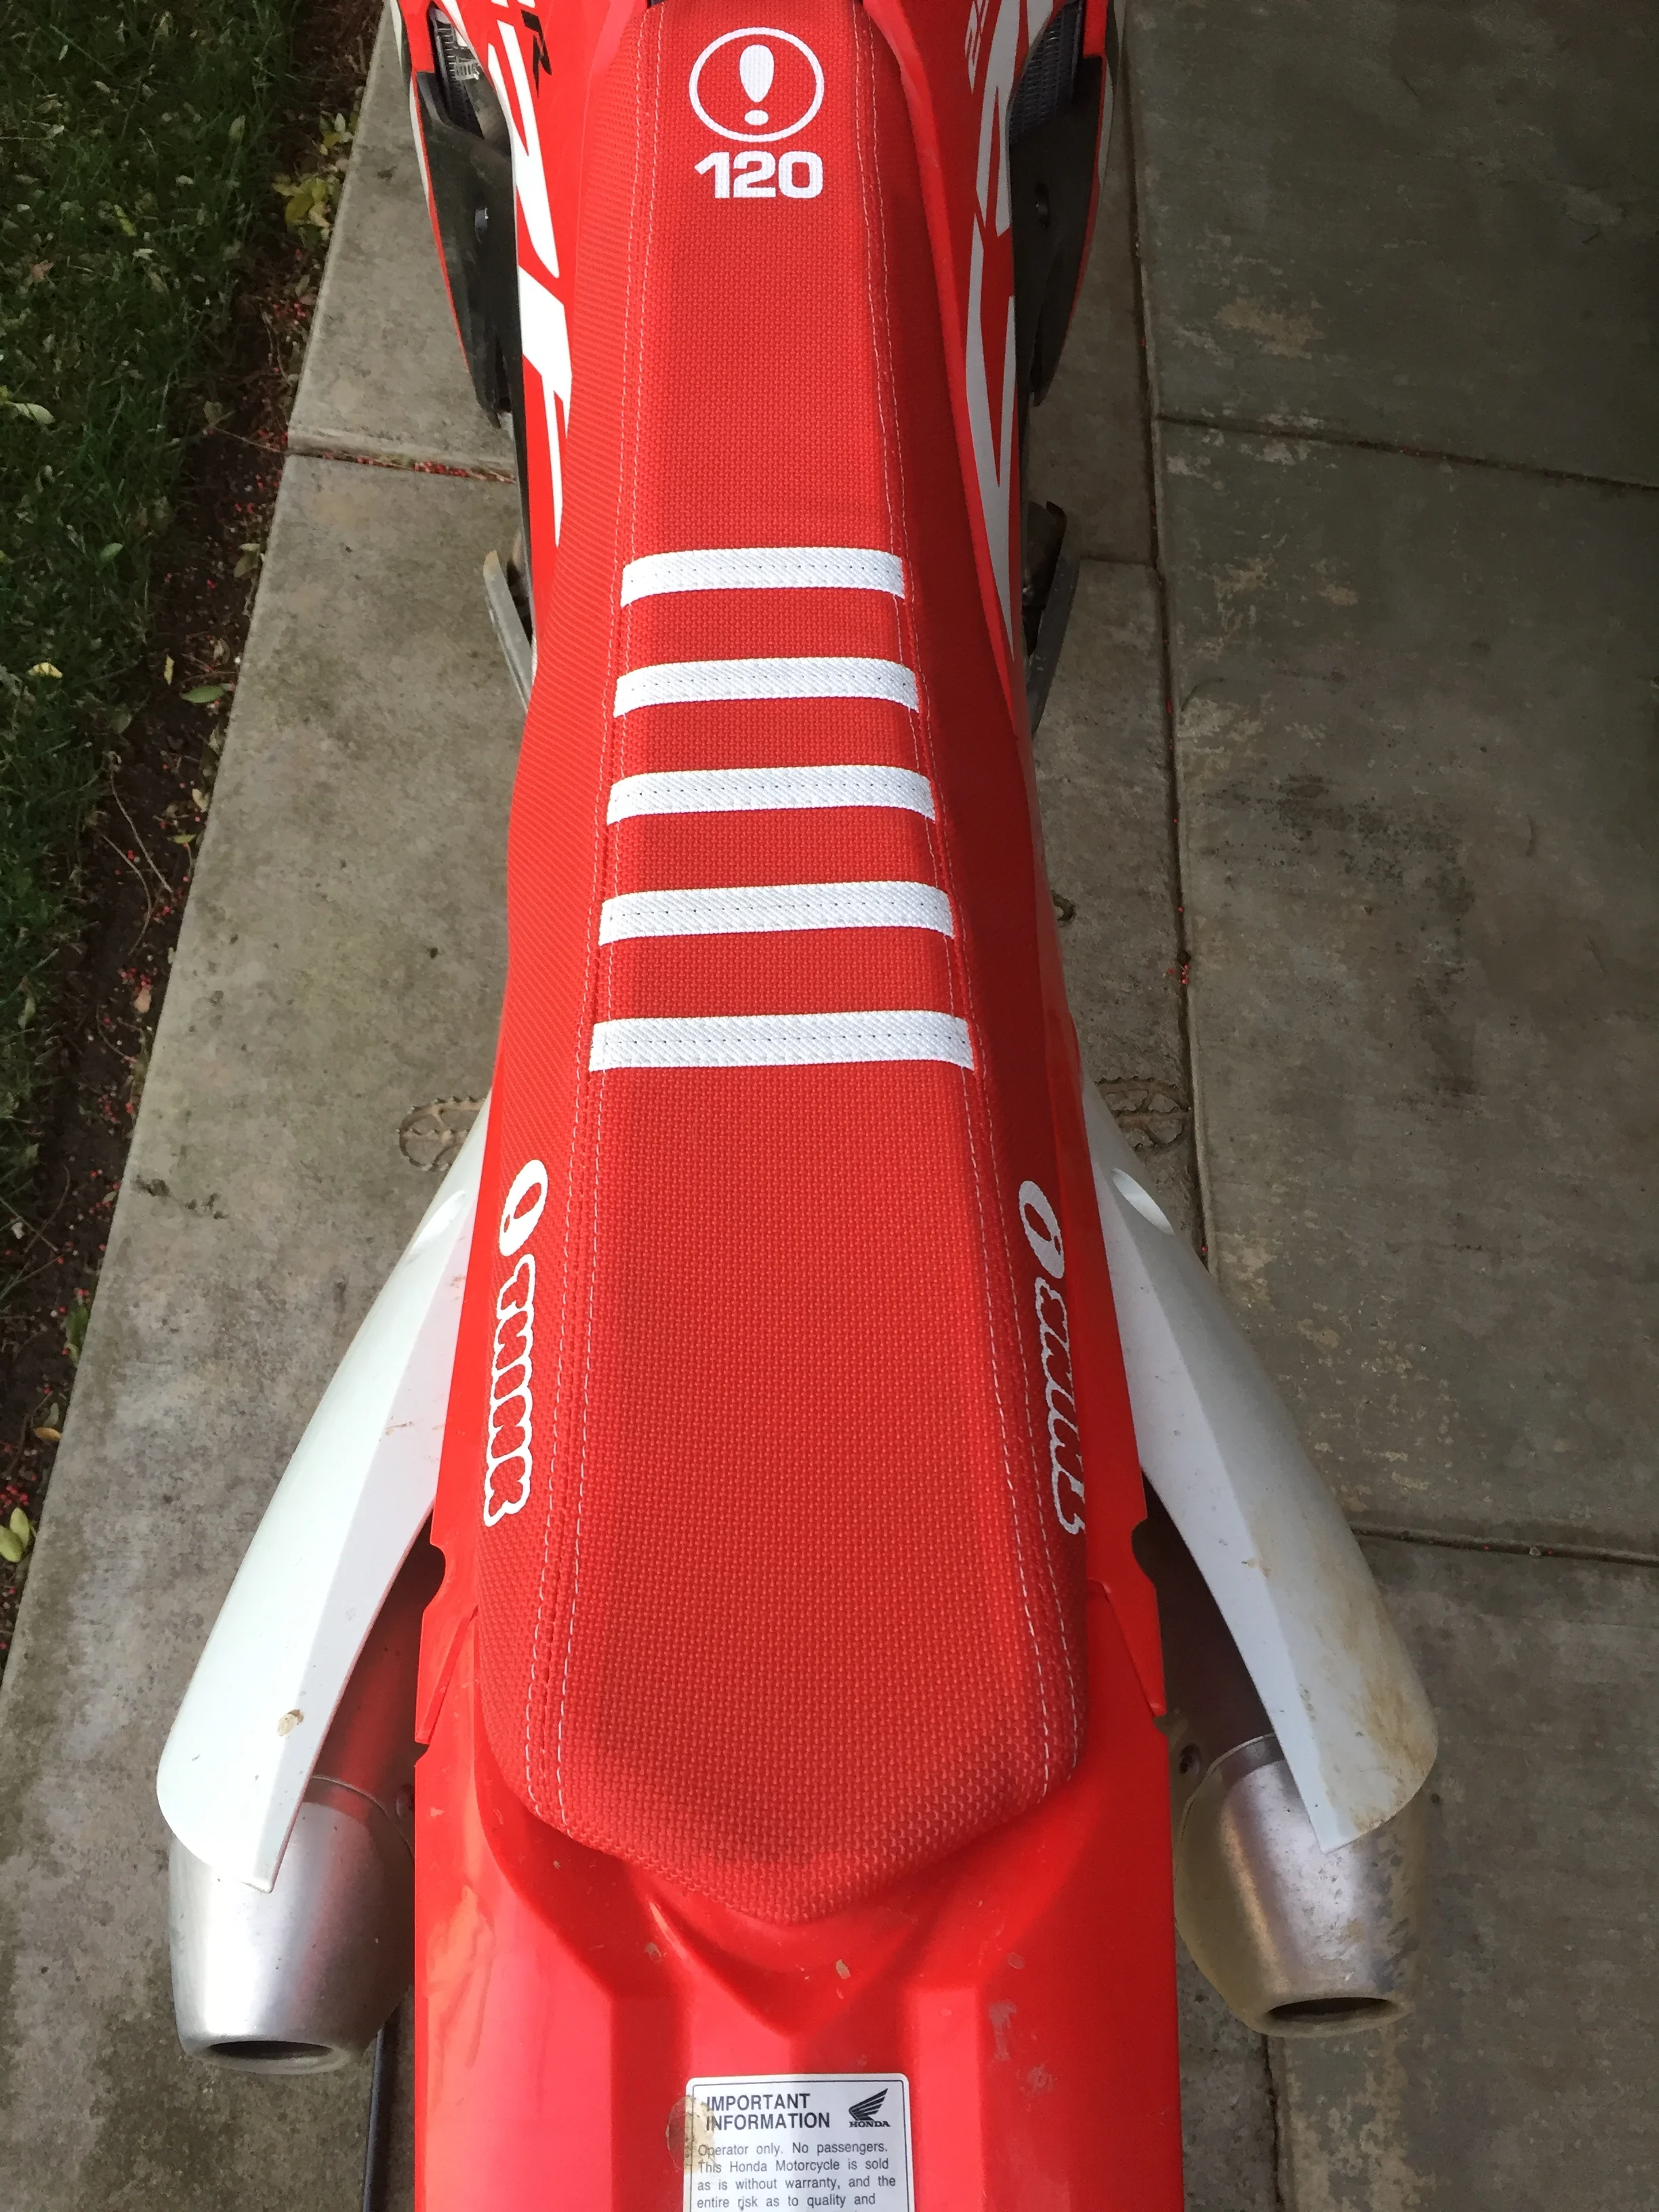
The new cover has a cool look to it with the custom “120” Think put on the front of the cover making it custom for Kris (I’m not fast enough to have my own number). Installing the seat on the bike was almost easier than the stock one, but there is a reason for that. Remember how I said the new foam didn’t wrap around the bottom of the seat pan? Well, that now created a small gap all the way around the seat between the seat and the plastics, so much so that you can see daylight between the seat and the gas tank. This gap also left the seat pan a little loose on the side of the gas tank and lets the seat rattle slightly more than stock. However, where the seat hooks to the tank isn’t wedged tight, you really don’t notice it when riding, you notice more in the pits riding out to the track. That being said, those are the only negative things about the performance of the Think Technology seat foam. On the track those couple negatives go away when you feel the nice firm seat foam, not hard, but firm which never broke down at all, as well as the grippers sewn into the cover that really keep you in place on the seat. In addition to customizing the seat with your number (if you’re fast enough to have a number) Think Technology will also put a seat bump in your specified location for an extra $40. 

Think 120.JPG

After putting many hours on the Think foam and cover I’m impressed with the holdup of the product, the cover has only slightly lost its bright red look due to all the dirt and the foam hasn’t broken down or got water logged after further inspection. I did not notice a weight difference on the track, but maybe Kris can feel that kind of stuff more than me. The other cool feature of the Think foam is that it’s a closed cell foam (which comes from the aerospace industry), this means during washes it won’t absorb or retain water, which is good for two reasons; one it will not retain the water which makes it heavy, and two it will not stay water logged and ruin the foam like stock seat foam can do. Now to the part that will scare a lot of you away, the price of the Think foam is $299.99 (plus $40.00 if you want a bump) and the cover is $59.99. I know this is a lot of money (anything related to aerospace isn’t going to be cheap), but if you are into saving every ounce (as some of you crazy weight biased people are) as well as not having to sit on a water logged seat ever again, I’d definitely look into Think Technology. -Michael Allen

There is more of a gap between the Think Seat and fuel tank compared to stock. This is common with aftermarket foams and we may have pulled this seat cover on too tight up near the front. Check back to keeferinctesting.com for an update as we instal…

There is more of a gap between the Think Seat and fuel tank compared to stock. This is common with aftermarket foams and we may have pulled this seat cover on too tight up near the front. Check back to keeferinctesting.com for an update as we install another cover on to check gap. 

Stock seat and cover comparison. 

Stock seat and cover comparison. 


Second Opinion: 

I have used the Think Technology foam on other machines like a Yamaha YZ450F and have come to the same conclusion as Michael. I like the firmness of the seat and the fact it hasn't got heavier over repeated washes (over the course of a year). As you know I ride a lot, so I wash my bike a crap ton as well and it hasn't broken down. I have heard through some grumblings that the foam shrinks up over time, but I haven't seen this happen yet. Like I said, I have had mine on the Yamaha over a year now and all is well. This is a niche product, but I like testing these niche pieces because its not the norm. It’s expensive, yes, but it’s up to you to decide if it’s worth the money. It’s a good product, but to me gives you no real advantage on the track. The advantage is the lifespan and weight consistency of the foam. -Kris Keefer

Pro Taper Fuzion Handlebars

The Pro Taper Fuzion handlebar has been around for a while now and was a totally new concept to the off-road world (for crossbar lovers) when it was released a few years ago. The flex locking system allows riders to choose between a stiffer, more controlled handlebar feel or a softer more shock absorbing feel depending on terrain and rider preference. Changing the bar from “Locked” to “Unlocked” takes only seconds by simply turning a knob. The Fuzion utilizes Pro Taper’s exclusive aluminum alloy, 4mm wall design for lightweight, strength and comes in six different bar bends.


IMG_2398.JPG

Depending on what type of bike I am riding depends on if I like running a crossbar type handlebar or not. For example when I am riding a Honda I like to have a crossbar because they come standard with one. When I ride a Yamaha I go to a handlebar without a crossbar. Why? You guessed it, because they come stock with that style. I usually can tell the difference in stiffness when I go back and forth between each type of bar so this made me want to really test this Fuzion bar. 

The 1-1/8 Fuzion handlebar weighs in at 1lb, 15oz. and was put on several of my test bikes. The easy-to-adjust locking system can be adjusted by simply taking the bar pad off and turning the knob in the middle of the crossbar. If you’re used to running a 7/8 bar with a crossbar on your bike, but want some added strength, the Fuzion is a great option. The downside to using a standard oversize bar with a crossbar is getting added rigidity through the bars that could be hard on the arms/wrists. Setting the Pro Taper Fuzion to the “unlock” position was most noticeable on the 2018 Honda CRF450R due to it being a more rigid feeling chassis. In stock form the Honda comes with a 7/8 handlebar and putting the Fuzion bar on gave me only minimal gains in stiffness through my arms. On braking bumps and hard slap down landings the bar flexed as if I didn’t have a cross bar on. Does it flex more than an oversize crossbar-less handlebar? After spending more time on both types of bars I would say it is very close.


IMG_6237.jpg

I am very picky when it comes to handlebars and I felt that the Fuzion handlebar (when in the “locked” position) is slightly more precise (than on the unlocked position) when trying to corner on hard pack slick surfaces. Also, only a little more rigidity was felt on braking bumps and on flat landings when “locked”. The smoother the track surfaces the better the Fuzion worked in the locked position. However, 90% of the time I felt the Fuzion felt best when “unlocked”. Especially for the hacked out, choppy, desert tracks I test on.  A few tip overs and one big get off left me praising the Fuzion’s durability. This happened on the CRF450R and the handlebar got twisted in the bar mounts, but the handlebar itself wasn’t bent.


So at the end of the day why not just use an oversize non-crossbar handlebar you ask? The Fuzion handlebar eliminates having “crossbar lovers” cut his/her oversized crossbar handlebars (and avoiding potential handlebar failure to achieve desired flex when he/she demands a crossbar). I like that ProTaper addressed the need for this niche and picky people like myself. Especially for riders that need to see a crossbar yet have flex when he or she rides. Yes, it is more expensive than your average 7/8 handlebar, but it also will last longer in case you are a crasher like these dudes on MX Fails.

VP T4E Race Fuel Product Review 


VP has had T4 race fuel out for a while, but VP decided to come out with an updated version of the T4 and now it’s called T4E. What’s different? The VP employee couldn't tell me the specifics as it is a secret formula, but he said that I would notice a difference on the track compared to the standard T4. Hmmmmmmm....I was skeptical, but I gave it a go. 


Designed for stock or slightly modified four-stroke motorcycles and other off-road vehicles used in competition, unleaded/oxygenated and ethanol-free T4E (no the “E” doesn't mean ethanol) is a direct pour-in replacement for premium pump gas. Since pump gas has a short storage life and could cause greater need for repairs in the motorcycle industry due to its ethanol content, T4E’s 100 octane rating (R+M/2) provides greater protection against detonation. Compared with more expensive performance parts that increase power along only a small slice of the power curve, T4E claims to add 2-3 percent more power and better throttle response across the entire rpm range. I wanted to see if that “claim” was true and have been running it in several test bikes I have here. 


                                                           VP T4E is available now.

                                                           VP T4E is available now.

The biggest advantage of VP T4E over pump gas is our current pump gas (especially California pump fuel) contains ethanol, an alcohol-based alternative fuel manufactured by fermenting and distilling starch crops that have been converted to simple sugars. This is not good on the life span of the valve train, fuel pumps, and top end gaskets on small engines like a dirt bike. Ethanol in the fuel can leave a gummy substance that clogs fuel pumps (or jets on carbureted bikes) and causes early deterioration to head gaskets and O-rings and possibly shortening the life of your engine. Another major problem is phase separation; if water gets into the fuel this can cause the water/ethanol mixture to sink to the bottom of the tank where the fuel pick up is. Here’s a tip: If you are using pump fuel and you’re at a gas station and see a fuel truck filling the gas station’s tanks, go somewhere else, because chances are they are near the bottom of the reservoir. Water inside your engine can cause the fuel pump to stop working (seize up) and also can make your bike miss and sputter. 


Is their a on-track performance gain from T4E compared to the T4? Is the T4E worth the added cost instead of using pump fuel? For the average guy putting around on weekends, maybe not so much. Pump fuel is just fine. For the true enthusiast who rides hard and wants a reliable power gain, yes, it is. I ran five gallons of T4E in the Yamaha YZ450F and it took me less than three laps to feel the added throttle response (compared to pump fuel). Coming out of corners and rolling the throttle on in second gear I felt like the bike had more pulling power down low. Shifting in third gear I felt a better pull and the Yamaha actually ran slightly cleaner throughout the rpm range. I didn’t feel too much gain through the top end as most of what I felt was down on low rpm and up through the mid range. However, riding longer motos on a sandier-type track I noticed that the bike kept consistent power. Usually when I ride this type of track with this bike the power decreases a little as the bike gets very hot – but not so with the T4E. When comparing the T4 to the T4E the T4E does give me more bottom end than the T4. The mid range was close to the same. So if you’re looking for a little more bottom end snap/pull the T4E is the real deal. One thing you might have to deal with is a slightly different smell of the T4E. It is unique! My wife Heather thought a cat came into our garage and pissed all over the place, but to me it smells like race fuel. Just slightly different and I was fine with it! But……….You might want to find somewhere to store it, so the wife doesn't yell at you. If you’re in the market for a lower cost race fuel (versus some of VP’s higher-end products) that gives you power gains and helps your bike just run better, then the T4E is a good choice.


If you have any questions feel free to email meat kris@keeferinctesting.com

Works Connection Pro Pegs

Pro Pegs

Titanium Footpegs Review


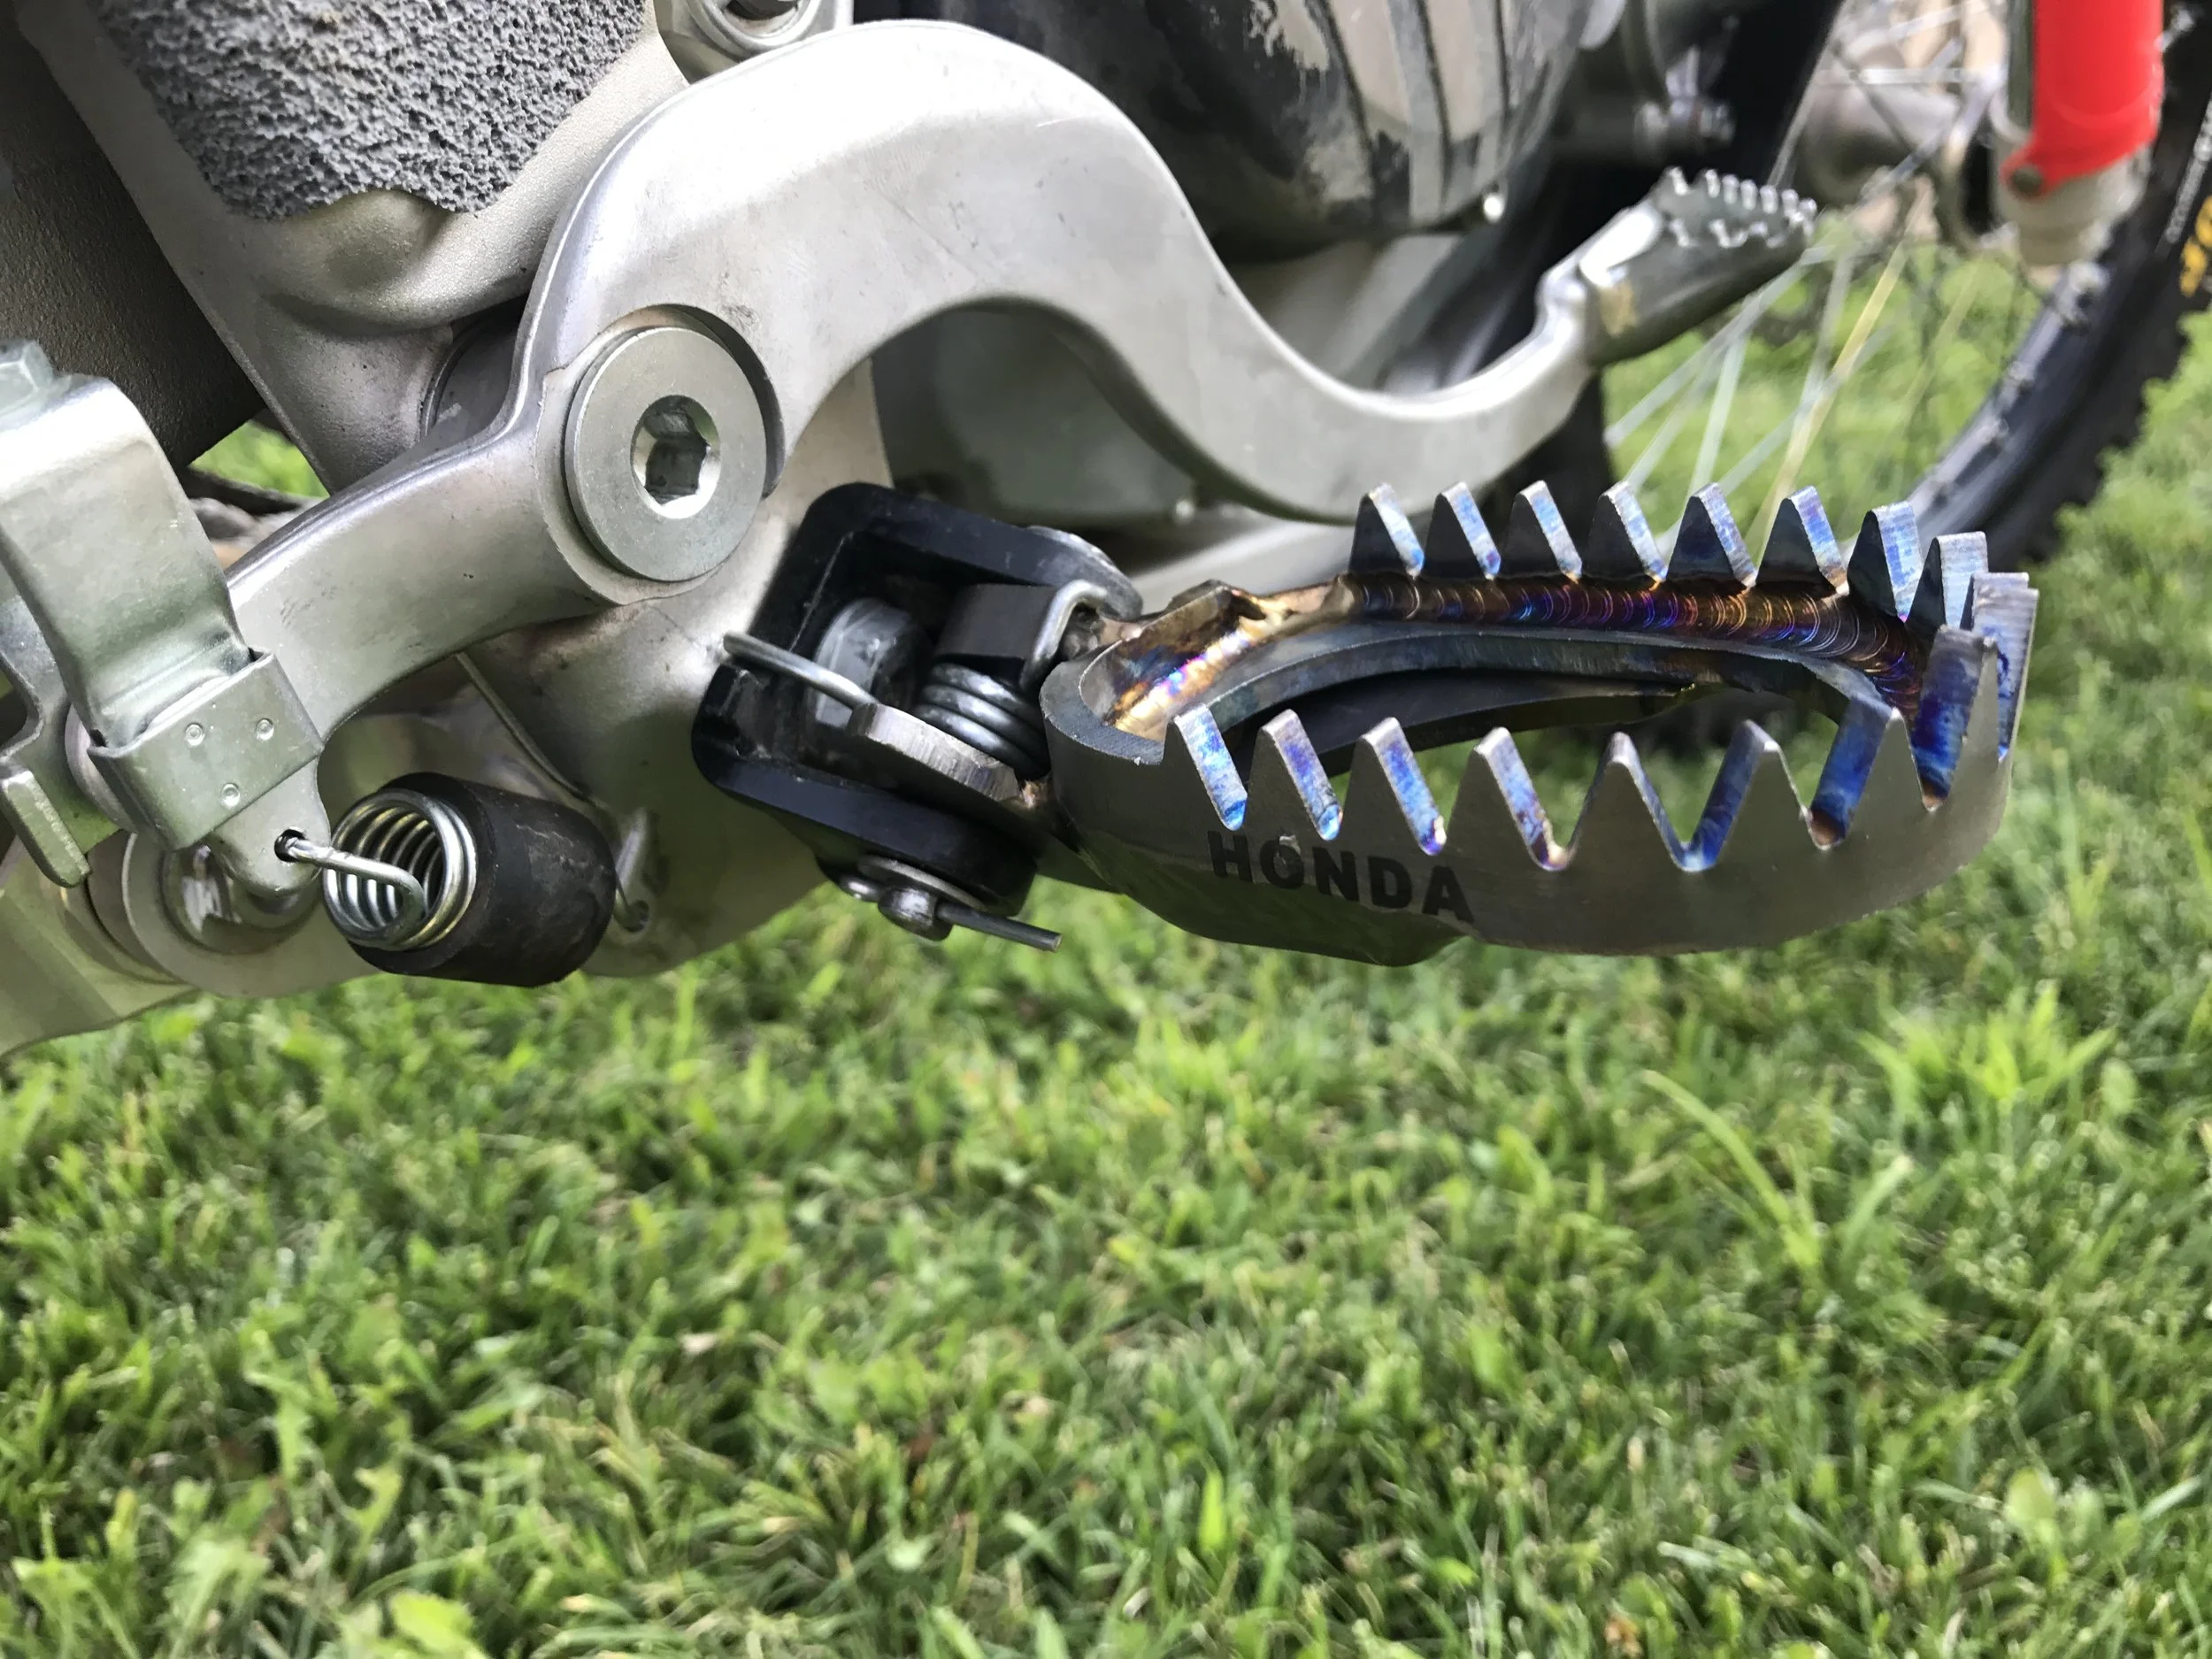
         This version was an open cleat design that a lot of GNCC riders use for muddy conditions. 

         This version was an open cleat design that a lot of GNCC riders use for muddy conditions. 


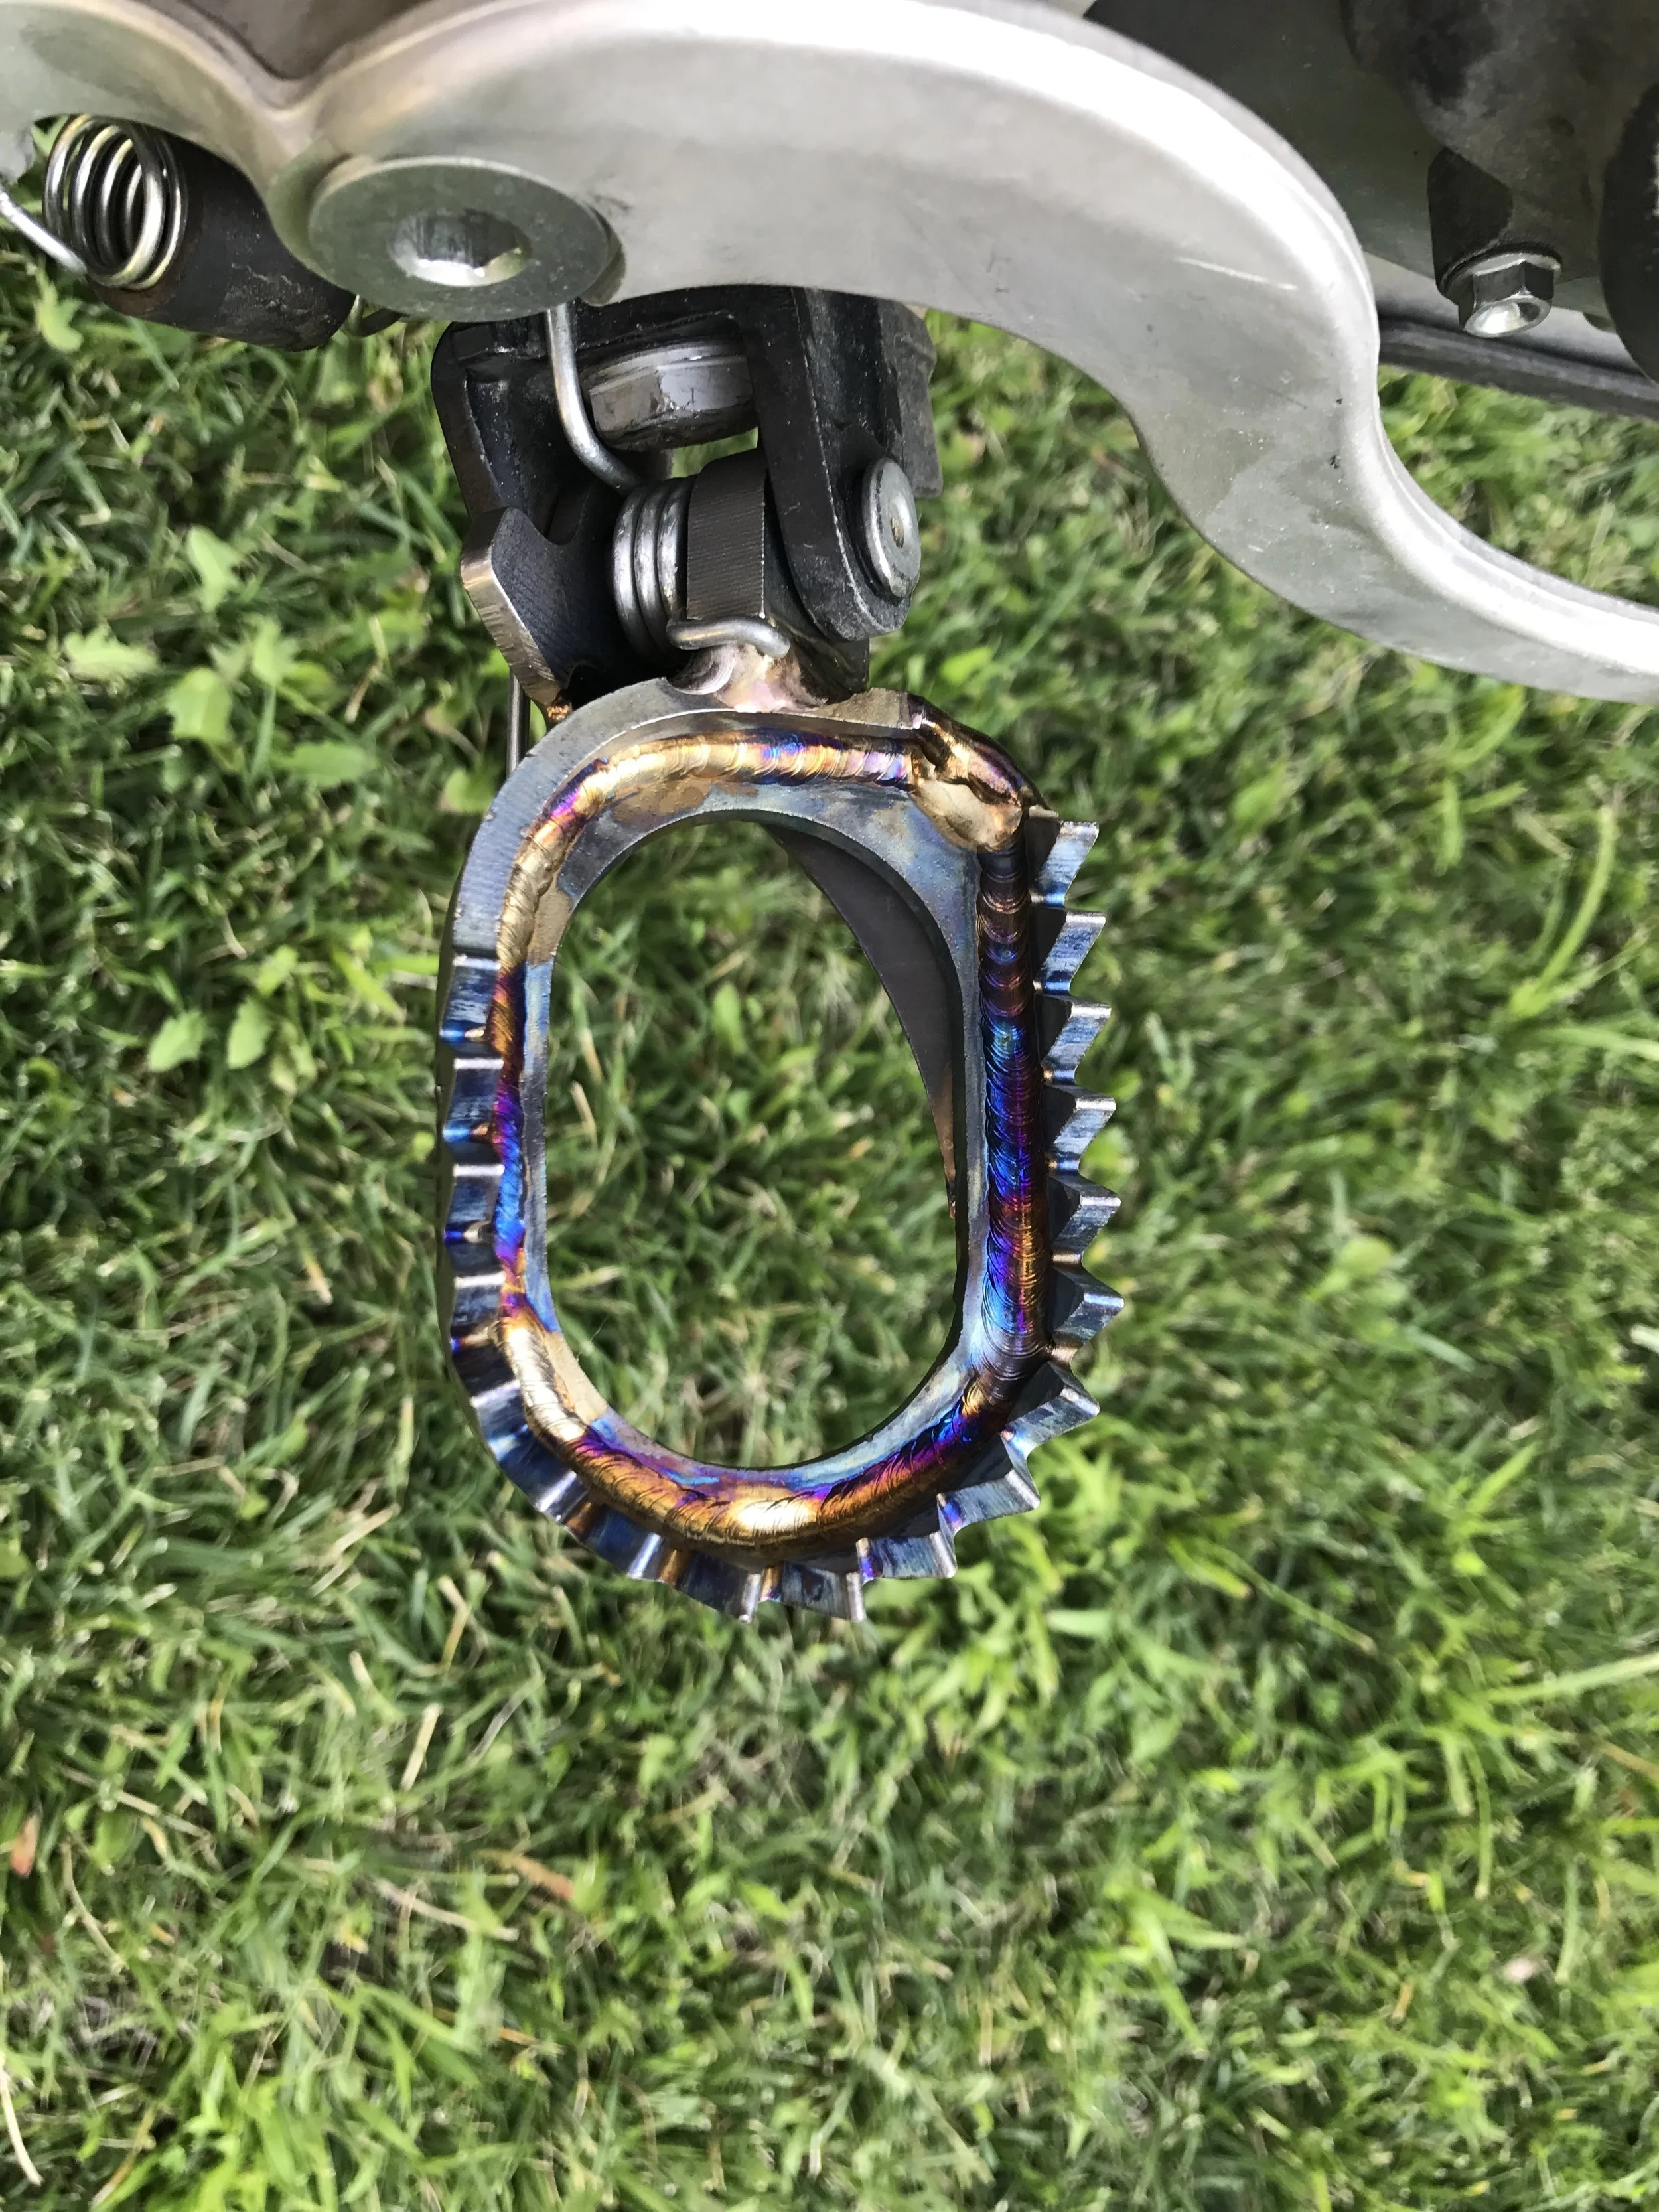
Some people don't even take the time to think about aftermarket footpegs and just keep the stock footpegs on for the duration of ownership. The stock pegs are usually pretty good and do just fine, but for those of you who haven’t had sharp or wide footpegs you really don't know what you're missing. Pro Pegs titanium footpegs are manufactured with high-grade Ti-6AL-4V titanium. These Pro Pegs are lightweight, very strong and corrosion-resistant. Each piece of the footpeg is TIG-welded together and really is a work of art. The Pro-Pegs have a factory look with impressive strength characteristics. The Pro Pegs are 60mm wide (2.4 inches), weighed in at 345 grams a set, use the stock springs and are all hand made. They will set you back $269.95 and are fairly easy to put on. The only snag I ran into was that the stock springs are tough to line up with the Pro Pegs holes and takes some finesse/patience for the pin to line up accordingly. The Pro Pegs come with two fresh cotter pins, so make sure you use the ones that come with the pegs.  


 Once on I was very impressed that the Pro Pegs lined up flat, just like the stock pegs. With some other aftermarket pegs the stop was too long and cause the footage to be tilted upward somewhat. With the Pro Pegs the footpegs lay flat and move up and down freely with no restricted movements. The Pro Pegs that you see here are the Mud/Enduro style that don’t have the middle cleat, which I prefer. I like the open design to keep mud out of the footpeg as much as possible for maximum grip. They make a full cleat (which has a middle cross brace), but I chose this style to try on the 2017 Honda CRF450R. I have seen many top tier factory motocross teams run this design and wanted to see if it affected my grip on the bike. I have tried the full cleat Pro Pegs on past test bikes and didn't notice any extra grip with the middle cross brace added. I think the open design is more trick looking and gives the bike a factory look! 


 When installing remember to always bend the fresh cotter pin around to ensure it doesn't slide outward. 

 When installing remember to always bend the fresh cotter pin around to ensure it doesn't slide outward. 

The Pro Pegs teeth (all 18 of them) are sharp and much deeper than that of a stock peg. The amount of teeth on a footpeg is not as important to me as the sharpness of each tooth. Each tooth is much sharper on the Pro Peg (than stock) and although there are less of them, than a stock Honda peg, the grip that I get is much higher. I can feel the soles of my boots digging in instead of just riding on top of a dull footpeg. I feel more locked in with the bike and I am able to ride on the balls of my feet easier with these sharper/wider Pro Pegs. Yes, the Pro Pegs will eat the soles of your boots faster than the stock pegs, so make sure to keep an eye on the soles of your boots closely. I didn't notice any weight difference (on the track) or any odd vibrations through my boots with the Pro Pegs. 


The Pro Pegs are distributed by Works Connection and MotoStuff and are available now. If you are looking to get some added grip, want to really stick to your pegs and work on your technique these are a great choice. The Pro Pegs have outstanding quality and have been on my Honda for almost a year and still look great! 


Available at motostuff.com and worksconnection.com