Suspension

Coppersmith Aero/Hybrid Fork

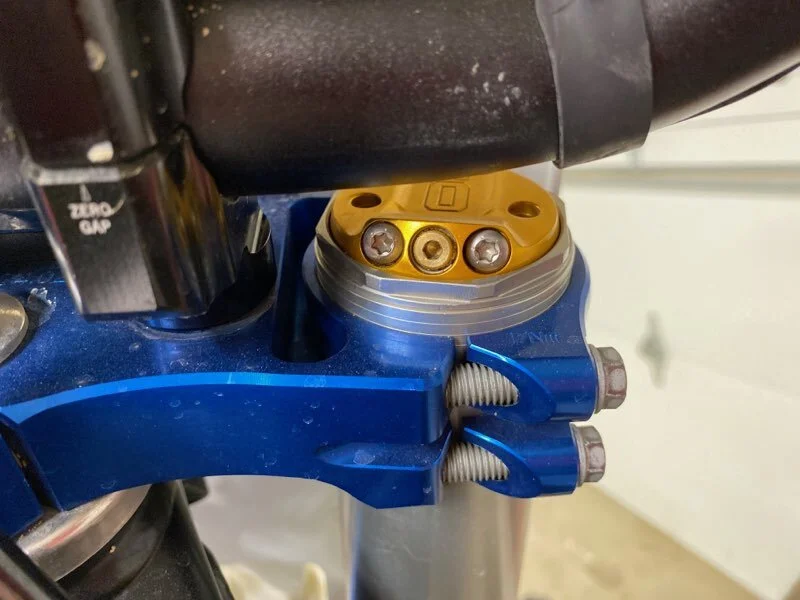
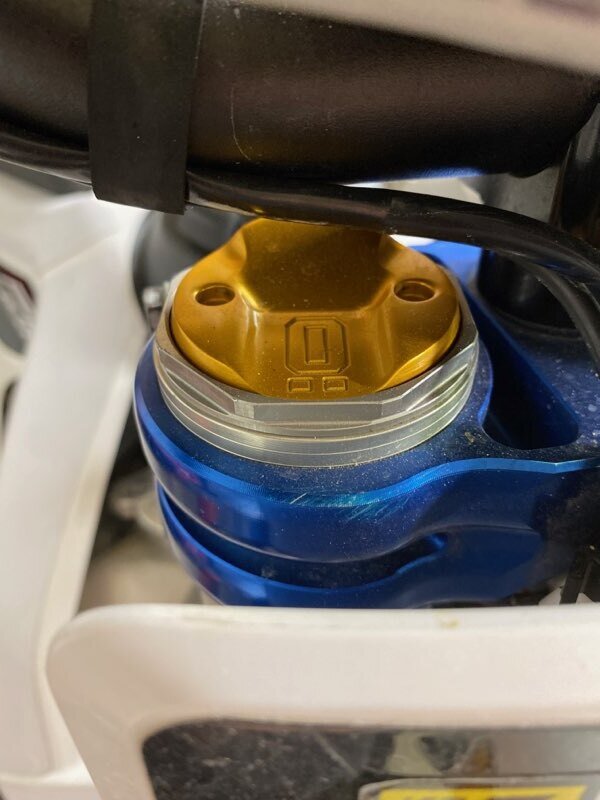
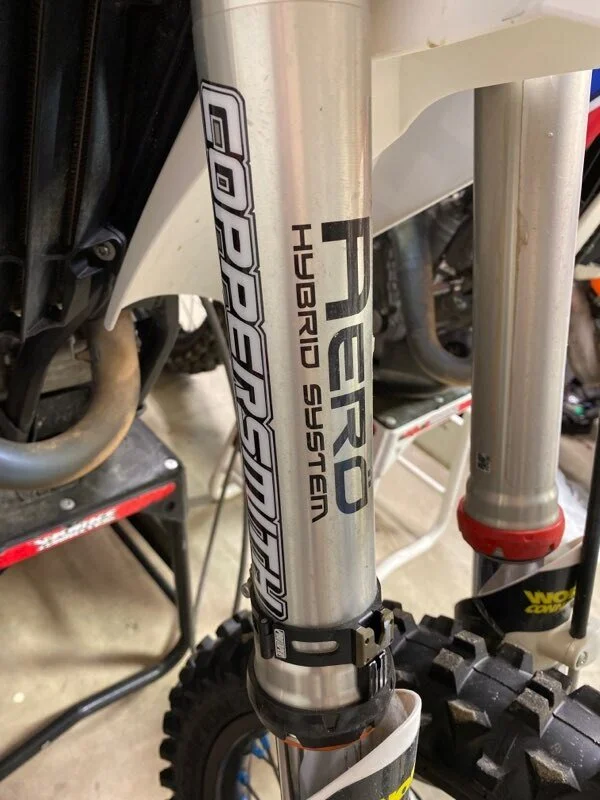
Coppersmith Racing Suspension has been around as long as I can remember and they have been mostly known for their Ohlins suspension set-ups. I stumbled across the Coppersmith Aero/Hybrid suspension kit for the WP AER air fork from the guys over at Racer X. If you’re on the fence about air vs. spring, the Coppersmith Aero/Hybrid fork kit gives you the best of both. It combines the old school feel of a spring fork with some of the tuneability of the WP AER fork. The Coppersmith Aero/Hybrid fork kit puts a modified Ohlins TTX22 spring cartridge in one WP fork leg for damping, with an OEM stock WP AER fork leg for adjustability. In essence, it is 50% Ohlins TTX22 (damping) and 50% WP AER (air spring). So how did it work on our Husqvarna FC450 test machine? Let me break it down for you here…

61404924326__3F5F9852-F6CC-4B09-8600-A8D644FA2E19.jpeg

I can already forecast the emails coming in asking how it compares to a KYB conversion and a WP Cone Valve fork, so let me get this out of the way. I will give you the simple answer of the Coppersmith doesn’t have quite the comfort of a KYB conversion on braking bumps, but does have more comfort than a Cone Valve fork on small bump absorption. The Coppersmith hybrid fork gives the rider superior bottoming resistance (similar to the AER fork feel) with the cushion of a spring fork on chatter as well as small to medium sized braking bumps. For the conditions we have out here on the west coast, it really is very surprising how much different it feels compared to the stock WP AER fork. 

Compared to the stock AER fork the Coppersmith Aero/Hybrid fork will give the rider more front end feel (traction) on lean angle and give you a more consistent fork action throughout the day. I was worried that going to one Ohlins TTX damping fork leg would almost give me that half ass sort of feel on the track, but there was only a small dose of an AER feel while riding. The only time I could notice that I still had anything resembling an air fork is when I slammed into a jump face or purposely overshot a jump to flat. The Coppersmith hybrid fork gave me that AER bottoming resistance, but without that harsh end stroke spring fork bottoming out type of feel.

61404939691__1356586D-5154-4189-8350-CFC28F2F1DEF.jpeg

I was trying to find a negative feel on the track (compared to the stock AER set up) in order to elaborate more for you guys, but to me, going to the Coppersmith hybrid fork seems all positive, when moving on from the AER set up. The stock WP AER fork isn’t the worst fork known to man, that title goes to the Showa SFF Air fork, but I just can’t stomach the inconsistency that it comes with during the course of a long moto day. I want the same feel throughout the day and I just can’t seem to get that with a full air fork set up. Maybe the only real negative that I experienced is that you still have to adjust the air pressure on the WP AER side of the hybrid. But Keefer, aren’t you still working with an air spring? 

Yes, we are, but the left side AER fork will now be ran at a very low pressure (6 bar) to accommodate the Ohlins TTX 22 cartridge. Running a lower air pressure eliminates almost all of the inconsistency of a higher pressure fork setting. Yes, the air will still fluctuate during a longer moto, but to me the feeling I get on the bike during the course of the day remains much more consistent than when running higher air pressures. A lower .45 spring rate is used in the Ohlins cartridge side and running the clickers at 13 clicks of compression and 14 clicks of rebound seemed to be the best setting between a 170 and 200 pound rider.

What about the weight bias between the right/left fork legs while riding? 

Yes, I could feel a slight weight difference on initial lean on right hand corners with the hybrid system, but it was minimal and I am a very hypersensitive test rider. When letting my other test rider try the Coppersmith hybrid fork he mentioned nothing of weight bias feel (left to right) and could NOT tell a difference. 

61404942681__5FAC8A86-7ADD-457B-9017-9EE18B1D5F69.jpeg

Although we didn’t install the Ohlins TTX22 cartridge in the fork, Coppersmith offers the installation to the customer. Just ship them your right fork leg and let Coppersmith handle it for you. Coppersmith also offers DLC and titanium Carbon/nitride coating as an upgrade if you’re feeling factory. Another benefit to installing the Coppersmith Aero/hybrid kit in only one fork leg is that it saves weight over a traditional coil spring fork plus cuts down on shipping cost and retails for $995 (installed). For more information call Coppersmith at (234) 229-9059.

Ride Engineering Full Performance Linkage (Husqvarna FC450)

Getting that comfortable feel as well as increased track toughness can be somewhat hard to find on the Husqvarna FC450. At least for me anyway. I can go to tracks that are soft and tighter and be completely happy with the Husqvarna and then go to a fast/choppy track that has more flowing corners and be confused on why this bike feels so different. I know a couple companies have been making different linkage ratios for the Husqvarna and KTM’s, but I wanted to try Ride Engineering’s performance linkage system on the FC450 to see if it actually improves upon the ride comfort on choppy tracks. 

 You might be saying to yourself, well what about the KTM Keefer? I do similar negative feelings on the KTM that I do on the white bike, but the Husqvarna does seem like it’s slightly more forgiving at times on rougher tracks. As you may already know this link also can work on the KTM, so if you’re on an orange bike, this test could also apply to you. I will be doing a full review on a couple different linkage systems (Ride Engineering/REP) on the KTM in the coming weeks, just to see if I can feel a difference between each. 

IMG_0365.jpg

So what exactly am I looking for here? Why is there a need for a different linkage ratio on this machine? Why didn't the R&D team at KTM/Husqvarna choose the ratio that Ride Engineering came up with in the first place? I will give you some insider knowledge on the R&D process a little before we dive into this test. Sometimes when OEM R&D teams test suspension, often there is a few linkages that the test riders have to weed through to see which one works best for a wide range of riders on said bike. Setting up a bike for the masses is not easy to do and most of the time the OEM’s choose a setting that is more of a “comfort setting” than a performance setting to offset the stiffness of the chassis. Comfort is needed on any new production motocross bike and getting a suspension spec that coincides with the correct linkage ratio as well as frame stiffness can be tricky. Not every bike benefits from an aftermarket linkage ratio, so don’t think you need a linkage on every bike on the dealer floor. If you’re happy with the feeling that you get when you ride your machine then try not to overthink it. JUST GO RIDE! If you feel what we are describing in this test then possibly a linkage could benefit you. If you DO NOT feel the things we are explaining in this test, you can simply disregard it and move on to something else you want to add to your FC450.   

What I Want Out Of The Rear Of The Husqvarna 2020 FC450?

The rear of the Husqvarna FC450 feels somewhat rigid on acceleration chop and I can feel like my rear end is dancing around when hard on the throttle out of rough corners. I spent some days searching for some added traction/comfort by changing sag settings, spring rates and clickers, but came up empty handed. I also tried a WP Pro Component shock and that just exacerbated my problem a little more on acceleration, creating a firmer feel out of corners. Even though I had more hold up and less fade with the Pro Component shock, I wasn't happy with my acceleration feel. 

343A3707.jpg

What Did I Get Out Of The Ride Engineering Performance Linkage? 

Ride Engineering recommends that you go up a spring rate with their linkage, but I wanted to try it with the stock 45 N/m spring rate as well as a 48 N/m. The Ride Engineering pull rods are 1.3mm longer than the stock rods and the knuckle is more progressive, so it ramps up different than the stock knuckle. Once installed and the sag was set to 104mm, I immediately felt slightly more comfort out of the rear of the bike on acceleration, but also noticed it being a little low for my liking in that area. On steeper jump faces or flat landings I felt like the shock bottomed and felt empty on high speed compression. After increasing the high speed compression, it helped a little on jump faces as well as helped the empty feel on slap down landings, but it hurt acceleration traction. I installed the heavier 48 N/m spring on, reset my sag, jumped back out on the track and was quickly greeted with a firmer feel, but the firm feel didn't translate into a harsher rear end like the stock linkage/spring had. 

The rear of the Husqvarna stayed up in the stroke more out of corners, but also had a freer feeling to it, which increased my rear end traction. Another positive to the heavier rear spring/Ride Engineering linkage combo was that the control of the Husqvarna was better when hitting de-cel bumps at speed. At times with the stock shock/link, the Husqvarna would ride too low and have a sudden kick to the rear end that left me with a sensation of less control leading into corners. With the heavier rear spring and Ride link the initial braking bump feel was firmer, yet the FC450 moved less when getting to the fifth, sixth, and seventh braking bump into corners. I could hold on the throttle a little longer because I had more control as well as better action of the rear end. If there was a negative to the heavier spring/Ride Engineering link, I would have to say that it can make the Husqvarna a slightly slower cornering bike on initial lean, but to me I didn't mind the slight slower turn in feel. I know some of you may not like that, but if you find that this is bothering you then simply run your sag at 103mm and this can help initial turn in. 

IMG_0221.jpg

Like I mentioned above, I tried the WP Pro Component shock with the Ride Link set up and it gave me a similar feeling that the stock shock/Ride link set up did, but with even more hold up when ridden aggressively (of course that has something to do with the valving as well). I liked that with the Ride Engineering knuckle/rod set up of the FC450 felt less firm on acceleration and yet still had more control on de-cel bumps. 

This Ride Engineering Performance Link is $449.90 and is available over at ride-engineering.com and fits current Husqvarna/KTM models. 

If you’re a KTM owner and looking for a little comparison, stay tuned for a REP/Ride Engineering Performance Link comparison as both companies make a different knuckle ratio for the white and orange machines. Will I be able to feel the difference? Find out soon! 

Pro Tech Wrap Around Fork Guards


Not only motocross riders, but ALL motorcycle riders alike can agree on one thing; there is almost nothing worse than going to load up your bike to go ride and noticing a leaky or blown fork seal. CRAP! There are two main ways fork seals end up leaking; one is from letting mud dry on your fork tubes, then going riding and forcing the dried mud into the seal, which tears the seal. The other is from small rock nicks on the fork tube, which can create sharp high spots that tear the fork seals as well. 

Pro Tech is a company out of the United Kingdom that reached out to us to test some of their fork guards that are meant to help keep your fork tubes a little more out of harm’s way. Pro Tech noticed that modern day fork guards on production bikes are very bare and exposed on the back side, that leaves the fork tubes susceptible to being chipped by rocks/mud. Along the lines of what KTM used to do with their full wrap around production fork guards, Pro Tech designed their guards to wrap slightly further around the back of the fork leg, which made for an easier installation process than the old KTM guards. I mean it’s fork guards people, let’s not make it rocket science to install right? The theory is that with less area for rocks to get past the guard there is less of a chance at damaging the fork seals. 

IMG_3572.jpg

We used these guards first on our 2019 KTM 450XC-F test unit seen zero nicks/chips on the forks when we took them off. The next bike we put them on was our KTM 300 XCW TPI and after riding in plenty of mud, following other riders at speed on high speed gravel trails, we have yet to have a fork seal failure. The guards come with all the necessary mounting holes and/or clamps to hold the front brake cable or trip meter wire to the guards as well as coming in a few different color options. The fit of the guards are spot on, but I don’t think they look quite as good or have the quality of production fork guards. However, to me, if they truly make the seals last longer it’s worth the slightly less looking quality. Most production fork guards plastic structure feels sturdier to the hands compared to the Pro Tech guards, but the PT guards didn't break or crack under the normal bush whacking we do out here in California. One other area where the Pro Tech guards are lacking is in the diversity of brands. So far they only offer guards for KTM, Husqvarna, Sherco, and Honda, but after talking with Pro Tech they told us that the next step is to make guards for more models as long as the demand is there. Although we don’t get that much mud on the west coast, I have put a lot of hours on these guards and like previously stated, I haven’t seen an issue yet. For around $50.00 they are a relatively inexpensive way to protect your forks a little more. If you want some extra insurance on those long off-road or muddy motos maybe this could be an option for you riders out there. You can check out Pro Tech at https://www.protechguards.co.uk/ to see if they have guards for your machine. If you have any questions about the Pro Tech fork guards feel free to reach out to me at Michael@keeferinctesting.com

IMG_3570.jpg

Keefer’s Thoughts: I was told that KTM went away from the wrap around fork guard for production because of mud collecting near the tops of the fork guards at times. When we tested those models (that I had the wrap around fork guards back then) at home we didn't have an issue, but that doesn't mean it couldn't happen. I know for drier conditions the wrap around fork guard is a great way to protect more of the lower fork tube and this is a good thing. Just be aware of mud collection near the fork guard when you're riding long, deep, mud ruts. 

We are fully committed to keeping up with our complete transparency of tests, so we will always make sure that the consumer is completely communicated to about any product. -KK 

WP Cone Valve Fork And Trax Shock For The 2018.5 Husqvarna FC450 Rockstar Edition


I have been riding the 2018.5 Husqvarna FC 450 Rockstar Edition A LOT. Over the course of only a few months I have over 50 hours on the test unit I have. I am in love with how well it works on the track, how easy it is to ride and how light it feels through corners. Yes, that’s right even with the WP 48mm AER fork it is still pretty damn good. However, I can’t leave well enough alone and must tinker with things to see if I could get the white edissssshhhh even better than where it’s at currently. I called the guys at WP to see about getting a set of their Cone Valve Fork’s and Trax Shock to see if this sucker can improve even more. The Cone Valve fork and Trax shock is basically WP’s A-kit option for us average dudes out there. Yes, it is expensive, but if you are in the market for close-to-factory level suspension, it is considerably less money than the Showa A-kit sets that are for sale. The Cone Valve fork and Trax sock can be purchased at any authorized WP dealer. Your dealer then can get you your own valving set up, but for this test WP valved my stuff for me directly. WP even offers the Cone Valve and Trax suspension for the Honda, Kawasaki, Husqvarna, KTM, and Suzuki models. So is it worth the money? I rode the stock suspension and Cone Valve/Trax set ups at several different tracks and here is what I came away with:

IMG_8714.JPG


Fork: 

IMG_8879.jpg


We are dealing with two totally different types of fork’s here, so the feel on the track is going to be completely different. The stock AER fork is the best air fork on the market, but still doesn't have that predictability over the course of a full day of racing/riding. I will find a good setting with the AER fork and it changes slightly throughout the day. The first thing I noticed when I when out on the track with the Cone Valve fork was that the Husqvarna turned slightly slower on initial lean (into corners). You can actually feel the extra weight right away in the front end, but it wasn't a bad feeling, I was just surprised I could feel it this much when entering corners. I started out with a fork height of 3mm up in the fork, but went with a 5mm height setting after I felt the slower front end lean feel. Along with the extra weight feeling however I gained more front end traction through every corner (especially flat corners). The Cone Valve fork leaves you with a more front end tire contact patch sensation and you can lean over more in ruts without getting the high front end, vague feeling like I did with the AER fork. With the AER fork I get some pushing in the front end through the middle to end of the corner, which made me roll off the throttle to try and compensate. With the Cone Valve fork I can lean in the corner and the fork stayed planted, which let my front end settle and bite. The CV fork also felt less active on braking bumps. I am able to jump in and out of bigger bumps without having the fork rebound too quick. If I wanted to pound through the bumps, the fork had a better damping control feeling through the middle to end part of the stroke. The most notable change was to my wrists when over jumping or flat landing with the Cone Valve fork. The AER fork holds up well, but I feel like it stops at the end of its stroke leaving me with a spike feeling that jolts up through my hands. With the Cone Valve fork, it’s a smoother action feel and I have less harshness at the end of the stroke than I do with the AER fork. You are getting more comfort and performance with the spring CV fork than you are with the AER. The only downside I can see from going to the CV fork is the weight (which didn't bother me after a few laps) and spending the money to switch over to spring. It’s costly! The guys over at WP have great settings that can get shared with authorized dealers if need be to get you comfortable in a hurry. It only took me got me two settings to get to where I was happy with my fork setting. 


Shock:

IMG_8878.jpg


The Trax shock gave the rear of the Rockstar 450 machine a firmer feeling than the standard shock, but it wasn’t so firm that it beat you up around the track. Unlike the CV fork, you will lose a little comfort on small bump absorption, but gain performance on bigger bumps on the track. Where the stock shock will blow through at the end of the stroke (high speed compression) the Trax shock holds up better and you are able to get more aggressive around the track. I can hit the faces of jumps harder and the Husqvarna will not give you an empty, low feeling sensation that the stock shock sometimes gave me. In order to combat that feeling with the stock shock I would have to crank up the high speed compression so much that I lost the comfort coming out of corners (and rear wheel traction). The Trax shock provides you with more high-speed damping and you still get a decent amount of acceleration comfort. I also noticed a little more connectivity to the the rear wheel (when hard on the gas) on flat corners with the Trax shock. The Trax shock is firmer so there is less wallow in the rear end when accelerating, so the rear of the FC450 tracks straighter and doesn't upset the chassis. “Balanced” is a great word to describe both ends of the Husqvarna Rockstar Edition now (with the cone valve fork and Trax shock). I have the Trax system turned “off” for my setting as I felt like it had more of a dead feeling (which is a feeling that I like). A “dead feeling” is where the bike can be pushed hard into braking bumps or square edge chop and will not move or react as quickly. With the Trax “on” the rear wheel followed the ground slightly better out of choppy ruts/corners, but reacted too quickly when coming into large braking bumps when entering corners. I would think the Trax system would benefit an off-road rider that needs his rear end to move and follow the ground more at higher speeds (think west coast off-road). I ran the sag a little higher at 103mm (rather than the standard 105mm) and this seemed to be the happy spot where the Husqvarna felt less rear end low. The Trax shock is very finicky to adjustments so make sure you only do very small 1 click increments as you will be able to feel each change you make.


If I were a Husqvarna Rockstar Edition owner (which I might be in the near future) and I was looking for that next level performance, this WP set up would be a great choice. I have always felt more of an upside going from stock to WP A-Kit level suspension on a Husqvarna/KTM than I have with a KYB or Showa A-Kit level on a Yamaha or Honda. While it is expensive to obtain these bump sticks it is slightly cheaper than other “Kit” level suspension. Remember when WP wasn’t the best set of suspension you could get on a bike? All of that is long gone now as WP has come a long way with their suspension and now one of the leaders in suspension performance and comfort. I know Matthes is sick of hearing about this bike, but I can’t wait to keep riding the crap out of this thing. The WP CV fork and Trax shock is huge reason why my Husqvarna FC450 Rockstar Edition test bike works so damn good!

2018 Kawasaki KX450F Race Tech Suspension

The 2018 Kawasaki KX450F has a lot of potential to be a great machine, but the Showa SFF-Air TAC fork holds this machine back some. In stock trim the fork can be somewhat difficult to set up and get a comfortable setting. When you soften it up to get comfort, it bottoms and rides too low in the stroke. When you stiffen it up to add hold up, it becomes harsh on square edge and small acceleration chop. If I had a Kawasaki, I would put a spring conversion in it immediately, but I understand that everyone is not like me and will go to a spring fork or a spring conversion kit. I wanted to see if we could make this seem of suspension better on the KX450F, so I handed the fork and shock off to Race Tech, to see if they could get my non air fork having ass somewhat happy and comfortable on the SFF-Air TAC. 

IMG_8217.jpg


First off let me give you a brief explanation of the SFF-Air TAC fork. SFF means Separate Function Fork because each fork leg performs a separate function. The left leg contains the damping cartridge and the right fork leg contains the pneumatic air spring. TAC means Triple Air Chamber. The right fork leg houses three pneumatic air chambers to tune the air spring side of the fork. The advantages that Kawasaki and Showa seen when developing this fork was the adjustability, weight, and minimal effect on total pressure, if the fork leg and seal are damaged. The air spring allows riders of different sizes to be able to set up their bikes at the track without any disassembly or costly fork springs. Additionally, air pressure can be altered quickly when track conditions change with mud, hard pack, rocks and loamy soil. The Showa SFF-Air TAC fork weighs just over two pounds less than Showa’s current spring fork that currently comes on the Honda’s. All sounds good on paper right? Well, when this fork was introduced it quickly became apparent that it wasn't as good on the track as Showa made it sound. 


Once Race Tech did their work, I installed the suspension back on the bike and was off testing. I went to more than a few types of tracks to really dissect if this Race Tech stuff was better than the stock suspension. I went as far as getting another stock 2018 Kawasaki KX450F to ride back to back with the Race Tech suspended set. The first thing I noticed was that the fork didn't have that sticky feel to it on the top of the fork’s stroke. When accelerating out of corners with the stock suspension the fork always seemed to be hard and deflect, but with the Race Tech fork it moved more freely in the stroke and gave me increased front end feel. Mid stroke comfort was still hard to find however and that proved to be my toughest challenge over the course of this test. I played with the inner and balance air pressures a lot before I came up with a setting that I was good with. I did notice with the Race Tech fork that the movement of the fork over square edge and braking bumps was plusher than the standard fork. Basically in Layman's terms; you feel less of the track up front. Bottoming resistance was still great and when I did decide to soften the fork up a little (to get some added compliance in hard pack conditions) it didn't blow through. With the Race Tech valving I felt like each adjustment I made (in air pressure) didn't negatively affect another area (of the fork’s action) too much. To me the biggest difference between the Race Tech fork and the stock fork is “entrance of corners”. I could come into corners harder without the fork diving or getting to low in the stroke and it kept better front tire contact to the ground than the stock fork. Does this mean I feel like this Race Tech SFF-Air TAC fork is better than a spring fork now? No, it doesn’t, but at least now I can get more consistency with the front end of this Kawasaki. Spring forks still add another level of comfort  and consistency through rough conditions that this Showa air fork can’t (even with the Race Tech Gold Valves). The question I will now get asked is…. Is this fork now good enough that I could live with it on my bike? My answer to you is “yes”! Unless you’re riding very rough, dry hard pack conditions (or long off-road races) the Race Tech fork is worth the price of admission. 

IMG_8214.jpg


Going into this test I wasn't thinking that there would be that much difference in feeling on the track between the stock shock and the Race Tech shock, but I was wrong. I experienced with shock sag settings and always came back to 106 mm as that is what made the Kawasaki feel the most balanced. The most noticeable improvement that I felt was rear wheel traction (especially on acceleration). Coming out of choppy corners (with the Race Tech shock) the rear end of the Kawasaki felt more planted, stuck to the ground better and gave me more forward bite. De-cel comfort (or braking bumps) feel was also improved as the rear wheel stayed on the ground better and gave me more of a planted feel. With the stock shock the Kawasaki rear end stayed straight, but sometimes would have a noticeable kick when hitting the first big braking bump coming into a corner (which sometimes would un-settle the chassis). The Race Tech shock soaked up the first few de-cel bumps before it would want to react and when it did react, it was more of a dead feel on de-cel. The only complaint I had was that it was maybe a little too soft on g-outs or sharp transitions (high-speed compression). I stiffened the high speed up a little and that helped some, but I think I would want to try and go a touch stiffer internally with the valving. 


IMG_8216.jpg

At the end of this test I was happy to figure out that there is some hope for riders that want to keep their Showa SFF-Air TAC fork and maybe don’t want to necessarily go to a spring conversion kit. Like I said in the 2018 450 MX Shootout, “I feel like the green machine has the best overall frame feel and just needed some suspension help”. Race Tech did a great job with providing some added comfort to the 2018 Kawasaki KX450F. Below is my best suspension setting with the Race Tech valved suspension. If you have any questions about this test please feel free to email me at kris@keeferinctesting.com and I can try to help as much as I can. 


IMG_8210.jpg


Fork: 

Inner: 155 psi.

Outer: 16 psi

Balance: 170-172 psi

Fork Height: 5mm

Compression: 8 out

Rebound: 10 out


Shock: 

Sag: 106 mm

Low Speed Compression: 8 out

High Speed Compression: 2 out

Rebound: 11 out


Enzo Racing Spring Perch And Sub-Tank System For 2018 YZ450F KYB SSS Fork Product Review 

The 2018 Yamaha YZ450F is the best suspended motocross bike that is available, but that doesn't mean I’m going to leave it alone. When I got the call from Enzo Racing’s Ross Maeda to see if I wanted to test a couple fork parts, I was more than happy to see if we can make the KYB SSS fork even dreamier. 

IMG_6627.jpg


We didn't go with a fork re-valve as we wanted to see if the parts provided made a noticeable change to the existing stock 2018 valving. I personally like this approach because if you're currently happy with your valving and just needed to fine tune this was a great test to see if the Enzo parts provided could make a difference. I am 170 pounds and a front end steering rider, but I felt the stock fork setting (once broken in) was a little soft on de-cel and jump faces/transitions. Ross installed a 5.1 fork spring (5.0 is stock) and sent me out on the track to see if I liked that change, which I did. It provided a little more hold up and I could ride over the front more while being more aggressive. It did give me slightly less front end traction on lean in (coming into corners), but the trade off for me was well worth it. I did however need a little more comfort on the top part of the fork’s stroke (acceleration, light bump absorption).


enzo_technica_spring_perchMX.jpg

Next up, Ross installed the Enzo Technica fork spring perch. This perch flows more oil and is a machined aluminum piece that Ross at Enzo makes for several different models. Once the spring perch was installed, they sent me back out on the track and I immediately noticed a difference on lean angle traction. The front end traction that I lost with the 5.1 front fork spring I gained back and then some. With the spring perched installed I immediately felt more front end bite coming into corners, especially on flat corners. Where the front tire felt like it was riding more on top of the dirt now I could feel the knobs digging into the terrafirma more when I went to cut down into a rut. Another part of the fork’s action that was improved was on braking bumps. The stock Yamaha fork isn't harsh by any means, so I guess the best way to describe what I felt was more of a plush feel when hitting bumps (on or off throttle). Let me try and describe what I am feeling to you all while you are sitting there reading this: Let’s say the stock fork is a basketball that you drop 10 feet up in the air, to the ground. The Enzo fork with their spring perch installed is like dropping the same basketball to the ground, but now from only from 5 feet up in the air. This is the sensation that I get when riding that is most describable to you all. It cuts the KYB fork’s hit to each bump (or sensation to your arms) in half. I was so amazed that I had to go back to the stock spring perches just to be sure what I was feeling was in fact that much better. If you listen to my podcast, you know how I rate each test as it’s off of a numeral system. On my sheet the numeral system would look something like this: Stock fork = 3 baseline. Enzo Fork with spring perches installed = 3.5. A noticeable, positive change! 


IMG_7317.jpg

For the last test Ross installed the Enzo Sub-Tank System that was so popular several years ago. However, this is not the same system that was around back then, this is more like a 2.0 version of the Sub-Tank System. The Enzo Racing Sub-Tank system is adjustable by bleed setting screws on the side. This adjustment is tunable using a small flat blade screwdriver. The standard setting is 4 complete turns out (counterclockwise) from maximum (all the way tight clockwise). This adjustment setting creates a restriction in the tanks which will control the air compression volume depending upon the speed that the fork is compressing. In simpler terms, the tighter the adjustment, the sooner the firmness of the fork will occur. If you are experiencing bottoming, you should turn the adjuster clockwise IN 1 turn at a time. If the action feels too stiff, turn the adjuster counterclockwise OUT 1 turn. I left it on the stock setting for this test, just to get a feel for what it does. What I can tell you is that the fork still has that plushness and front end bite it had with the Enzo Spring Perches, but I can feel more of a damping feeling near the end of the fork’s stroke now with the Sub-Tanks installed. This wasn't a huge improvement, but I could hit faces of jumps harder and flat land singles further. Basically this system works great if I was racing and getting aggressive while trying to make the pass on a rider. I like how putting these Enzo Sub-Tanks on did nothing to my newfound front wheel traction that the Enzo spring perches gave me. 

IMG_7329.jpg


At the end of the day I got an even better (more comfortable) feeling front end and didn't have to re-valve my fork. I will be trying a full Enzo re-valve in the future, but I thought for keeping the stock Yamaha’s valving in and only adding a few pieces to the fork, it really helped the fork’s action and ride attitude of the bike around the track for the better. The spring perches and sub-tank system are available now. You can call Enzo at (714) 541-5218 for pricing or visit www.enzoracing.com 

For any questions about this test or any other burning questions please feel free to email me at kris@keeferinctestingcom.