Hop Up

Top 6 Mods To The Yamaha YZ125

My 14 year old son Aden has been going back and forth between two different colored 125’s, but has seemed to take a liking to the YZ125 the most lately. I decided see which simple mods could help this Yamaha YZ125 two stroke the most in order to get him some extra ponies. These modifications aren't supposed to drain your wallet, but instead will give you the most bang for your buck. Aden needed to graduate from an 85 up to a bigger machine, but needed a bike that could handle well yet be fast enough to pull him around. We stayed clear of the 250F’s for now and settled on a machine that was easy to ride for his 5’6 115 pound frame. The YZ125 to me was the safest choice as it isn’t as fast as a KTM 125 SX and handles a little better on rougher tracks. However, he’s at a level now where his balls are dropping and the throttle is getting twisted harder, so getting him a little extra horsepower was beneficial when we went to deeper tilled up tracks. Here are six very simple mods that we have done to the YZ125 in order to get more horsepower, but also keep reliability as well as some money in my bank account. These mods are set in no particular order, but getting a pipe/silencer combo with any of these mods should be first on your list of “must haves”.

IMG_6737.jpg

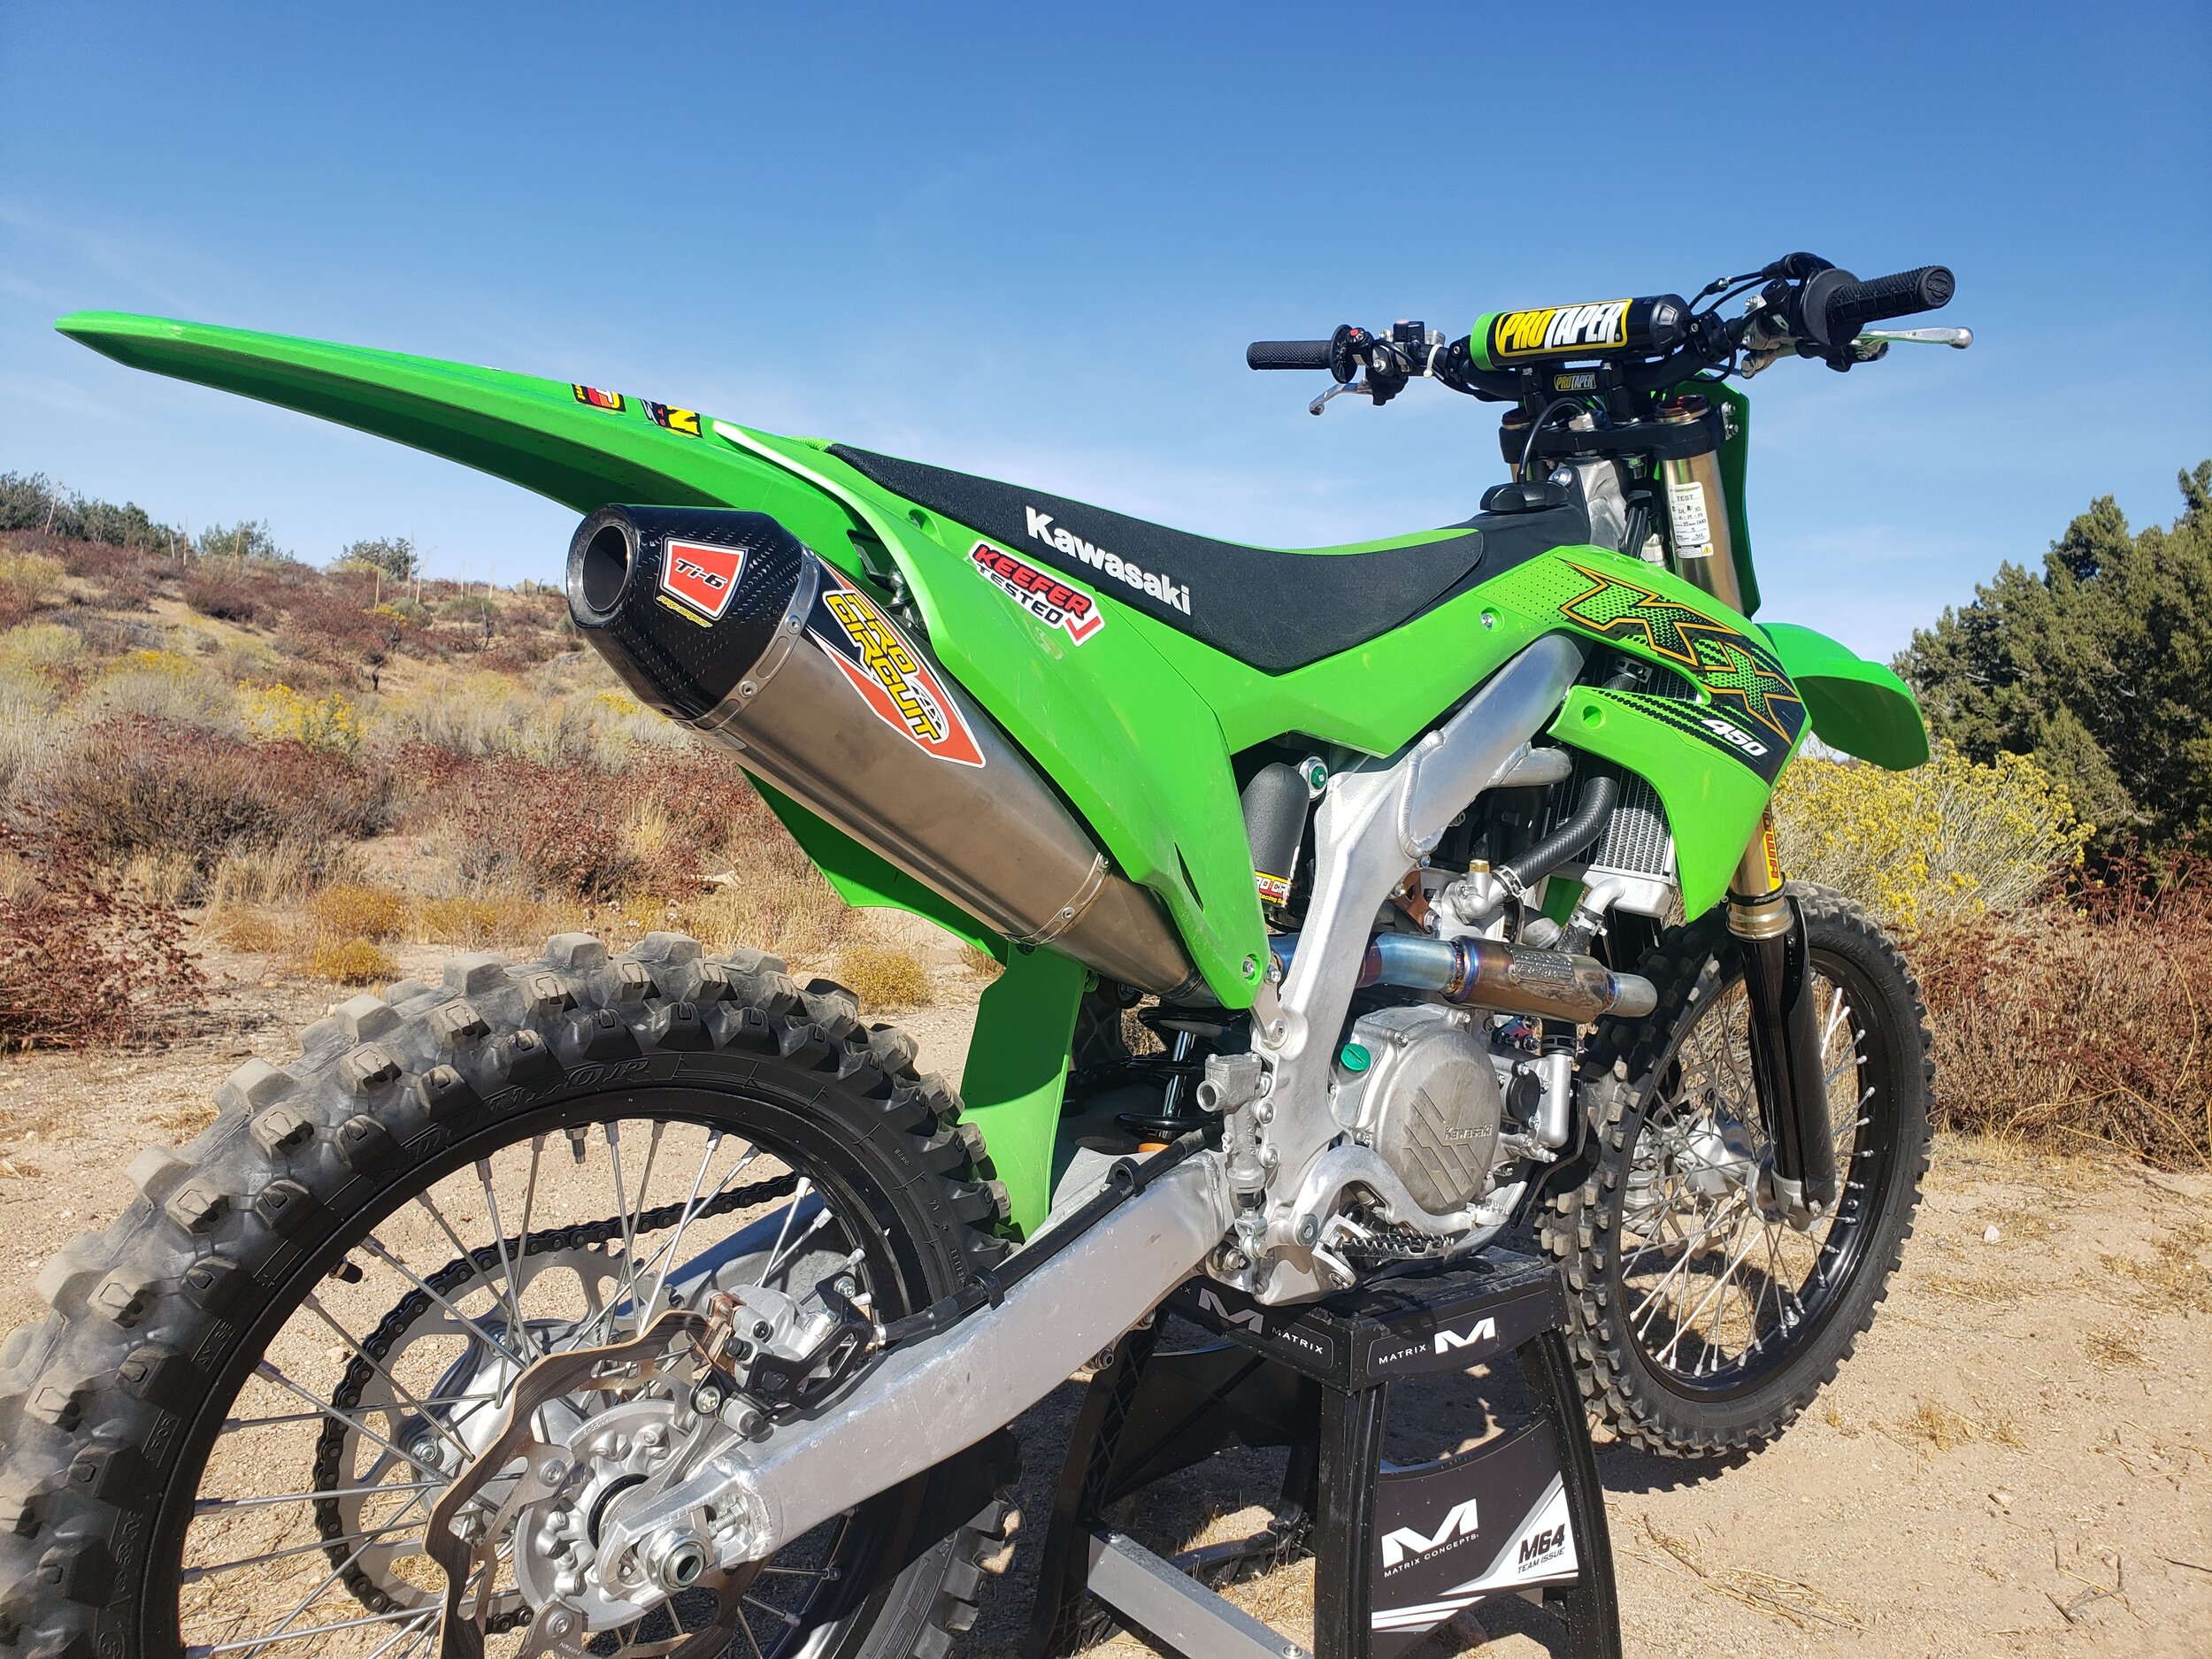
FMF Factory Fatty Pipe/Shorty Silencer or Pro Circuit Works Pipe/304 Silencer: The FMF pipe/silencer combo adds a little more pulling power out of corners over stock, while the mid range on the FMF pulls slightly longer than stock and climbs farther through the top end. The FMF set up doesn't provide more over-rev over stock, but you will notice a healthier second and third gear pull down the straights. The YZ125 runs much cleaner with the FMF pipe/silencer (compared to stock) and looks stealthy as the silencer is hidden behind the number plate. I like that the FMF pipe comes with o-rings already installed and is ready to put on. The faster the track, the more this combination shined. MSRP: $397.00 www.fmfracing.com 

IMG_7250.jpg

The Pro Circuit Works Pipe and R-304 silencer has a deeper sound than the FMF/stock system and gives the YZ125 more bottom end than the FMF. The PC pipe/silencer has increased pulling power out of corners (mid-range) and just feels like it’s more torquey. When rolling the throttle on you’re able just to feel more meat as you’re able to shift the YZ125 a little sooner. The top end signs off a little earlier than the FMF, but the Pro Circuit allows the rider to have more freedom with his/her riding without having to cover the clutch as much. MSRP: $396.00 www.procricuit.com 

IMG_7908.jpg

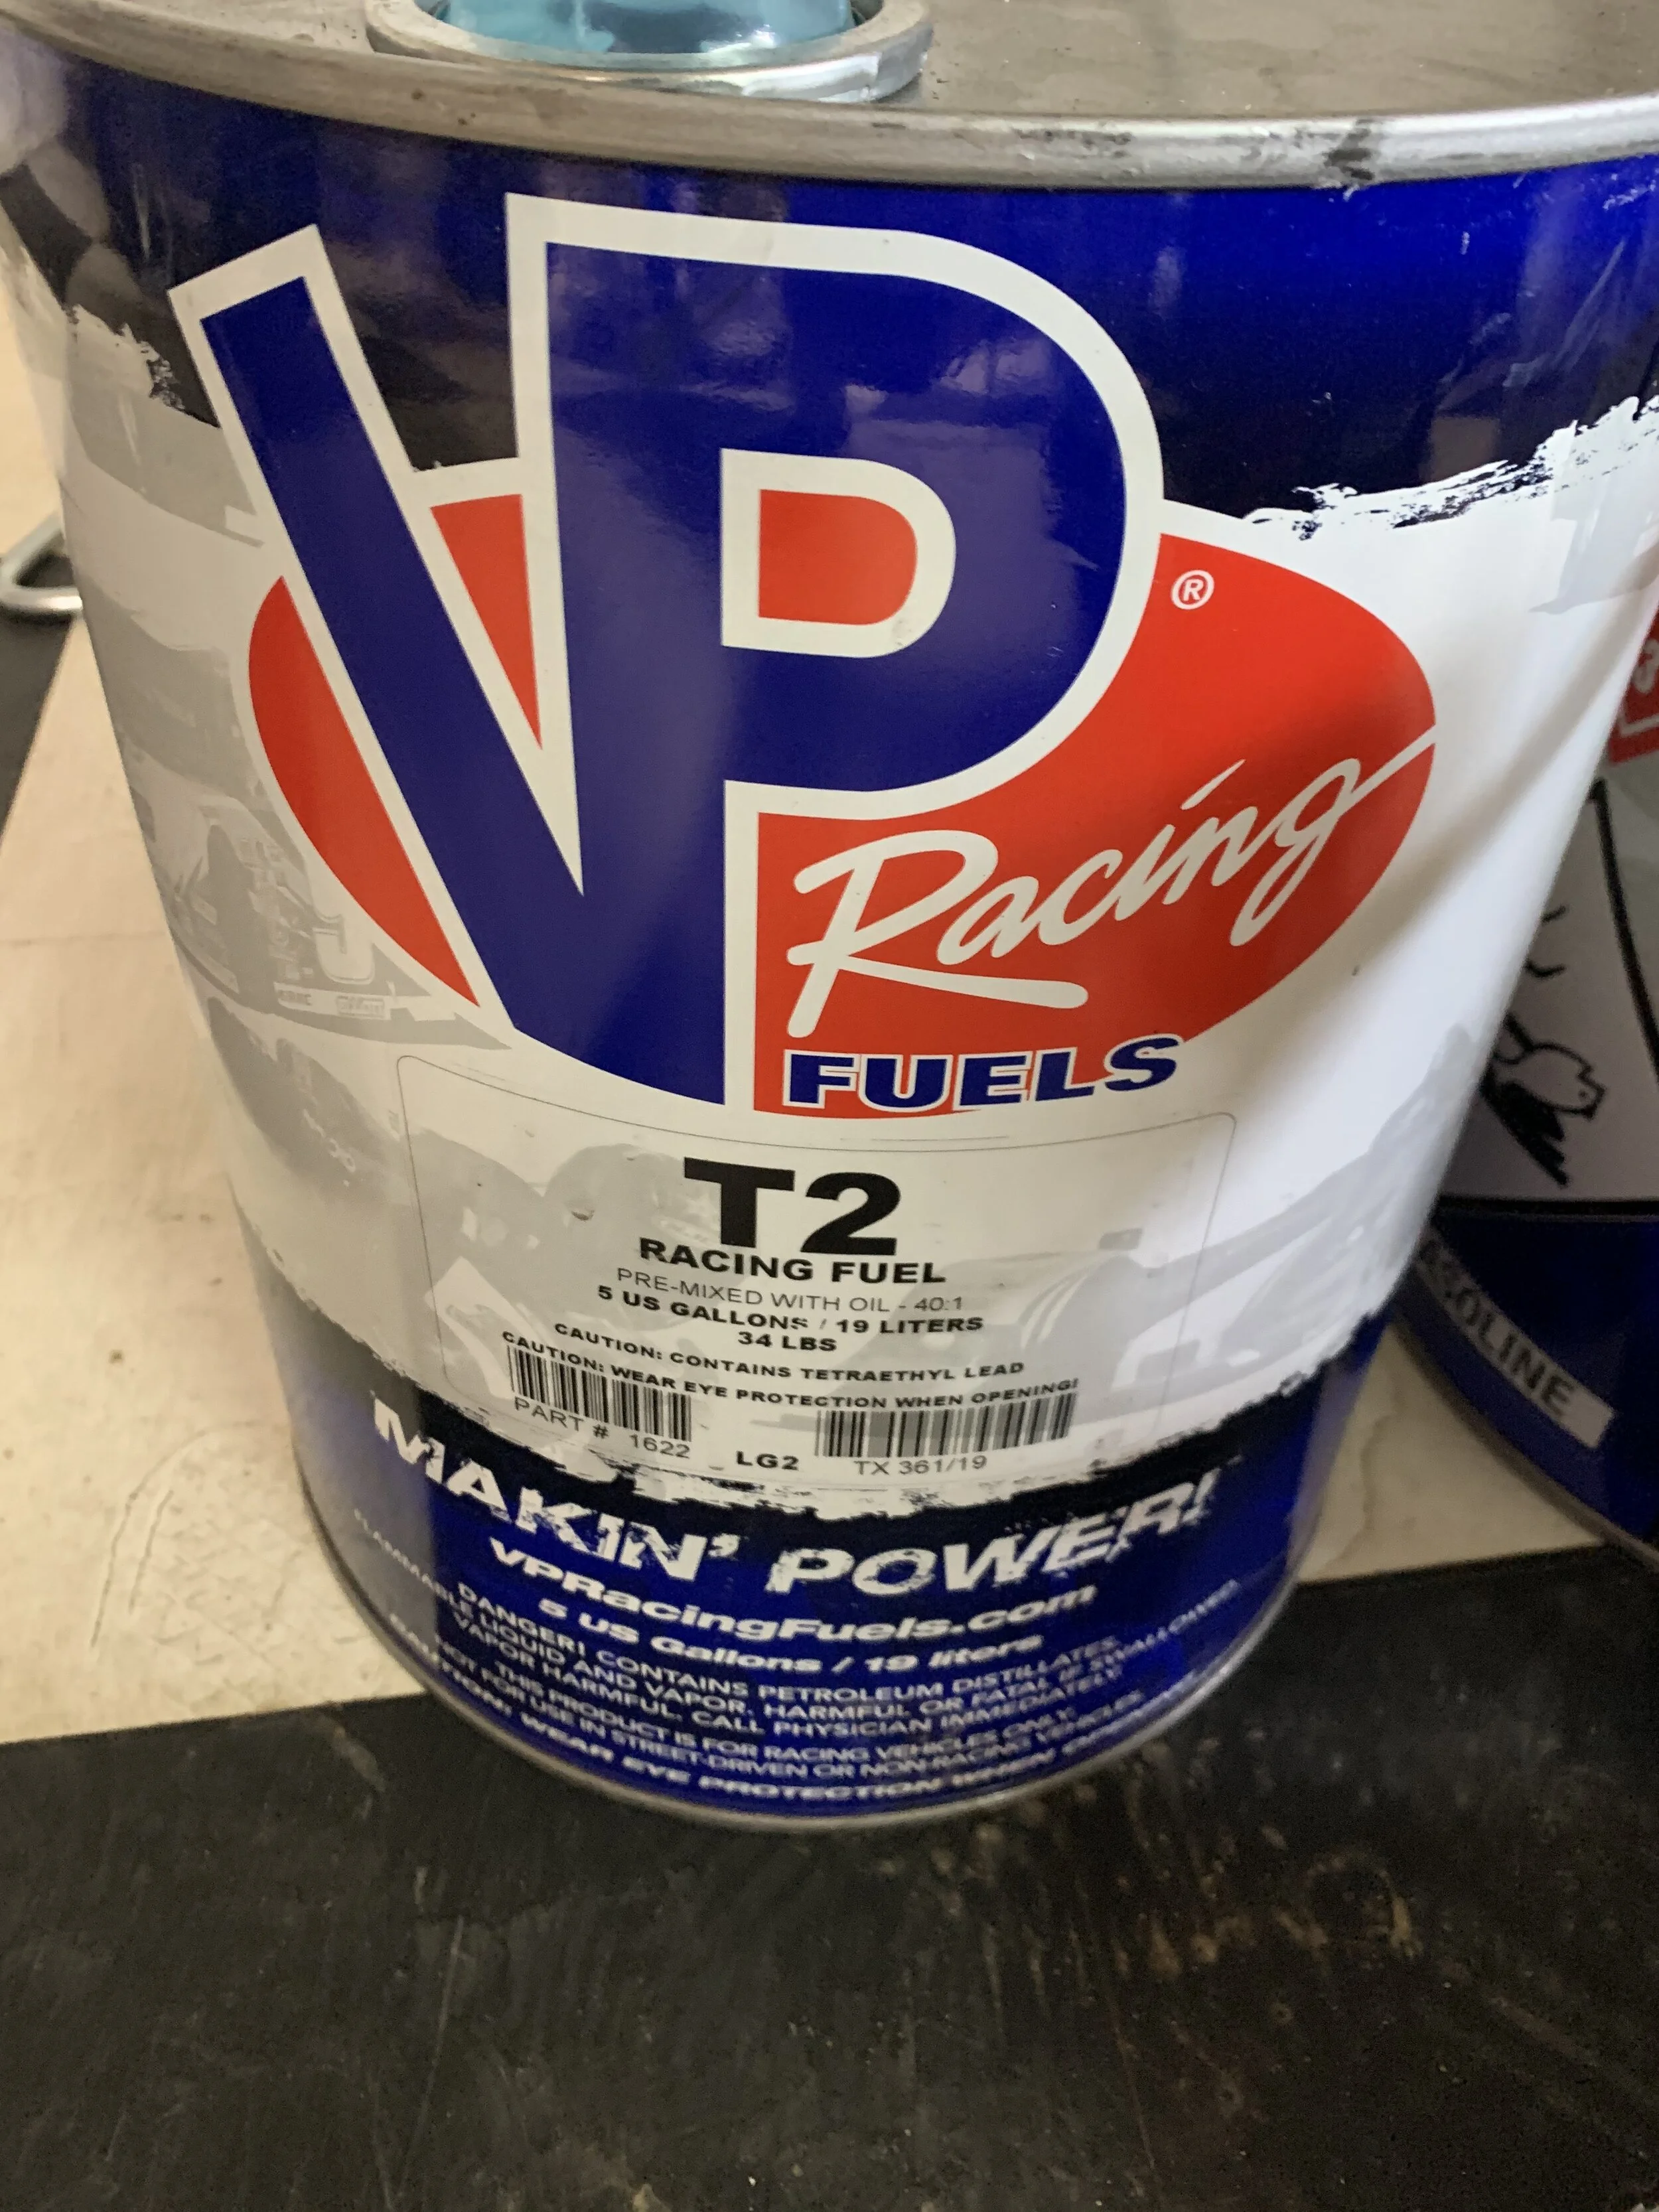
VP T2 Pre-Mixed Race Fuel: VP Racing Fuels T2 blend is the company’s latest concoction of two-stroke motorcycle race fuel. Unlike their popular C12 two-stroke fuel, T2 is oxygenated in order to create more power. Recommended for either stock or modified two strokes, the VP Racing Fuels T2 comes premixed at a 40:1 ratio and is ready to pour right out the can. T2 contains no ethanol, which can help the engine parts in your YZ125 last longer. The 101 octane rating helps prevent against detonation, especially in high compression engines and works well with the Apex head. VP T2 gave the YZ125 better throttle response and a stronger bottom to mid range pulling power. At around 75 bucks for 5 gallons it’s an easy way to leave the ratio rite at home and get some more power for your next race. We didn’t have to change the jetting once poured in and the color of the spark plug was always nice and brown. MSRP: Check your local VP dealer www.vpracingfuels.com 

Jetting: Here are the 38mm Mikuni TMX jetting specs for sea level to 4000ft:

Main Jet: 430

Pilot: 40

Needle: 6BFY43-3

Clip: 2nd from top

Air screw: 2-1/4 turns out

IMG_7905.jpg

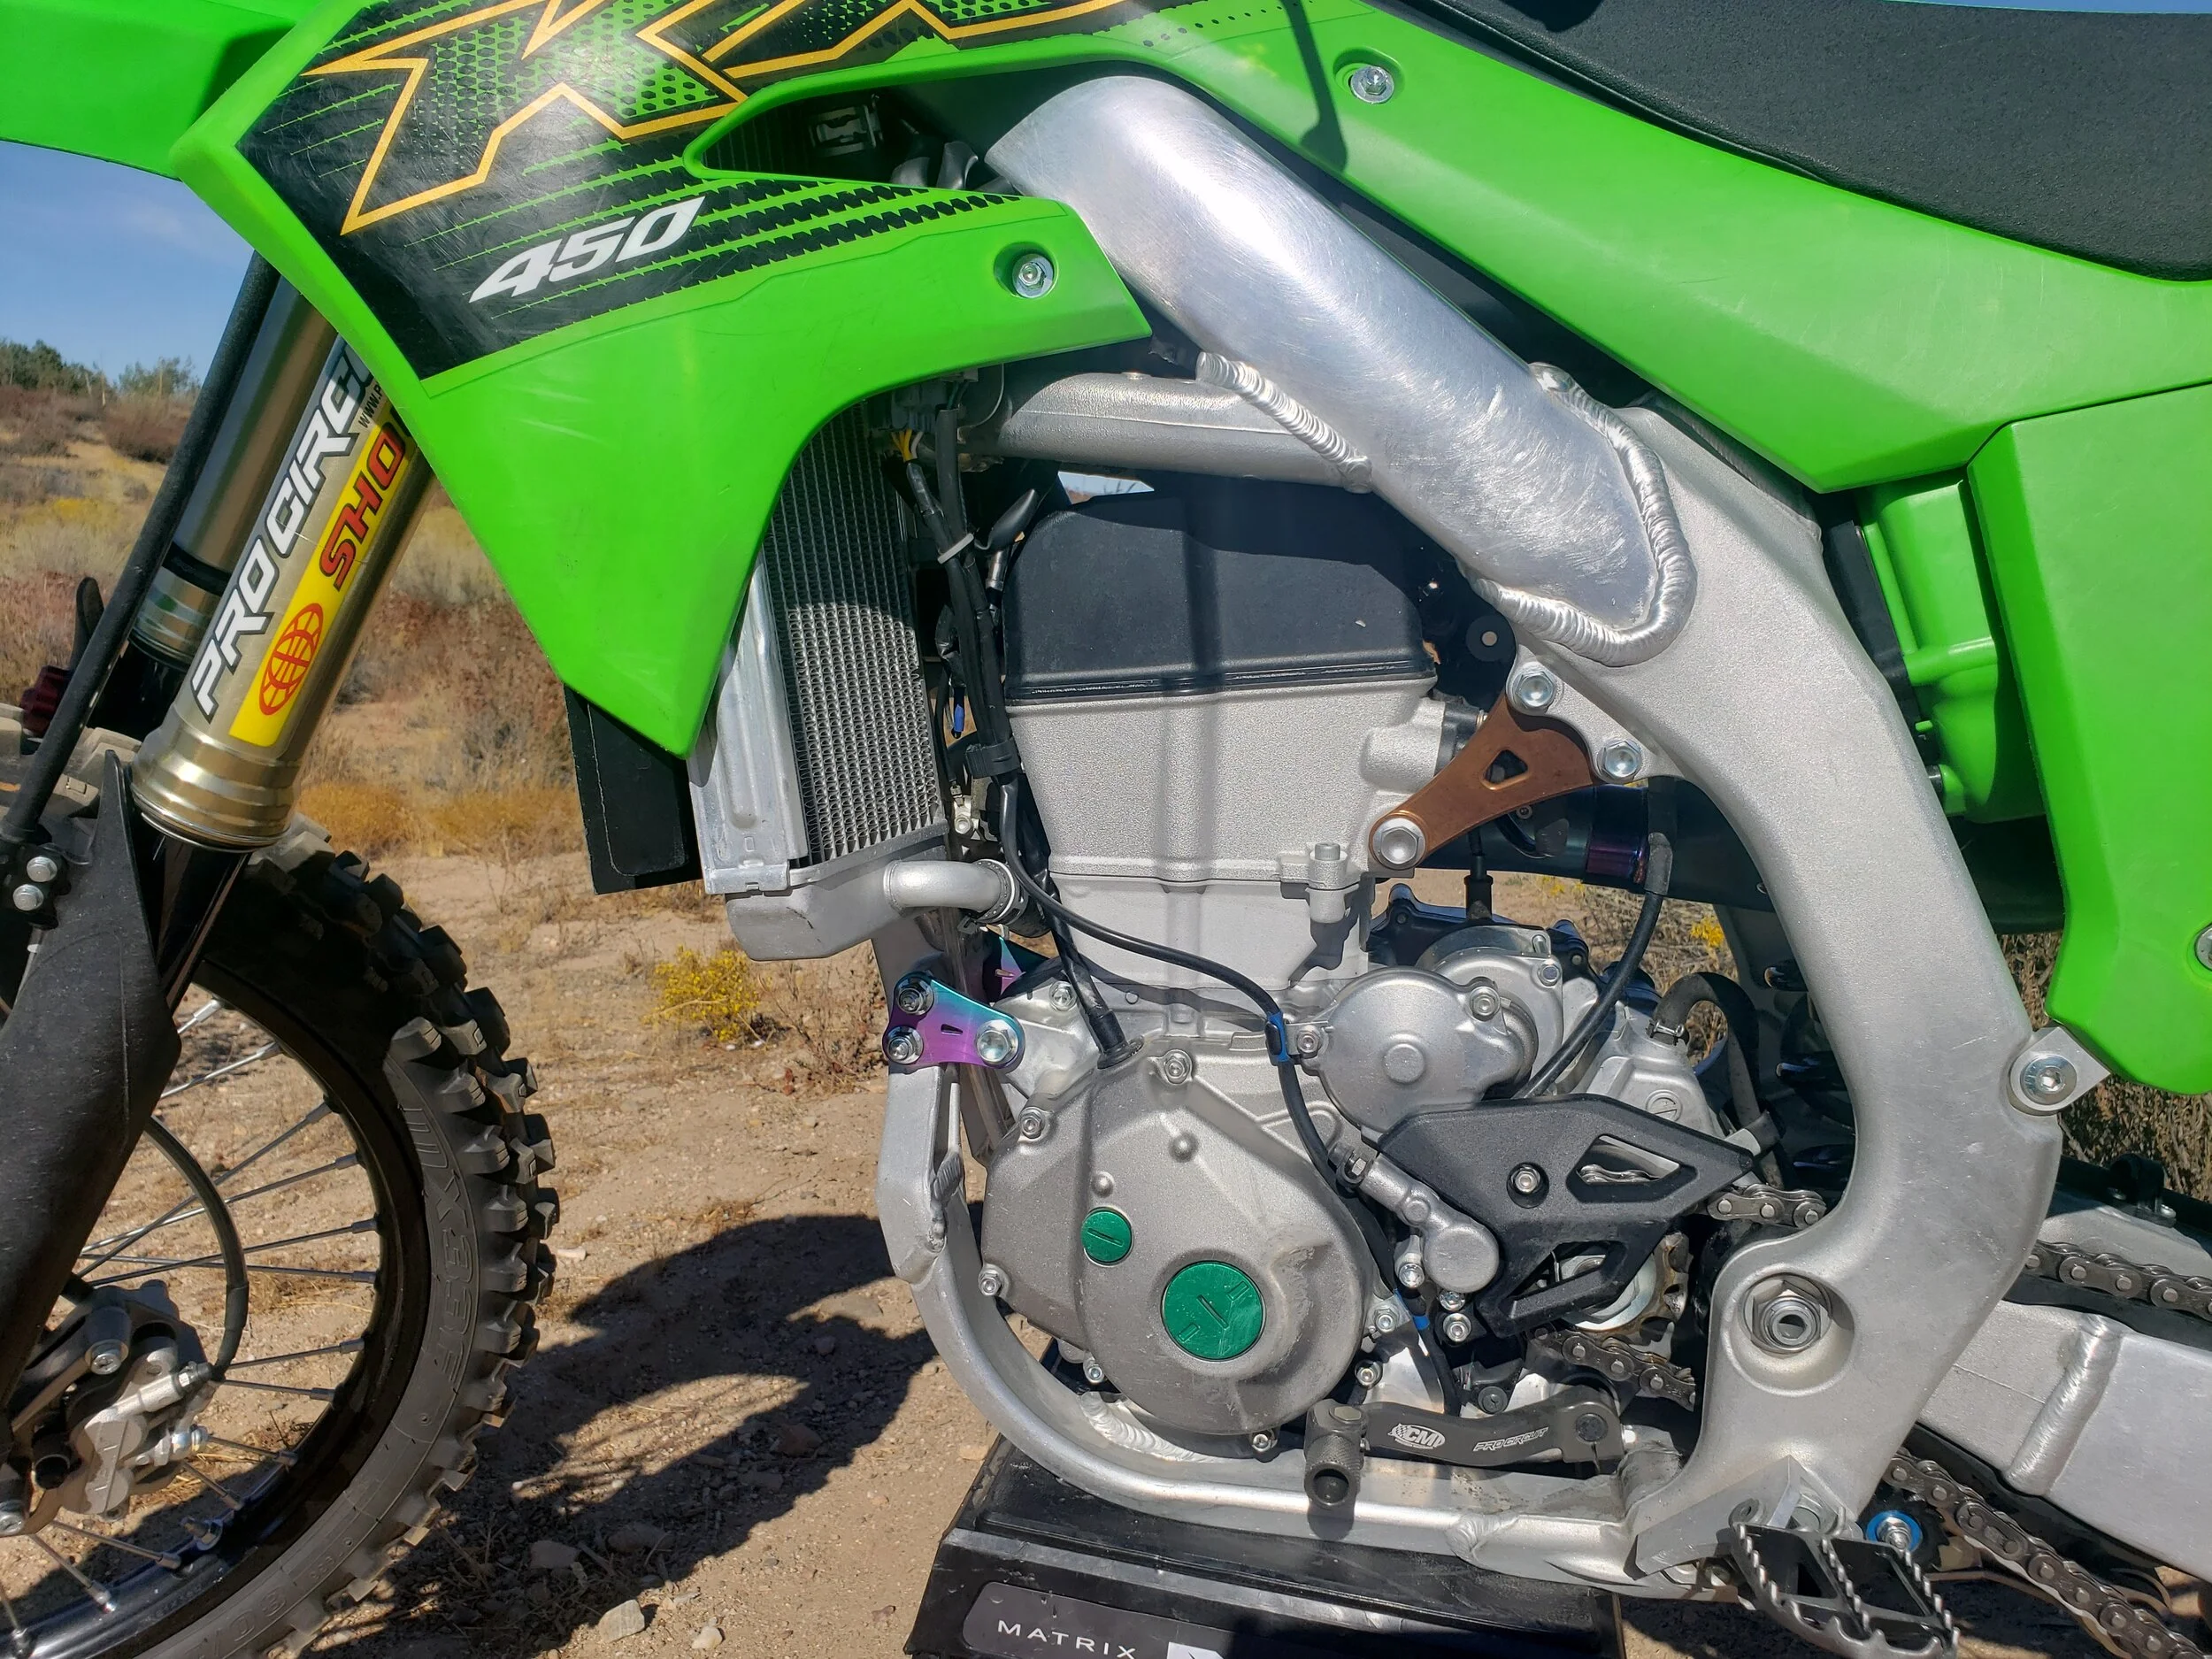
V-Force3 Reed Valve System: The Moto Tassinari reed valve system is one of the best mods you can do to wake up the Yamaha’s engine. If you do nothing else but a pipe/silencer and a V-Force you will be almost on a level playing field with the KTM 125SX. The V-Force3 system gives the Yamaha increased power, throttle response and also allows the Yamaha to rev farther than that of the stock reed cage system. The V-Force reeds also last longer than the stock reeds and resist chipping much better. MSRP: $158.00 https://store.mototassinari.com/ 

Gearing: Going to a 13/49 from a 13/48 proved to be a better choice for not only my four stroke riding style, but my son’s nervous novice throttle hand as well. Going to a 13/49 gearing allowed me to have a little more grunt from second gear, but also let me shift sooner into third. Third gear still felt long and usable, but just gave the YZ125 a little more throttle response/recovery through the mid range. 

unnamed-47.jpg

Apex Technical Innovations Cylinder Head: The objective of the Apex cylinder head is to improve upon the OEM combustion chamber shape to get more efficient combustion, while also offering interchangeability, as well as additional cooling from the billet design. A very important parameter of cylinder head design is the squish clearance. Because of manufacturing tolerances, the stock YZ125 head has a pretty large squish clearance for a 125 at around .050”. The point of the squish band is to shield and cool end gasses from the flame front to prevent detonation and to add turbulence to aid mixing and make for more efficient combustion. By having the squish clearance too big, like on the stock head, all the gas in that space is never forced to the combustion chamber and isn’t burned until too late of a crank angle to do effective work. This can cost you power, fuel efficiency, and make jetting more finicky. Also the flame front can creep into this space and actually cause detonation. 

The Apex YZ125 head is designed to have a nominal squish clearance of .035” which gives a great mix of reliability, safety, and performance. Apex then tuned the compression ratios, squish areas, and msv’s of each head profile to match the type of riding they’re intended for. The msv is the speed which the fuel air mix moves across the squish area into the combustion chamber and is another very important tuning parameter. Too high and the engine will be too peaky and risk detonation and too low and the engine will need excessive advance to run right and will be slow in general. The msv, compression ratio, squish area and squish clearance all affect each other, so a lot goes into getting the right combination.

Another unique problem that the stock YZ125 has is the way it has a flat top piston with a large bevel on the side. This makes conventional head designs not pair well with it. Normally one would have to choose an angle to match either the bevel part, or the flat part which leads to a compromise in how the squished gasses are dealt with. Using modern CAD and CNC machines Apex is now able to design the squish band of the head to suit the stock OEM piston shape. This way all of the fuel gets properly burned and you avoid detonation near the cylinder wall. 

Apex SX/XC insert has the highest compression, slightly higher than stock and has the highest msv that we’d advise running. This gives broad snappy power and a boost in power throughout the entire front side of the power curve. The mx insert has slightly lower compression than stock but an msv that’s higher than stock (but lower than the SX/XC) to let the bike rev out as freely as possible and give maximum over-rev. 

I installed the SX/XC Apex head in order to get Aden more bottom end coming out of corners so he could carry a taller gear. My son is only 115 pounds so having him carry third gear through corners wasn't a problem with the Apex head design. When I hopped on the YZ125, I couldn’t get over how responsive and clean the Yamaha ran with the Apex head. Apex said that we wouldn't get more top/end over-rev with this head design, but to me this head improved the power throughout the entire RPM range. Aden is more of a lugger (four stroke rider) than a revver and this allowed him to carry second and third more. Running a good race fuel like T2 or C-12 is recommended for this modification. MSRP: $200.00 https://www.apex-technical-innovations.com 

2020 Kawasaki KX450 Vet National Race Build (Part One)

Written By: Joe Oehlhof

Five months ago, Keefer says to me while we were out riding, “Hey, you should race the Vet National.”  I responded back with, “Nah, it’s too much work getting ready for it.  I don’t have the time.” Of course immediately after Kris is done flapping his lips, his wife Heather chimes in with, “Yeah, you should race it. Kris will get you whatever bike you want.” My head sparked up and for some weird reason my mouth started to reply with, “Alright, in that case I am in”!  KK looks at Heather with a scoured look and says, “Wait, wait, wait…Whoa, Whoa, Whoa. You can’t be making those kinds of promises!”  A verbal agreement from any Keefer is a binding agreement so I immediately went Law And Order on his ass with “Nope, she said it.  That’s the deal.”  And Keefer replied with, “OK, we will get you a good bike and let you get it dialed in. Will you race it then?”  I reluctantly said, “Yes.”  Figuring it would probably never happen with Keefer’s schedule as well it being the fire season here in California (I am a San Bernardino County Fireman).  Never the less, we are roughly a week out from the Vet National and here I am preparing myself and a bike that I had about one month of time on.  

Getting the actual bike took a little longer than expected because of the “450 MX Bracket Shootout” and other factors, but in the end, Keefer decided to give me the 2020 Kawasaki KX450. Once he told me this, I got excited because I chose this bike as one of the top bike’s in this year’s 450 bracket. It’s a bike I feel really comfortable on, so I was excited to put some time on it, shake it down, and figure out what areas I wanted to address.

Luckily for me, Kawasaki provided a solid base to start from, which helps when you are in a time crunch.  The stock Kawasaki 450 is a great all-around bike for a wide range of riders, hence the reason why it got second in the bracket. For me the engine is strong yet very controlled, has a confidence inspiring compliant chassis, coupled with a smooth progressive powerband, that allows you to feel in control, while being able to push your limit. After spending a little over a week shaking this bike down, I came up with a few key areas that I wanted to improve. So here we go with phase one…

20191024_143042.jpg

First area I wanted to concentrate on was the rider triangle which is really easy because I felt very comfortable with the stock bar position and bend. Call me old school but I do still like the 7/8” bar because of the flex that it provides. Kawasaki offers a lot of adjustability with several different bar position options with the triple clamp and two options with the foot pegs, but after trying several different combinations, I settled on the stock peg position and the bar mounts in the rear hole, facing in the forward position. Once I decided on this setup, I enlisted Pro Taper to provide that next level comfort. I went with the Carmichael bend Fuzion Bar because it’s a 1 ¼” bar, so you get the durability in case you have a crash, but comfort and flex of the 7/8” bar due to the option of locking or unlocking the cross bar. The locked position gives you a little firmer feel with less flex and the unlocked position gives you a bit more flex that mimics the character of a 7/8” bar.  Pro Taper also provided the oversized bar mounts, which easily bolted in using the rubber mounting and stock clamp. I rounded it out with the 1/3 waffle soft grips that added grip and comfort for my sissy hands.  

www.protaper.com

20191024_143031.jpg

Next on the list of improvements was to boost the power for starts.  In stock form the Kawasaki KX450 provides a very broad manageable rider friendly powerband, but by no means is this bike slow. The power feels connected to the throttle, has excellent roll on bottom end with a strong pull through mid and top.  I had no complaints with the power delivery, I just wanted more. Don’t we all! I called the guys at Pro Circuit knowing that their relationship and years of experience with Kawasaki would provide me what I hopefully needed.  They sent me up with their Ti-6 Exhaust which provides a 1.5 pound weight savings as its titanium tubing is thing of beauty.  After bolting the system on (which is painless), I immediately noticed improvements throughout the power band.  It kept that smooth manageable roll on power, but increased it slightly, plus added more pull in the mid-range and thus improving the recovery time when shifting from second to third.  It also provided more over-rev just in case I got lazy (which is more common now that I am over 40) and I needed to leave the KX450 in second gear at times.  I know it sounds crazy to have a system that boosts power everywhere because usually it can be better in one area and not so good in another, but this system gave me exactly what I was looking for.  I have a couple more options to try to help move the power more, but that will be in phase two of this story so be watching for that.

www.procircuit.com

20191024_143228.jpg

The last thing I was able to try in this phase of the Keefer forced “Vet National Bike Build” was another “comfort” piece. This piece made big improvements on the 2019 Suzuki RM-Z450 bike build, so we asked Kris Palm of FCP Engine Mounts to help me out for this green machine.  Factory Chassis Parts provided engine mounts with different a material and thickness (compared to stock) that allowed the chassis to flex differently yet shockingly provided a smoother overall feel, especially when the track is at its worst.  After a long day of testing with Keefer as well as doing two twenty-minute motos at Glen Helen, Kris from FCP bolted the engine mounts on and had me try them. If you have never ridden Glen Helen at 4pm just imagine a track that’s dry, most of the berms are blown out, has edgy off camber sweepers, kickers on the jumps, nasty braking bumps, and even nastier square edges through the corners, as well as down the next straight away. These conditions are commonplace here in California. If I was back home in Ohio, I may have not went this direction because of the soil differences, but since I am dealing with this kind of drier soil here on the west coast, I look for “comfort” when testing any part.  It’s miserable to ride a track as rough as GH when you’re not comfortable, but if you can make a bike work in those conditions, you have accomplished a great feat.  Like I said before, the Kawasaki chassis is (in my opinion) the best one out there, so I wasn’t sure if the FCP mounts would be able to improve upon that. In a nutshell, the mounts give the chassis just that little bit more flex, which takes away the transfer of energy that happens when you hit those bumps, so you don’t feel the sharpness of them as much. Upon entering corners, the FCP mounts take away some of that harsh hit you may feel and calms the movement of the bike down even more.  On initial lean through corners is where the mounts shine by allowing you to brake really hard and stick inside shallow inside west coast ruts.  Once in that rut, the bike stays planted and absorbs the acceleration chop better and continues down the next straight in a calmer manner.

www.fcpracing.com

I am really happy with the improvements we were able to make with bolt on parts and pieces from Pro Taper, Pro Circuit, and FCP.  Taking a good bike and making it a little better is always fun yet tough, so I am looking forward to phase two where I will be testing a remap of the stock ECU by Pro Circuit, modifying the suspension in order to dial it in for my weight and riding ability as well as a full clutch system from Hinson.  Stay tuned for that test as well as a Vet National story, to see how all of this preparation in one month’s time goes and the more difficult task of preparing myself with limited riding time due to firefighting duties, dad duties, and husband duties.  My hope is to give you guys that have regular jobs and family responsibilities a path to dialing in your bike, so you can enjoy that one day a week you get to ride. -Joe Oehlhof

If you have any questions about this test please feel free to email kris@keeferinctesting.com and he will try to do his best to answer any questions you might have.